Getting Started to Quarkus Messaging with RabbitMQ
previewThis guide demonstrates how your Quarkus application can utilize Quarkus Messaging to interact with RabbitMQ.
|
This technology is considered preview. In preview, backward compatibility and presence in the ecosystem is not guaranteed. Specific improvements might require changing configuration or APIs, and plans to become stable are under way. Feedback is welcome on our mailing list or as issues in our GitHub issue tracker. For a full list of possible statuses, check our FAQ entry. |
Prerequisites
To complete this guide, you need:
-
Roughly 15 minutes
-
An IDE
-
JDK 17+ installed with
JAVA_HOMEconfigured appropriately -
Apache Maven 3.9.12
-
Docker and Docker Compose or Podman, and Docker Compose
-
Optionally the Quarkus CLI if you want to use it
-
Optionally Mandrel or GraalVM installed and configured appropriately if you want to build a native executable (or Docker if you use a native container build)
Architecture
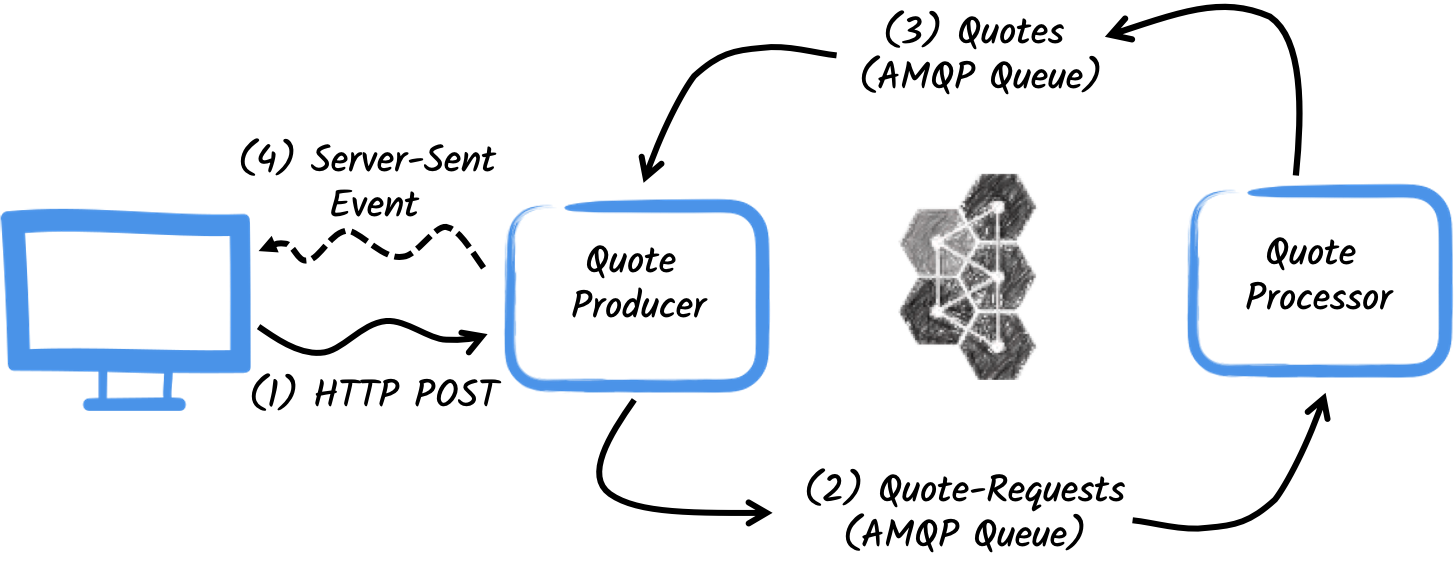
In this guide, we are going to develop two applications communicating with a RabbitMQ broker. The first application sends a quote request to the RabbitMQ quote requests exchange and consumes messages from the quote queue. The second application receives the quote request and sends a quote back.

The first application, the producer, will let the user request some quotes over an HTTP endpoint.
For each quote request, a random identifier is generated and returned to the user, to put the quote request on pending.
At the same time the generated request id is sent to the quote-requests exchange.

The second application, the processor, in turn, will read from the quote-requests queue put a random price to the quote, and send it to an exchange named quotes.
Lastly, the producer will read the quotes and send them to the browser using server-sent events.
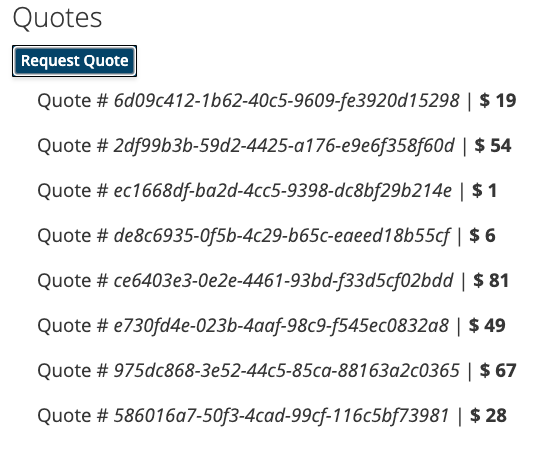
The user will therefore see the quote price updated from pending to the received price in real-time.
Solution
We recommend that you follow the instructions in the next sections and create applications step by step. However, you can go right to the completed example.
Clone the Git repository: git clone https://github.com/quarkusio/quarkus-quickstarts.git, or download an archive.
The solution is located in the rabbitmq-quickstart directory.
Creating the Maven Project
First, we need to create two projects: the producer and the processor.
To create the producer project, in a terminal run:
For Windows users:
-
If using cmd, (don’t use backward slash
\and put everything on the same line) -
If using Powershell, wrap
-Dparameters in double quotes e.g."-DprojectArtifactId=rabbitmq-quickstart-producer"
This command creates the project structure and select the two Quarkus extensions we will be using:
-
The Reactive Messaging RabbitMQ connector
-
Quarkus REST (formerly RESTEasy Reactive) and its Jackson support to handle JSON payloads
|
If you already have your Quarkus project configured, you can add the CLI
Maven
Gradle
This will add the following to your pom.xml
build.gradle
|
To create the processor project, from the same directory, run:
For Windows users:
-
If using cmd, (don’t use backward slash
\and put everything on the same line) -
If using Powershell, wrap
-Dparameters in double quotes e.g."-DprojectArtifactId=rabbitmq-quickstart-processor"
At that point you should have the following structure:
.
├── rabbitmq-quickstart-processor
│  ├── README.md
│  ├── mvnw
│  ├── mvnw.cmd
│  ├── pom.xml
│  └── src
│     └── main
│        ├── docker
│        ├── java
│        └── resources
│           └── application.properties
└── rabbitmq-quickstart-producer
   ├── README.md
   ├── mvnw
   ├── mvnw.cmd
   ├── pom.xml
   └── src
      └── main
         ├── docker
         ├── java
         └── resources
            └── application.properties
Open the two projects in your favorite IDE.
The Quote object
The Quote class will be used in both producer and processor projects.
For the sake of simplicity we will duplicate the class.
In both projects, create the src/main/java/org/acme/rabbitmq/model/Quote.java file, with the following content:
package org.acme.rabbitmq.model;

import io.quarkus.runtime.annotations.RegisterForReflection;

@RegisterForReflection
public class Quote {

    public String id;
    public int price;

    /**
    * Default constructor required for Jackson serializer
    */
    public Quote() { }

    public Quote(String id, int price) {
        this.id = id;
        this.price = price;
    }

    @Override
    public String toString() {
        return "Quote{" +
                "id='" + id + '\'' +
                ", price=" + price +
                '}';
    }
}
JSON representation of Quote objects will be used in messages sent to the RabbitMQ queues
and also in the server-sent events sent to browser clients.
Quarkus has built-in capabilities to deal with JSON RabbitMQ messages.
|
@RegisterForReflection
The |
Sending quote request
Inside the producer project locate the generated src/main/java/org/acme/rabbitmq/producer/QuotesResource.java file, and update the content to be:
package org.acme.rabbitmq.producer;

import java.util.UUID;

import jakarta.ws.rs.GET;
import jakarta.ws.rs.POST;
import jakarta.ws.rs.Path;
import jakarta.ws.rs.Produces;
import jakarta.ws.rs.core.MediaType;

import org.acme.rabbitmq.model.Quote;
import org.eclipse.microprofile.reactive.messaging.Channel;
import org.eclipse.microprofile.reactive.messaging.Emitter;

import io.smallrye.mutiny.Multi;

@Path("/quotes")
public class QuotesResource {

    @Channel("quote-requests") Emitter<String> quoteRequestEmitter; (1)

    /**
     * Endpoint to generate a new quote request id and send it to "quote-requests" channel (which
     * maps to the "quote-requests" RabbitMQ exchange) using the emitter.
     */
    @POST
    @Path("/request")
    @Produces(MediaType.TEXT_PLAIN)
    public String createRequest() {
        UUID uuid = UUID.randomUUID();
        quoteRequestEmitter.send(uuid.toString()); (2)
        return uuid.toString();
    }
}| 1 | Inject a Reactive Messaging Emitter to send messages to the quote-requests channel. |
| 2 | On a post request, generate a random UUID and send it to the RabbitMQ queue using the emitter. |
This channel is mapped to a RabbitMQ exchange using the configuration we will add to the application.properties file.
Open the src/main/resource/application.properties file and add:
# Configure the outgoing RabbitMQ exchange `quote-requests`
mp.messaging.outgoing.quote-requests.connector=smallrye-rabbitmq
mp.messaging.outgoing.quote-requests.exchange.name=quote-requests
All we need to specify is the smallrye-rabbitmq connector.
By default, reactive messaging maps the channel name quote-requests to the same RabbitMQ exchange name.
Processing quote requests
Now let’s consume the quote request and give out a price.
Inside the processor project, locate the src/main/java/org/acme/rabbitmq/processor/QuoteProcessor.java file and add the following:
package org.acme.rabbitmq.processor;

import java.util.Random;

import jakarta.enterprise.context.ApplicationScoped;

import org.acme.rabbitmq.model.Quote;
import org.eclipse.microprofile.reactive.messaging.Incoming;
import org.eclipse.microprofile.reactive.messaging.Outgoing;

import io.smallrye.reactive.messaging.annotations.Blocking;

/**
 * A bean consuming data from the "quote-requests" RabbitMQ queue and giving out a random quote.
 * The result is pushed to the "quotes" RabbitMQ exchange.
 */
@ApplicationScoped
public class QuoteProcessor {

    private Random random = new Random();

    @Incoming("requests")       (1)
    @Outgoing("quotes")         (2)
    @Blocking                   (3)
    public Quote process(String quoteRequest) throws InterruptedException {
        // simulate some hard-working task
        Thread.sleep(1000);
        return new Quote(quoteRequest, random.nextInt(100));
    }
}| 1 | Indicates that the method consumes the items from the requests channel |
| 2 | Indicates that the objects returned by the method are sent to the quotes channel |
| 3 | Indicates that the processing is blocking and cannot be run on the caller thread. |
The process method is called for every RabbitMQ message from the quote-requests queue, and will send a Quote object to the quotes exchange.
As with the previous example we need to configure the connectors in the application.properties file.
Open the src/main/resources/application.properties file and add:
# Configure the incoming RabbitMQ queue `quote-requests`
mp.messaging.incoming.requests.connector=smallrye-rabbitmq
mp.messaging.incoming.requests.queue.name=quote-requests
mp.messaging.incoming.requests.exchange.name=quote-requests

# Configure the outgoing RabbitMQ exchange `quotes`
mp.messaging.outgoing.quotes.connector=smallrye-rabbitmq
mp.messaging.outgoing.quotes.exchange.name=quotes
Note that in this case we have one incoming and one outgoing connector configuration, each one distinctly named. The configuration properties are structured as follows:
mp.messaging.[outgoing|incoming].{channel-name}.property=value
The channel-name segment must match the value set in the @Incoming and @Outgoing annotation:
-
quote-requests→ RabbitMQ queue from which we read the quote requests -
quotes→ RabbitMQ exchange in which we write the quotes
Receiving quotes
Back to our producer project.
Let’s modify the QuotesResource to consume quotes, bind it to an HTTP endpoint to send events to clients:
import io.smallrye.mutiny.Multi;
//...

@Channel("quotes") Multi<Quote> quotes;     (1)

/**
 * Endpoint retrieving the "quotes" queue and sending the items to a server sent event.
 */
@GET
@Produces(MediaType.SERVER_SENT_EVENTS) (2)
public Multi<Quote> stream() {
    return quotes; (3)
}| 1 | Injects the quotes channel using the @Channel qualifier |
| 2 | Indicates that the content is sent using Server Sent Events |
| 3 | Returns the stream (Reactive Stream) |
Again we need to configure the incoming quotes channel inside producer project.
Add the following inside application.properties file:
# Configure the outgoing `quote-requests` queue
mp.messaging.outgoing.quote-requests.connector=smallrye-rabbitmq

# Configure the incoming `quotes` queue
mp.messaging.incoming.quotes.connector=smallrye-rabbitmq
The HTML page
Final touch, the HTML page reading the converted prices using SSE.
Create inside the producer project src/main/resources/META-INF/resources/quotes.html file, with the following content:
<!DOCTYPE html> <html lang="en"> <head> <meta charset="UTF-8"> <title>Quotes</title>

    <link rel="stylesheet" type="text/css"
          href="https://cdnjs.cloudflare.com/ajax/libs/patternfly/3.24.0/css/patternfly.min.css">
    <link rel="stylesheet" type="text/css"
          href="https://cdnjs.cloudflare.com/ajax/libs/patternfly/3.24.0/css/patternfly-additions.min.css">
</head>
<body>
<div class="container">
    <div class="card">
        <div class="card-body">
            <h2 class="card-title">Quotes</h2>
            <button class="btn btn-info" id="request-quote">Request Quote</button>
            <div class="quotes"></div>
        </div>
    </div>
</div>
</body>
<script src="https://code.jquery.com/jquery-3.6.0.min.js"></script>
<script>
    $("#request-quote").click((event) => {
        fetch("/quotes/request", {method: "POST"})
        .then(res => res.text())
        .then(qid => {
            var row = $(`<h4 class='col-md-12' id='${qid}'>Quote # <i>${qid}</i> | <strong>Pending</strong></h4>`);
            $(".quotes").append(row);
        });
    });
    var source = new EventSource("/quotes");
    source.onmessage = (event) => {
      var json = JSON.parse(event.data);
      $(`#${json.id}`).html(function(index, html) {
        return html.replace("Pending", `\$\xA0${json.price}`);
      });
    };
</script>
</html>
Nothing spectacular here. On each received quote, it updates the page.
Get it running
You just need to run both applications using:
mvn -f rabbitmq-quickstart-producer quarkus:devAnd, in a separate terminal:
mvn -f rabbitmq-quickstart-processor quarkus:devQuarkus starts a RabbitMQ broker automatically, configures the application and shares the broker instance between different applications. See Dev Services for RabbitMQ for more details.
Open http://localhost:8080/quotes.html in your browser and request some quotes by clicking the button.
Running in JVM or Native mode
When not running in dev or test mode, you will need to start your RabbitMQ broker.
You can follow the instructions from the RabbitMQ Docker website or create a docker-compose.yaml file with the following content:
version: '2'

services:

  rabbit:
    image: docker.io/library/rabbitmq:3.12-management
    ports:
      - "5672:5672"
    networks:
      - rabbitmq-quickstart-network

  producer:
    image: quarkus-quickstarts/rabbitmq-quickstart-producer:1.0-${QUARKUS_MODE:-jvm}
    build:
      context: rabbitmq-quickstart-producer
      dockerfile: src/main/docker/Dockerfile.${QUARKUS_MODE:-jvm}
    environment:
      RABBITMQ_HOST: rabbit
      RABBITMQ_PORT: 5672
    ports:
      - "8080:8080"
    networks:
      - rabbitmq-quickstart-network

  processor:
    image: quarkus-quickstarts/rabbitmq-quickstart-processor:1.0-${QUARKUS_MODE:-jvm}
    build:
      context: rabbitmq-quickstart-processor
      dockerfile: src/main/docker/Dockerfile.${QUARKUS_MODE:-jvm}
    environment:
      RABBITMQ_HOST: rabbit
      RABBITMQ_PORT: 5672
    networks:
      - rabbitmq-quickstart-network

networks:
  rabbitmq-quickstart-network:
    name: rabbitmq-quickstart
Note how the RabbitMQ broker location is configured.
The rabbitmq-host and rabbitmq-port (AMQP_HOST and AMQP_PORT environment variables) properties configure location.
First, make sure you stopped the applications, and build both applications in JVM mode with:
mvn -f rabbitmq-quickstart-producer clean package
mvn -f rabbitmq-quickstart-processor clean package
Once packaged, run docker compose up --build.
The UI is exposed on http://localhost:8080/quotes.html
To run your applications as native, first we need to build the native executables:
mvn -f rabbitmq-quickstart-producer package -Dnative  -Dquarkus.native.container-build=true
mvn -f rabbitmq-quickstart-processor package -Dnative -Dquarkus.native.container-build=true
The -Dquarkus.native.container-build=true instructs Quarkus to build Linux 64bits native executables, who can run inside containers.
Then, run the system using:
export QUARKUS_MODE=native
docker compose up --build
As before, the UI is exposed on http://localhost:8080/quotes.html
Going further
This guide has shown how you can interact with RabbitMQ using Quarkus. It utilizes SmallRye Reactive Messaging to build data streaming applications.
If you did the Kafka, you have realized that it’s the same code. The only difference is the connector configuration and the JSON mapping.
