Getting Started with Quarkus Messaging and Apache Kafka
In this guide, you will build two applications that exchange messages through Apache Kafka using Quarkus Messaging: a producer that sends quote requests and a processor that replies with prices.
Prerequisites
To complete this guide, you need:
-
Roughly 15 minutes
-
An IDE
-
JDK 17+ installed with
JAVA_HOMEconfigured appropriately -
Apache Maven 3.9.16
-
Docker and Docker Compose or Podman, and Docker Compose
-
Optionally the Quarkus CLI if you want to use it
-
Optionally Mandrel or GraalVM installed and configured appropriately if you want to build a native executable (or Docker if you use a native container build)
Architecture
The two applications communicate via Kafka. The first application sends a quote request to Kafka and consumes Kafka messages from the quote topic. The second application receives the quote request and sends a quote back.
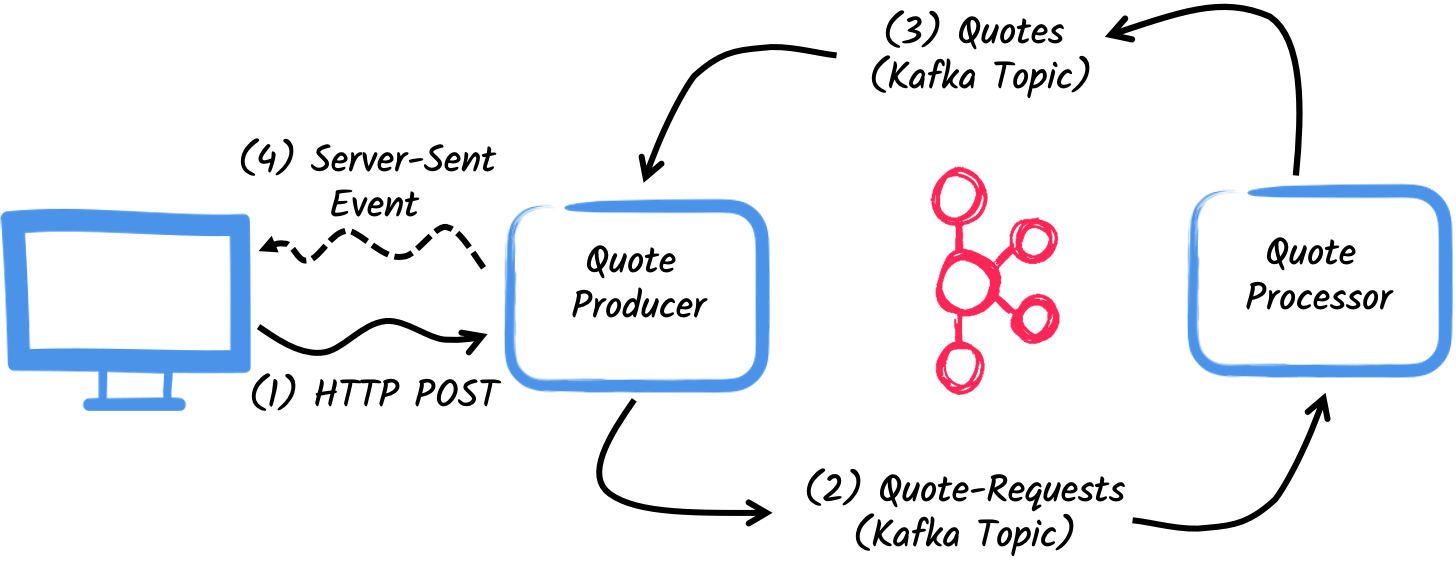
The first application, the producer, will let the user request some quotes over an HTTP endpoint.
For each quote request a random identifier is generated and returned to the user, to mark the quote request as pending.
At the same time, the generated request id is sent over a Kafka topic quote-requests.
The second application, the processor, will read from the quote-requests topic, put a random price to the quote, and send it to a Kafka topic named quotes.
Lastly, the producer will read the quotes and send them to the browser using server-sent events. The user will therefore see the quote price updated from pending to the received price in real-time.
Solution
Follow the instructions below to create the applications step by step. You can also go directly to the completed example.
Clone the Git repository: git clone https://github.com/quarkusio/quarkus-quickstarts.git, or download an archive.
The solution is located in the kafka-quickstart directory.
Creating the Maven Project
First, create two projects: the producer and the processor.
To create the producer project, in a terminal run:
For Windows users:
-
If using cmd, (don’t use backward slash
\and put everything on the same line) -
If using Powershell, wrap
-Dparameters in double quotes e.g."-DprojectArtifactId=kafka-quickstart-producer"
This command creates the project structure and selects two Quarkus extensions:
-
Quarkus REST (formerly RESTEasy Reactive) and its Jackson support (to handle JSON) to serve the HTTP endpoint.
-
The Kafka connector for Reactive Messaging
To create the processor project, from the same directory, run:
For Windows users:
-
If using cmd, (don’t use backward slash
\and put everything on the same line) -
If using Powershell, wrap
-Dparameters in double quotes e.g."-DprojectArtifactId=kafka-quickstart-processor"
At that point, you should have the following structure:
.
├── kafka-quickstart-processor
│  ├── README.md
│  ├── mvnw
│  ├── mvnw.cmd
│  ├── pom.xml
│  └── src
│     └── main
│        ├── docker
│        ├── java
│        └── resources
│           └── application.properties
└── kafka-quickstart-producer
   ├── README.md
   ├── mvnw
   ├── mvnw.cmd
   ├── pom.xml
   └── src
      └── main
         ├── docker
         ├── java
         └── resources
            └── application.properties
Open the two projects in your IDE.
|
Dev Services
No need to start a Kafka broker in dev mode or for tests. Quarkus starts one automatically. See Dev Services for Kafka for details. |
The Quote object
The Quote class is used in both the producer and processor projects.
For simplicity, duplicate the class.
In both projects, create the src/main/java/org/acme/kafka/model/Quote.java file, with the following content:
package org.acme.kafka.model;

public class Quote {

    public String id;
    public int price;

    /**
    * Default constructor required for Jackson serializer
    */
    public Quote() { }

    public Quote(String id, int price) {
        this.id = id;
        this.price = price;
    }

    @Override
    public String toString() {
        return "Quote{" +
                "id='" + id + '\'' +
                ", price=" + price +
                '}';
    }
}
JSON representation of Quote objects will be used in messages sent to the Kafka topic
and also in the server-sent events sent to web browsers.
Quarkus has built-in capabilities to deal with JSON Kafka messages and automatically generates the required serializers and deserializers.
Sending quote request
Inside the producer project, create the src/main/java/org/acme/kafka/producer/QuotesResource.java file and add the following content:
package org.acme.kafka.producer;

import java.util.UUID;

import jakarta.ws.rs.POST;
import jakarta.ws.rs.Path;
import jakarta.ws.rs.Produces;
import jakarta.ws.rs.core.MediaType;

import org.eclipse.microprofile.reactive.messaging.Channel;
import org.eclipse.microprofile.reactive.messaging.Emitter;

@Path("/quotes")
public class QuotesResource {

    @Channel("quote-requests")
    Emitter<String> quoteRequestEmitter; (1)

    /**
     * Endpoint to generate a new quote request id and send it to "quote-requests" Kafka topic using the emitter.
     */
    @POST
    @Path("/request")
    @Produces(MediaType.TEXT_PLAIN)
    public String createRequest() {
        UUID uuid = UUID.randomUUID();
        quoteRequestEmitter.send(uuid.toString()); (2)
        return uuid.toString(); (3)
    }
}| 1 | Inject a Reactive Messaging Emitter to send messages to the quote-requests channel. |
| 2 | On a post request, generate a random UUID and send it to the Kafka topic using the emitter. |
| 3 | Return the same UUID to the client. |
The quote-requests channel is managed as a Kafka topic, as that’s the only connector on the classpath.
If not indicated otherwise, like in this example, Quarkus uses the channel name as topic name.
So, in this example, the application writes into the quote-requests topic.
Quarkus also configures the serializer automatically, because it finds that the Emitter produces String values.
| When you have multiple connectors, you need to indicate which connector to use in the application configuration. |
Processing quote requests
Now consume the quote request and give out a price.
Inside the processor project, create the src/main/java/org/acme/kafka/processor/QuotesProcessor.java file and add the following content:
package org.acme.kafka.processor;

import java.util.Random;

import jakarta.enterprise.context.ApplicationScoped;

import org.acme.kafka.model.Quote;
import org.eclipse.microprofile.reactive.messaging.Incoming;
import org.eclipse.microprofile.reactive.messaging.Outgoing;

import io.smallrye.reactive.messaging.annotations.Blocking;

/**
 * A bean consuming data from the "quote-requests" Kafka topic (mapped to "requests" channel) and giving out a random quote.
 * The result is pushed to the "quotes" Kafka topic.
 */
@ApplicationScoped
public class QuotesProcessor {

    private Random random = new Random();

    @Incoming("requests") (1)
    @Outgoing("quotes")   (2)
    @Blocking             (3)
    public Quote process(String quoteRequest) throws InterruptedException {
        // simulate some hard working task
        Thread.sleep(200);
        return new Quote(quoteRequest, random.nextInt(100));
    }
}| 1 | Indicates that the method consumes the items from the requests channel. |
| 2 | Indicates that the objects returned by the method are sent to the quotes channel. |
| 3 | Indicates that the processing is blocking and cannot be run on the caller thread. |
For every Kafka record from the quote-requests topic, Reactive Messaging calls the process method, and sends the returned Quote object to the quotes channel.
In this case, configure the channels in the application.properties file:
%dev.quarkus.http.port=8081

# Configure the incoming `quote-requests` Kafka topic
mp.messaging.incoming.requests.topic=quote-requests
mp.messaging.incoming.requests.auto.offset.reset=earliest
The configuration properties are structured as follows:
mp.messaging.[outgoing|incoming].{channel-name}.property=value
The channel-name segment must match the value set in the @Incoming and @Outgoing annotation:
-
quote-requests→ Kafka topic from which the quote requests are read -
quotes→ Kafka topic to which the quotes are written
|
More details about this configuration is available on the Producer configuration and Consumer configuration section from the Kafka documentation. These properties are configured with the prefix |
mp.messaging.incoming.requests.auto.offset.reset=earliest instructs the application to start reading the topics from the first offset, when there is no committed offset for the consumer group.
In other words, it will also process messages sent before the processor application started.
There is no need to set serializers or deserializers. Quarkus detects them, and if none are found, generates them using JSON serialization.
Receiving quotes
Back to the producer project.
Modify the QuotesResource to consume quotes from Kafka and send them back to the client via Server-Sent Events:
import io.smallrye.mutiny.Multi;

...

@Channel("quotes")
Multi<Quote> quotes; (1)

/**
 * Endpoint retrieving the "quotes" Kafka topic and sending the items to a server sent event.
 */
@GET
@Produces(MediaType.SERVER_SENT_EVENTS) (2)
public Multi<Quote> stream() {
    return quotes; (3)
}| 1 | Injects the quotes channel using the @Channel qualifier |
| 2 | Indicates that the content is sent using Server Sent Events |
| 3 | Returns the stream (Reactive Stream) |
No need to configure anything, as Quarkus will automatically associate the quotes channel to the quotes Kafka topic.
It will also generate a deserializer for the Quote class.
|
Message serialization in Kafka
In this example we used Jackson to serialize/deserialize Kafka messages. For more options on message serialization, see Kafka Reference Guide - Serialization. A contract-first approach using a schema registry is strongly recommended. See the Using Apache Kafka with Schema Registry and Avro guide or the Using Apache Kafka with Schema Registry and JSON Schema guide. |
The HTML page
The final piece is an HTML page that requests quotes and displays the prices received over SSE.
Inside the producer project, create the src/main/resources/META-INF/resources/quotes.html file with the following content:
<!DOCTYPE html>
<html lang="en">
<head>
<meta charset="UTF-8">
<title>Prices</title>
<link rel="stylesheet" type="text/css"
href="https://cdnjs.cloudflare.com/ajax/libs/patternfly/3.24.0/css/patternfly.min.css">
<link rel="stylesheet" type="text/css"
href="https://cdnjs.cloudflare.com/ajax/libs/patternfly/3.24.0/css/patternfly-additions.min.css">
</head>
<body>
<div class="container">
<div class="card">
<div class="card-body">
<h2 class="card-title">Quotes</h2>
<button class="btn btn-info" id="request-quote">Request Quote</button>
<div class="quotes"></div>
</div>
</div>
</div>
</body>
<script src="https://code.jquery.com/jquery-3.6.0.min.js"></script>
<script>
$("#request-quote").click((event) => {
fetch("/quotes/request", {method: "POST"})
.then(res => res.text())
.then(qid => {
var row = $(`<h4 class='col-md-12' id='${qid}'>Quote # <i>${qid}</i> | <strong>Pending</strong></h4>`);
$(".quotes").prepend(row);
});
});
var source = new EventSource("/quotes");
source.onmessage = (event) => {
var json = JSON.parse(event.data);
$(`#${json.id}`).html((index, html) => {
return html.replace("Pending", `\$\xA0${json.price}`);
});
};
</script>
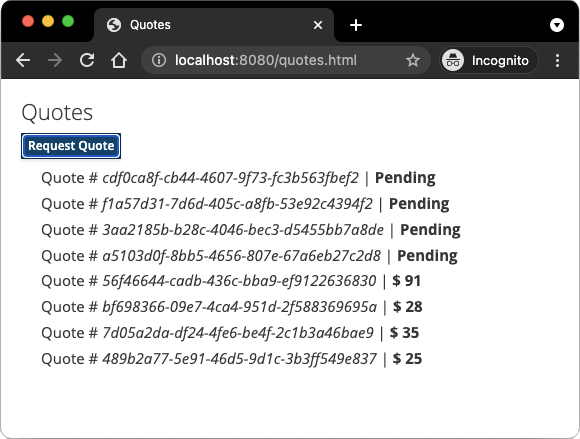
</html>When the user clicks the button, an HTTP request is made to request a quote, and a pending quote is added to the list. On each quote received over SSE, the corresponding item in the list is updated.
Get it running
Run both applications. In one terminal, run:
mvn -f producer quarkus:devIn another terminal, run:
mvn -f processor quarkus:devQuarkus starts a Kafka broker automatically, configures the application and shares the Kafka broker instance between different applications. See Dev Services for Kafka for more details.
Open http://localhost:8080/quotes.html in your browser and request some quotes by clicking the button.
Running in JVM or Native mode
When not running in dev or test mode, you will need to start your Kafka broker.
You can follow the instructions from the Apache Kafka website or create a docker-compose.yaml file with the following content:
services:

  kafka:
    image: quay.io/strimzi/kafka:latest-kafka-4.1.0
    command: [
      "sh", "-c",
      "./bin/kafka-storage.sh format --standalone -t $$(./bin/kafka-storage.sh random-uuid) -c ./config/server.properties && ./bin/kafka-server-start.sh ./config/server.properties --override advertised.listeners=$${KAFKA_ADVERTISED_LISTENERS}"
    ]
    ports:
      - "9092:9092"
    environment:
      LOG_DIR: "/tmp/logs"
      KAFKA_ADVERTISED_LISTENERS: 'PLAINTEXT://kafka:9092'
    networks:
      - kafka-quickstart-network

  producer:
    image: quarkus-quickstarts/kafka-quickstart-producer:1.0-${QUARKUS_MODE:-jvm}
    build:
      context: producer
      dockerfile: src/main/docker/Dockerfile.${QUARKUS_MODE:-jvm}
    depends_on:
      - kafka
    environment:
      KAFKA_BOOTSTRAP_SERVERS: kafka:9092
    ports:
      - "8080:8080"
    networks:
      - kafka-quickstart-network

  processor:
    image: quarkus-quickstarts/kafka-quickstart-processor:1.0-${QUARKUS_MODE:-jvm}
    build:
      context: processor
      dockerfile: src/main/docker/Dockerfile.${QUARKUS_MODE:-jvm}
    depends_on:
      - kafka
    environment:
      KAFKA_BOOTSTRAP_SERVERS: kafka:9092
    networks:
      - kafka-quickstart-network

networks:
  kafka-quickstart-network:
    name: kafkaquickstart
Make sure you first build both applications in JVM mode with:
mvn -f producer package
mvn -f processor package
Once packaged, run docker-compose up.
| This is a development cluster, do not use in production. |
You can also build and run the applications as native executables. First, compile both applications as native:
mvn -f producer package -Dnative -Dquarkus.native.container-build=true
mvn -f processor package -Dnative -Dquarkus.native.container-build=true
Run the system with:
export QUARKUS_MODE=native
docker-compose up --build
Going further
This guide demonstrated how to interact with Kafka using Quarkus and SmallRye Reactive Messaging to build data streaming applications.
For the full list of features and configuration options, see the Reference guide for Apache Kafka Extension.
| The Quarkus Kafka extension also supports using Kafka clients directly. |