Using Stork with Kubernetes
previewThis guide explains how to use Stork with Kubernetes for service discovery and load balancing.
If you are new to Stork, please read the Stork Getting Started Guide.
|
This technology is considered preview. In preview, backward compatibility and presence in the ecosystem is not guaranteed. Specific improvements might require changing configuration or APIs, and plans to become stable are under way. Feedback is welcome on our mailing list or as issues in our GitHub issue tracker. For a full list of possible statuses, check our FAQ entry. |
Prerequisites
To complete this guide, you need:
-
Roughly 15 minutes
-
An IDE
-
JDK 17+ installed with
JAVA_HOMEconfigured appropriately -
Apache Maven 3.9.16
-
A working container runtime (Docker or Podman)
-
Optionally the Quarkus CLI if you want to use it
-
Optionally Mandrel or GraalVM installed and configured appropriately if you want to build a native executable (or Docker if you use a native container build)
-
Access to a Kubernetes cluster (Minikube is a viable option)
Architecture
In this guide, we will work with a few components deployed in a Kubernetes cluster:
-
A simple blue service.
-
A simple red service.
-
The
color-serviceis the Kubernetes service which is the entry point to the Blue and Red instances. -
A client service using a REST client to call the blue or the red service. Service discovery and selection are delegated to Stork.
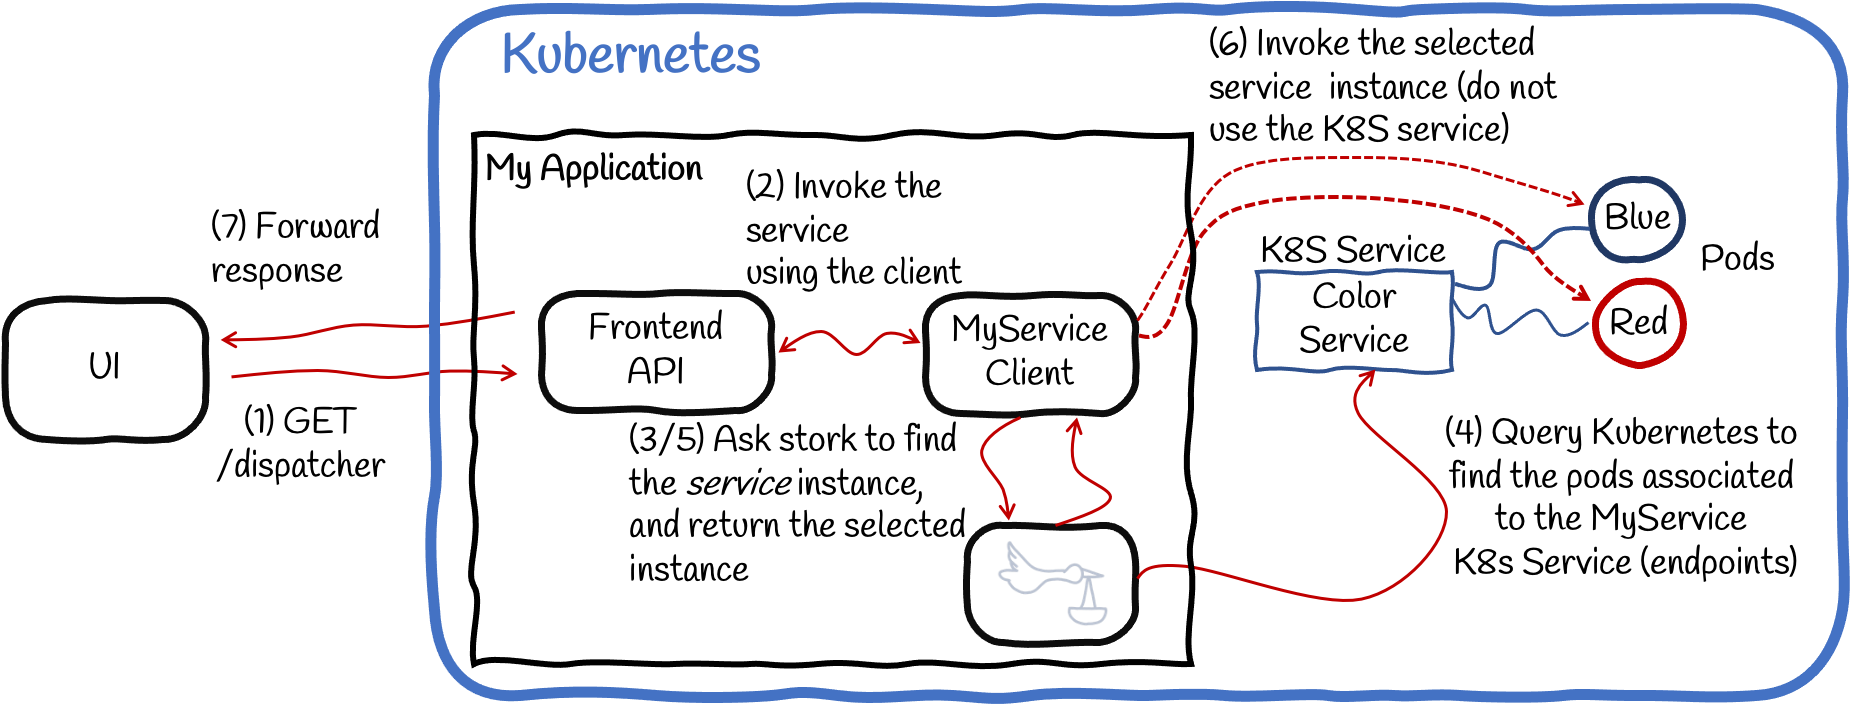
For the sake of simplicity, everything will be deployed in the same namespace of the Kubernetes cluster.
Solution
We recommend that you follow the instructions in the next sections and create the applications step by step. However, you can go right to the completed example.
Clone the Git repository: git clone https://github.com/quarkusio/quarkus-quickstarts.git, or download an archive.
The solution is located in the stork-kubernetes-quickstart directory.
Discovery and selection
Before going further, we need to discuss discovery vs. selection.
-
Service discovery is the process of locating service instances. It produces a list of service instances that is potentially empty (if no service matches the request) or contains multiple service instances.
-
Service selection, also called load-balancing, chooses the best instance from the list returned by the discovery process. The result is a single service instance or an exception when no suitable instance can be found.
Stork handles both discovery and selection. However, it does not handle the communication with the service but only provides a service instance. The various integrations in Quarkus extract the location of the service from that service instance.
Bootstrapping the project
Create a Quarkus project importing the quarkus-rest-client, quarkus-rest, and quarkus-smallrye-stork extensions using your favorite approach:
For Windows users:
-
If using cmd, (don’t use backward slash
\and put everything on the same line) -
If using Powershell, wrap
-Dparameters in double quotes e.g."-DprojectArtifactId=stork-kubernetes-quickstart"
In the generated project, also add the following dependencies:
<dependency>
    <groupId>io.smallrye.stork</groupId>
    <artifactId>stork-service-discovery-kubernetes</artifactId>
</dependency>
<dependency>
      <groupId>io.smallrye.stork</groupId>
      <artifactId>stork-load-balancer-random</artifactId>
</dependency>
<dependency>
    <groupId>io.quarkus</groupId>
    <artifactId>quarkus-kubernetes</artifactId>
</dependency>
<dependency>
    <groupId>io.quarkus</groupId>
    <artifactId>quarkus-kubernetes-client</artifactId>
</dependency>
<dependency>
    <groupId>io.quarkus</groupId>
    <artifactId>quarkus-container-image-jib</artifactId>
</dependency>implementation("io.smallrye.stork:stork-service-discovery-kubernetes")
implementation("io.smallrye.stork:stork-load-balancer-random")
implementation("io.quarkus:quarkus-kubernetes")
implementation("io.quarkus:quarkus-kubernetes-client")
implementation("io.quarkus:quarkus-container-image-jib")stork-service-discovery-kubernetes provides an implementation of service discovery for Kubernetes. stork-load-balancer-random provides an implementation of random load balancer. quarkus-kubernetes enables the generation of Kubernetes manifests each time we perform a build. The quarkus-kubernetes-client extension enables the use of the Fabric8 Kubernetes Client in native mode. And quarkus-container-image-jib enables the build of a container image using Jib.
The Blue and Red services
Let’s start with the very beginning: the service we will discover, select and call.
The Red and Blue are two simple REST services serving an endpoint responding Hello from Red! and Hello from Blue! respectively. The code of both applications has been developed following the Getting Started Guide.
As the goal of this guide is to show how to use Stork Kubernetes service discovery, we won’t provide the specifics steps for the Red and Blue services. Their container images are already built and available in a public registry:
Deploy the Blue and Red services in Kubernetes
Now that we have our service container images available in a public registry, we need to deploy them into the Kubernetes cluster.
The following file contains all the Kubernetes resources needed to deploy the Blue and Red services in the cluster and make them accessible:
kind: Role
apiVersion: rbac.authorization.k8s.io/v1
metadata:
  namespace: development
  name: endpoints-reader
rules:
  - apiGroups: [""] # "" indicates the core API group
    resources: ["endpoints", "pods"]
    verbs: ["get", "list"]
---
apiVersion: rbac.authorization.k8s.io/v1
kind: RoleBinding
metadata:
  name: stork-rb
  namespace: development
subjects:
  - kind: ServiceAccount
    # Reference to upper's `metadata.name`
    name: default
    # Reference to upper's `metadata.namespace`
    namespace: development
roleRef:
  kind: Role
  name: endpoints-reader
  apiGroup: rbac.authorization.k8s.io
---
apiVersion: v1
kind: Service
metadata:
  annotations:
    app.quarkus.io/commit-id: f747f359406bedfb1a39c57392a5b5a9eaefec56
    app.quarkus.io/build-timestamp: 2022-03-31 - 10:36:56 +0000
  labels:
    app.kubernetes.io/name: color-service
    app.kubernetes.io/version: "1.0"
  name: color-service (1)
spec:
  ports:
    - name: http
      port: 80
      targetPort: 8080
  selector:
    app.kubernetes.io/version: "1.0"
    type: color-service
  type: ClusterIP
---
apiVersion: apps/v1
kind: Deployment
metadata:
  annotations:
    app.quarkus.io/commit-id: f747f359406bedfb1a39c57392a5b5a9eaefec56
    app.quarkus.io/build-timestamp: 2022-03-31 - 10:36:56 +0000
  labels:
    color: blue
    type: color-service
    app.kubernetes.io/name: blue-service
    app.kubernetes.io/version: "1.0"
  name: blue-service (2)
spec:
  replicas: 1
  selector:
    matchLabels:
      app.kubernetes.io/name: blue-service
      app.kubernetes.io/version: "1.0"
  template:
    metadata:
      annotations:
        app.quarkus.io/commit-id: f747f359406bedfb1a39c57392a5b5a9eaefec56
        app.quarkus.io/build-timestamp: 2022-03-31 - 10:36:56 +0000
      labels:
        color: blue
        type: color-service
        app.kubernetes.io/name: blue-service
        app.kubernetes.io/version: "1.0"
    spec:
      containers:
        - env:
            - name: KUBERNETES_NAMESPACE
              valueFrom:
                fieldRef:
                  fieldPath: metadata.namespace
          image: quay.io/quarkus/blue-service:1.0
          imagePullPolicy: Always
          name: blue-service
          ports:
            - containerPort: 8080
              name: http
              protocol: TCP
---
apiVersion: apps/v1
kind: Deployment
metadata:
  annotations:
    app.quarkus.io/commit-id: 27be03414510f776ca70d70d859b33e134570443
    app.quarkus.io/build-timestamp: 2022-03-31 - 10:38:54 +0000
  labels:
    color: red
    type: color-service
    app.kubernetes.io/version: "1.0"
    app.kubernetes.io/name: red-service
  name: red-service (2)
spec:
  replicas: 1
  selector:
    matchLabels:
      app.kubernetes.io/version: "1.0"
      app.kubernetes.io/name: red-service
  template:
    metadata:
      annotations:
        app.quarkus.io/commit-id: 27be03414510f776ca70d70d859b33e134570443
        app.quarkus.io/build-timestamp: 2022-03-31 - 10:38:54 +0000
      labels:
        color: red
        type: color-service
        app.kubernetes.io/version: "1.0"
        app.kubernetes.io/name: red-service
    spec:
      containers:
        - env:
            - name: KUBERNETES_NAMESPACE
              valueFrom:
                fieldRef:
                  fieldPath: metadata.namespace
          image: quay.io/quarkus/red-service:1.0
          imagePullPolicy: Always
          name: red-service
          ports:
            - containerPort: 8080
              name: http
              protocol: TCP
---
apiVersion: networking.k8s.io/v1
kind: Ingress (3)
metadata:
  annotations:
    app.quarkus.io/commit-id: f747f359406bedfb1a39c57392a5b5a9eaefec56
    app.quarkus.io/build-timestamp: 2022-03-31 - 10:46:19 +0000
  labels:
    app.kubernetes.io/name: color-service
    app.kubernetes.io/version: "1.0"
    color: blue
    type: color-service
  name: color-service
spec:
  rules:
    - host: color-service.127.0.0.1.nip.io
      http:
        paths:
          - backend:
              service:
                name: color-service
                port:
                  name: http
            path: /
            pathType: Prefix
There are a few interesting parts in this listing:
| 1 | The Kubernetes Service resource, color-service, that Stork will discover. |
| 2 | The Red and Blue service instances behind the color-service Kubernetes service. |
| 3 | A Kubernetes Ingress resource making the color-service accessible from the outside of the cluster at the color-service.127.0.0.1.nip.io url. Note that the Ingress is not needed for Stork however, it helps to check that the architecture is in place. |
Create a file named kubernetes-setup.yml with the content above at the root of the project and run the following commands to deploy all the resources in the Kubernetes cluster. Don’t forget to create a dedicated namespace:
kubectl create namespace development
kubectl apply -f kubernetes-setup.yml -n=development
If everything went well the Color service is accessible on http://color-service.127.0.0.1.nip.io. You should have Hello from Red! and Hello from Blue! response randomly.
| Stork is not limited to Kubernetes and integrates with other service discovery mechanisms. |
The REST Client interface and the front end API
So far, we didn’t use Stork; we just deployed the services we will be discovering, selecting, and calling.
We will call the services using the REST Client.
Create the src/main/java/org/acme/MyService.java file with the following content:
package org.acme;

import org.eclipse.microprofile.rest.client.inject.RegisterRestClient;

import jakarta.ws.rs.GET;
import jakarta.ws.rs.Produces;
import jakarta.ws.rs.core.MediaType;

/**
 * The REST Client interface.
 *
 * Notice the `baseUri`. It uses `stork://` as URL scheme indicating that the called service uses Stork to locate and
 * select the service instance. The `my-service` part is the service name. This is used to configure Stork discovery
 * and selection in the `application.properties` file.
 */
@RegisterRestClient(baseUri = "stork://my-service")
public interface MyService {

    @GET
    @Produces(MediaType.TEXT_PLAIN)
    String get();
}
It’s a straightforward REST client interface containing a single method. However, note the baseUri attribute:
* the stork:// suffix instructs the REST client to delegate the discovery and selection of the service instances to Stork,
* the my-service part of the URI is the service name we will be using in the application configuration.
It does not change how the REST client is used.
Create the src/main/java/org/acme/FrontendApi.java file with the following content:
package org.acme;

import org.eclipse.microprofile.rest.client.inject.RestClient;

import jakarta.ws.rs.GET;
import jakarta.ws.rs.Path;
import jakarta.ws.rs.Produces;
import jakarta.ws.rs.core.MediaType;

/**
 * A frontend API using our REST Client (which uses Stork to locate and select the service instance on each call).
 */
@Path("/api")
public class FrontendApi {

    @RestClient MyService service;

    @GET
    @Produces(MediaType.TEXT_PLAIN)
    public String invoke() {
        return service.get();
    }

}
It injects and uses the REST client as usual.
Stork configuration
Now we need to configure Stork for using Kubernetes to discover the red and blue instances of the service.
In the src/main/resources/application.properties, add:
quarkus.stork.my-service.service-discovery.type=kubernetes
quarkus.stork.my-service.service-discovery.k8s-namespace=development
quarkus.stork.my-service.service-discovery.application=color-service
quarkus.stork.my-service.load-balancer.type=random
stork.my-service.service-discovery indicates which type of service discovery we will be using to locate the my-service service.
In our case, it’s kubernetes.
If your access to the Kubernetes cluster is configured via Kube config file, you don’t need to configure the access to it. Otherwise, set the proper Kubernetes url using the quarkus.stork.my-service.service-discovery.k8s-host property.
quarkus.stork.my-service.service-discovery.application contains the name of the Kubernetes service Stork is going to ask for. In our case, this is the color-service corresponding to the kubernetes service backed by the Red and Blue instances.
Finally, quarkus.stork.my-service.load-balancer.type configures the service selection. In our case, we use a random Load Balancer.
Deploy the REST Client interface and the front end API in the Kubernetes cluster
The system is almost complete. We only need to deploy the REST Client interface and the client service to the cluster.
In the src/main/resources/application.properties, add:
quarkus.container-image.registry=<public registry>
quarkus.kubernetes-client.trust-certs=true
quarkus.kubernetes.ingress.expose=true
quarkus.kubernetes.ingress.host=my-service.127.0.0.1.nip.io
The quarkus.container-image.registry contains the container registry to use.
The quarkus.kubernetes.ingress.expose indicates that the service will be accessible from the outside of the cluster.
The quarkus.kubernetes.ingress.host contains the url to access the service. We are using nip.io wildcard for IP address mappings.
For a more customized configuration you can check the Deploying to Kubernetes guide
Build and push the container image
Thanks to the extensions we are using, we can perform the build of a container image using Jib and also enabling the generation of Kubernetes manifests while building the application. For example, the following command will generate a Kubernetes manifest in the target/kubernetes/ directory and also build and push a container image for the project:
./mvnw package -Dquarkus.container-image.build=true -Dquarkus.container-image.push=trueDeploy client service to the Kubernetes cluster
The generated manifest can be applied to the cluster from the project root using kubectl:
kubectl apply -f target/kubernetes/kubernetes.yml -n=development|
Please note that if you use Elliptic Curve keys with Stork and are getting exceptions like Note that internally an You can have this provider registered as described in the BouncyCastle or BouncyCastle FIPS sections. |
We’re done! So, let’s see if it works.
Open a browser and navigate to http://my-service.127.0.0.1.nip.io/api.
Or if you prefer, in another terminal, run:
> curl http://my-service.127.0.0.1.nip.io/api
...
> curl http://my-service.127.0.0.1.nip.io/api
...
> curl http://my-service.127.0.0.1.nip.io/api
...
The responses should alternate randomly between Hello from Red! and Hello from Blue!.
You can compile this application into a native executable:
quarkus build --native./mvnw install -Dnative./gradlew build -Dquarkus.native.enabled=trueThen, you need to build a container image based on the native executable. For this use the corresponding Dockerfile:
> docker build -f src/main/docker/Dockerfile.native -t quarkus/stork-kubernetes-quickstart .After publishing the new image to the container registry. You can redeploy the Kubernetes manifest to the cluster.