Getting Started With Reactive
Reactive is a set of principles to build robust, efficient, and concurrent applications and systems. These principles let you handle more load than traditional approaches while using the resources (CPU and memory) more efficiently while also reacting to failures gracefully.
Quarkus is a Reactive framework. Since the beginning, Reactive has been an essential tenet of the Quarkus architecture. It includes many reactive features and offers a broad ecosystem.
This guide is not an in-depth article about what Reactive is and how Quarkus enables reactive architectures. If you want to read more about these topics, refer to the Reactive Architecture guide, which provides an overview of the Quarkus reactive ecosystem.
In this guide, we will get you started with some reactive features of Quarkus. We are going to implement a simple CRUD application. Yet, unlike in the Hibernate with Panache guide, it uses the reactive features of Quarkus.
This guide will help you with:
-
Bootstrapping a reactive CRUD application with Quarkus
-
Using Hibernate Reactive with Panache to interact with a database in a reactive fashion
-
Using Quarkus REST (formerly RESTEasy Reactive) to implement HTTP API while enforcing the reactive principle
-
Packaging and Running the application
Prerequisites
To complete this guide, you need:
-
Roughly 15 minutes
-
An IDE
-
JDK 17+ installed with
JAVA_HOMEconfigured appropriately -
Apache Maven 3.9.16
-
Optionally the Quarkus CLI if you want to use it
-
Optionally Mandrel or GraalVM installed and configured appropriately if you want to build a native executable (or Docker if you use a native container build)
Verify that Maven is using the Java version you expect.
If you have multiple JDKs installed, make sure Maven is using the expected one.
You can verify which JDK Maven uses by running mvn --version.
|
Imperative vs. Reactive: a question of threads
As mentioned above, in this guide, we are going to implement a reactive CRUD application. But you may wonder what the differences and benefits are in comparison to the traditional and imperative model.
To better understand the contrast, we need to explain the difference between the reactive and imperative execution models. It’s essential to comprehend that Reactive is not just a different execution model, but that distinction is necessary to understand this guide.
In the traditional and imperative approach, frameworks assign a thread to handle the request. So, the whole processing of the request runs on this worker thread. This model does not scale very well. Indeed, to handle multiple concurrent requests, you need multiple threads; and so your application concurrency is constrained by the number of threads. In addition, these threads are blocked as soon as your code interacts with remote services. So, it leads to inefficient usage of the resources, as you may need more threads, and each thread, as they are mapped to OS threads, has a cost in terms of memory and CPU.

On the other side, the reactive model relies on non-blocking I/Os and a different execution model. Non-blocking I/O provides an efficient way to deal with concurrent I/O. A minimal amount of threads called I/O threads, can handle many concurrent I/O. With such a model, request processing is not delegated to a worker thread but uses these I/O threads directly.It saves memory and CPU as there is no need to create worker threads to handle the requests. It also improves the concurrency as it removes the constraint on the number of threads. Finally, it also improves response time as it reduces the number of thread switches.
From sequential to continuation style
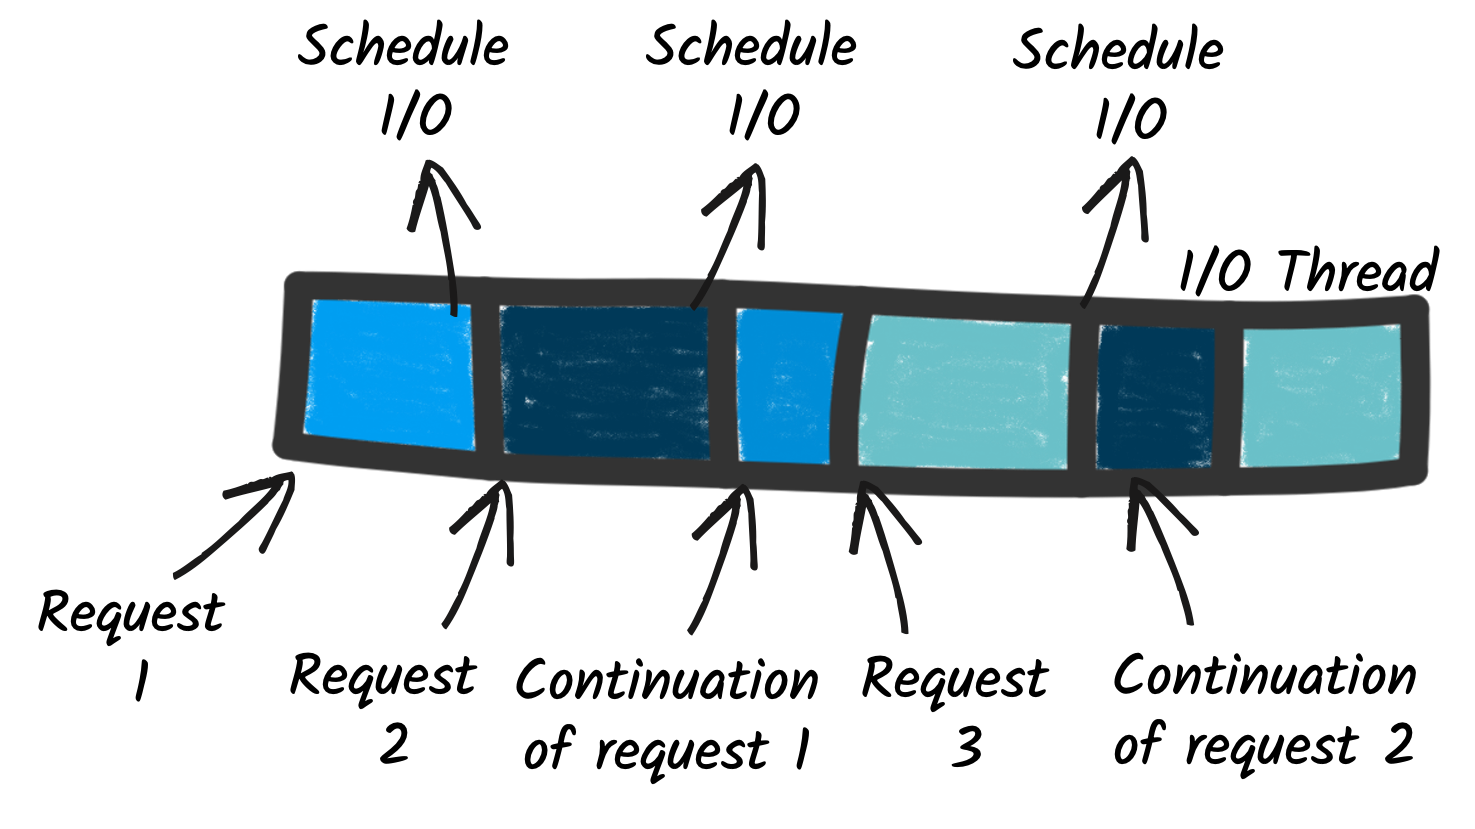
So, with the reactive execution model, the requests are processed using I/O threads. But that’s not all. An I/O thread can handle multiple concurrent requests. How? Here is the trick and one of the most significant differences between reactive and imperative.
When processing a request requires interacting with a remote service, like an HTTP API or a database, it does not block the execution while waiting for the response. Instead, it schedules the I/O operation and attaches a continuation, i.e., the request processing remaining code. This continuation can be passed as a callback (a function invoked with the I/O outcome), or use more advanced constructs such as reactive programming or co-routines. Regardless of how the continuation is expressed, the essential aspect is the release of the I/O thread and, as a consequence, the fact that this thread can be used to process another request. When the scheduled I/O completes, the I/O thread executes the continuation, and the processing of the pending request continues.
So, unlike the imperative model, where I/O blocks the execution, reactive switches to a continuation-based design, where the I/O threads are released, and continuation invoked when the I/Os complete. As a result, the I/O thread can handle multiple concurrent requests, improving the overall concurrency of the application.
But, there is a catch. We need a way to write continuation-passing code. There are many ways of doing this. In Quarkus, we propose:
-
Mutiny - an intuitive and event-driven reactive programming library
-
Kotlin co-routines - a way to write asynchronous code in a sequential manner
In this guide, we will use Mutiny. To know more about Mutiny, check the Mutiny documentation.
| Project Loom is coming to the JDK soon and proposes a virtual thread-based model. The Quarkus architecture is ready to support Loom as soon as it’s become globally available. |
Bootstrapping the Reactive Fruits application
With this in mind, let’s see how we can develop a CRUD application with Quarkus, which will use the I/O thread to handle the HTTP requests, interact with a database, process the result, and write the HTTP response; in other words: a reactive CRUD application.
While we recommend you to follow the step-by-step instructions, you can find the final solution on https://github.com/quarkusio/quarkus-quickstarts/tree/main/hibernate-reactive-panache-quickstart.
First, go to code.quarkus.io and select the following extensions:
-
Quarkus REST Jackson
-
Hibernate Reactive with Panache
-
Reactive PostgreSQL client
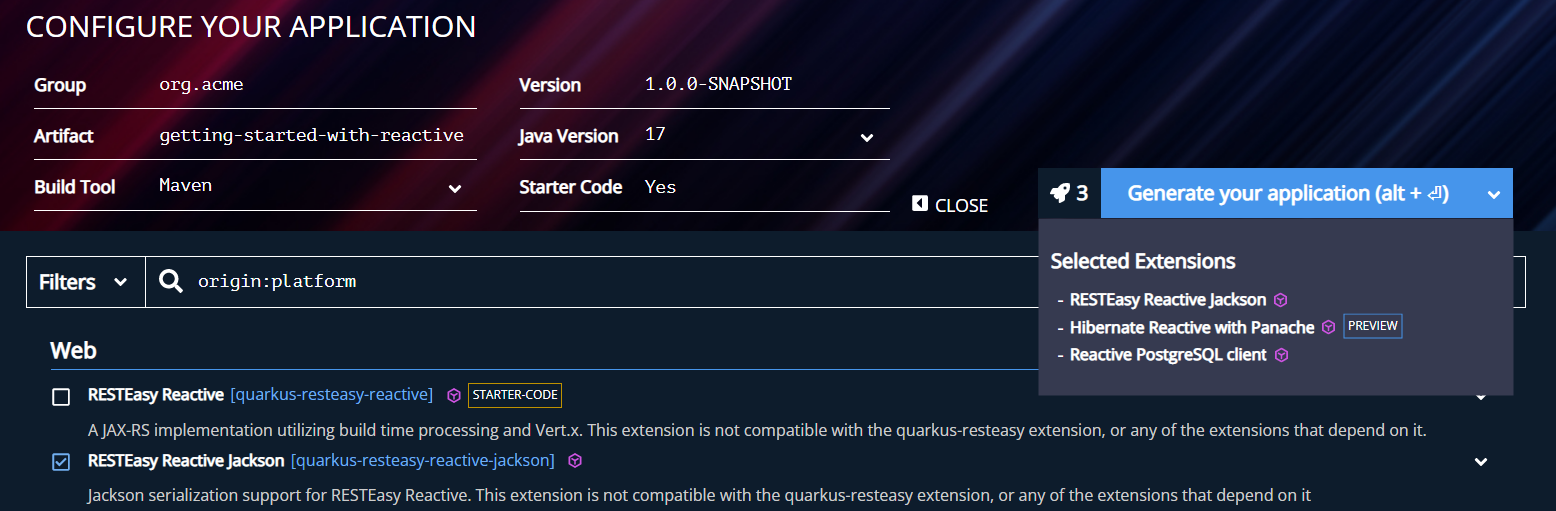
The last extension is the reactive database driver for PostgreSQL. Hibernate Reactive uses that driver to interact with the database without blocking the caller thread.
Once selected, click on "Generate your application", download the zip file, unzip it and open the code in your favorite IDE.
Reactive Panache Entity
Let’s start with the Fruit entity.Create the src/main/java/org/acme/hibernate/orm/panache/Fruit.java file with the following content:
package org.acme.hibernate.orm.panache;

import jakarta.persistence.Cacheable;
import jakarta.persistence.Column;
import jakarta.persistence.Entity;

import io.quarkus.hibernate.reactive.panache.PanacheEntity;  (1)

@Entity
@Cacheable
public class Fruit extends PanacheEntity {

	 @Column(length = 40, unique = true)
	 public String name;

}| 1 | Make sure you import the reactive variant of PanacheEntity. |
This class represents Fruits.
It’s a straightforward entity with a single field (name).
Note that it uses io.quarkus.hibernate.reactive.panache.PanacheEntity, the reactive variant of PanacheEntity.
So, behind the scenes, Hibernate uses the execution model we described above.
It interacts with the database without blocking the thread.
In addition, this reactive PanacheEntity proposes a reactive API.
We will use this API to implement the REST endpoint.
Before going further, open the src/main/resources/application.properties file and add:
quarkus.datasource.db-kind=postgresql
quarkus.hibernate-orm.schema-management.strategy=drop-and-create
It instructs the application to use PostgreSQL for the database and to handle the database schema generation.
In the same directory, create an import.sql file, which inserts a few fruits, so we don’t start with an empty database in dev mode:
INSERT INTO fruit(id, name) VALUES (1, 'Cherry');
INSERT INTO fruit(id, name) VALUES (2, 'Apple');
INSERT INTO fruit(id, name) VALUES (3, 'Banana');
ALTER SEQUENCE fruit_seq RESTART WITH 4;
In a terminal, launch the application in dev mode using: ./mvnw quarkus:dev.
Quarkus automatically starts a database instance for you and configure the application. Now we only need to implement the HTTP endpoint.
Reactive Resource
Because the interaction with the database is non-blocking and asynchronous, we need to use asynchronous constructs to implement our HTTP resource.
Quarkus uses Mutiny as its central reactive programming model.
So, it supports returning Mutiny types (Uni and Multi) from HTTP endpoints.
Also, our Fruit Panache entity exposes methods using these types, so we only need to implement the glue.
Create the src/main/java/org/acme/hibernate/orm/panache/FruitResource.java file with the following content:
package org.acme.hibernate.orm.panache;

import java.util.List;

import io.quarkus.panache.common.Sort;
import io.smallrye.mutiny.Uni;
import jakarta.enterprise.context.ApplicationScoped;
import jakarta.ws.rs.Path;

@Path("/fruits")
@ApplicationScoped
public class FruitResource {

}
Let’s start with the getAll method. The getAll method returns all the fruits stored in the database.
In the FruitResource, add the following code:
@GET
public Uni<List<Fruit>> get() {
    return Fruit.listAll(Sort.by("name"));
}
Open http://localhost:8080/fruits to invoke this method:
[{"id":2,"name":"Apple"},{"id":3,"name":"Banana"},{"id":1,"name":"Cherry"},{"id":4,"name":"peach"}]We get the expected JSON array. Quarkus REST automatically maps the list into a JSON Array, except if instructed otherwise.
Look at the return type; it returns a Uni of List<Fruit>.
Uni is an asynchronous type.
It’s a bit like a future.
It’s a placeholder that will get its value (item) later.
When it receives the item (Mutiny says it emits its item), you can attach some behavior.
That’s how we express the continuation: get a uni, and when the uni emits its item, execute the rest of the processing.
Reactive developers may wonder why we can’t return a stream of fruits directly.
It tends to be a bad idea when dealing with a database.
Relational databases do not handle streaming well.
It’s a problem of protocols not designed for this use case.
So, to stream rows from the database, you need to keep a connection (and sometimes a transaction) open until all the rows are consumed.
If you have slow consumers, you break the golden rule of databases: don’t hold connections for too long.
Indeed, the number of connections is rather low, and having consumers keeping them for too long will dramatically reduce the concurrency of your application.
So, when possible, use a Uni<List<T>> and load the content.
If you have a large set of results, implement pagination.
|
Let’s continue our API with getSingle:
@GET
@Path("/{id}")
public Uni<Fruit> getSingle(Long id) {
    return Fruit.findById(id);
}
In this case, we use Fruit.findById to retrieve the fruit.
It returns a Uni, which will complete when the database has retrieved the row.
The create method allows adding a new fruit to the database:
@POST
public Uni<RestResponse<Fruit>> create(Fruit fruit) {
    return Panache.withTransaction(fruit::persist).replaceWith(RestResponse.status(CREATED, fruit));
}
The code is a bit more involved.
To write to a database, we need a transaction, therefore we use Panache.withTransaction to obtain one (asynchronously) and proceed to call the persist method.
The persist method returns a Uni that emits the result of the insertion of the fruit in the database.
Once the insertion completes (which plays the role of the continuation), we create a 201 CREATED HTTP response.
If you have curl on your machine, you can try the endpoint using:
> curl --header "Content-Type: application/json" \
  --request POST \
  --data '{"name":"peach"}' \
  http://localhost:8080/fruits
Following the same ideas, you can implement the other CRUD methods.
Testing and Running
Testing a reactive application is similar to testing a non-reactive one: use the HTTP endpoint and verify the HTTP responses. The fact that the application is reactive does not change anything.
In FruitsEndpointTest.java you can see how the test for the fruit application can be implemented.
Packaging and running the application does not change either.
You can use the following command as usual:
quarkus build./mvnw install./gradlew buildor to build a native executable:
quarkus build --native./mvnw install -Dnative./gradlew build -Dquarkus.native.enabled=trueYou can also package the application in a container.
To run the application, don’t forget to start a database and provide the configuration to your application.
For example, you can use Docker to run your database:
docker run -it --rm=true \
    --name postgres-quarkus -e POSTGRES_USER=quarkus \
    -e POSTGRES_PASSWORD=quarkus -e POSTGRES_DB=fruits \
    -p 5432:5432 docker.io/library/postgres:18
Then, launch the application using:
java \
   -Dquarkus.datasource.reactive.url=postgresql://localhost/fruits \
   -Dquarkus.datasource.username=quarkus \
   -Dquarkus.datasource.password=quarkus \
   -jar target/quarkus-app/quarkus-run.jar
Or, if you packaged your application as native executable, use:
./target/getting-started-with-reactive-runner \
  -Dquarkus.datasource.reactive.url=postgresql://localhost/fruits \
  -Dquarkus.datasource.username=quarkus \
  -Dquarkus.datasource.password=quarkus
The parameters passed to the application are described in the datasource guide. There are other ways to configure the application - please check the configuration guide to have an overview of the possibilities (such as env variable, .env files and so on).