Dev Assistant
General overview
The Quarkus Dev Assistant is an AI-powered helper built directly into Quarkus Dev Mode. Its goal is to make you more productive by helping you troubleshoot and assisting with development tasks.
The assistant runs only within dev mode and never affects your production application.
What Can It Do?
The Dev Assistant can help with:
-
Troubleshooting exceptions and stack traces
-
Generating example client code (e.g.,
javascriptclient for REST endpoints) -
Generating javadoc for your code
-
Generating test code for your application
-
Generating test data for your application
-
Explain existing code in you application
-
Complete
//TODOsections in your code -
… and more to come !
How to Add the Dev Assistant
To enable the Dev Assistant in your Quarkus project, add the quarkus-chappie extension:
<dependency>
    <groupId>io.quarkiverse.chappie</groupId>
    <artifactId>quarkus-chappie</artifactId>
    <version>${chappie-extension-version}</version> (1)
</dependency>| 1 | Replace ${chappie-extension-version} with the latest available version. You can find the latest version on search.maven.org. |
Once added, open the Dev UI to start using the assistant.
|
The assistant interfaces are defined in Quarkus "core", but their implementation are located in Quarkiverse (Chappie). You can, if needed, provide an alternative implementation of the assistant. |
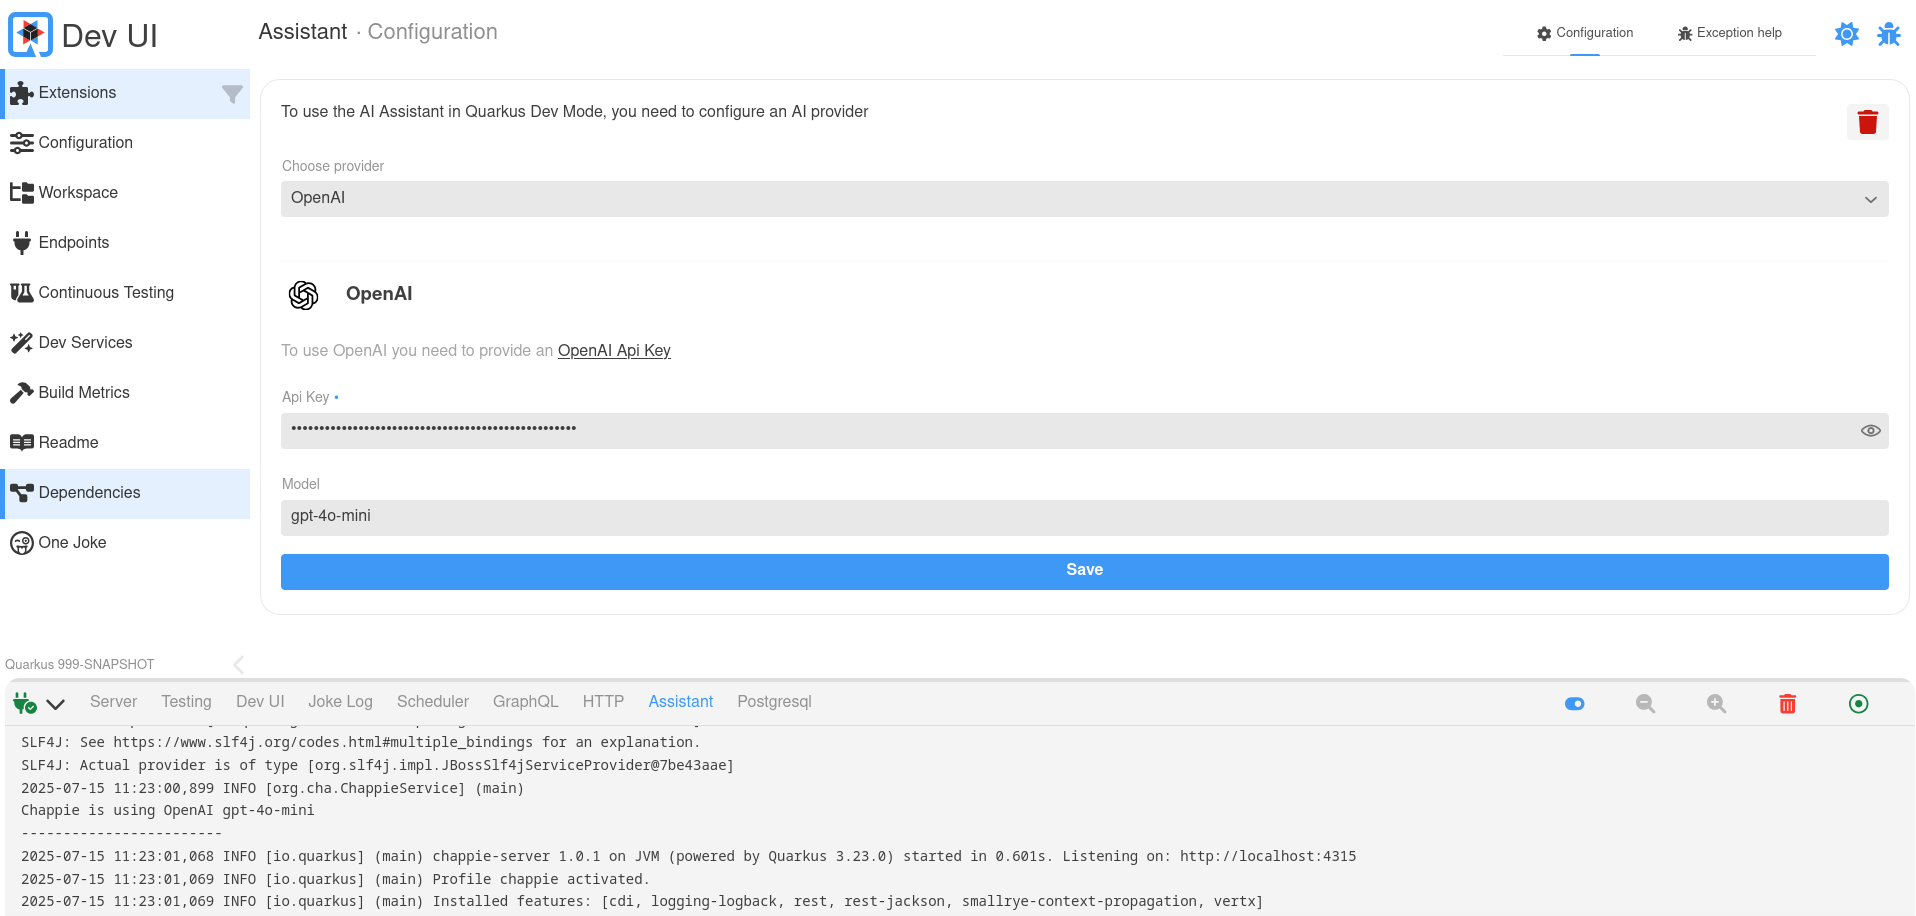
Configuration and Providers
By default, the assistant is disabled until configured. You can choose from supported AI providers:
-
OpenAI (e.g., ChatGPT, Openshift AI, Podman AI Lab, …)
-
Ollama (local models like
llama3)
Configuration can be done directly in Dev UI via the assistant settings pane. You’ll need:
-
An API key (for OpenAI)
-
A local running model (for Ollama or Podman AI)
Settings are stored in ~/.quarkus/chappie/chappie-assistant.properties.
Usage
The Dev Assistant integrates seamlessly into various parts of the Dev UI. Wherever assistant features are available, they are highlighted using a distinctive pink theme, making it easy to spot AI-powered interactions.
Currently, assistant functions are available in:
-
The Workspace view
-
Extension pages that support AI-driven help
Look for pink-highlighted buttons or badges - these indicate actions powered by the Dev Assistant.
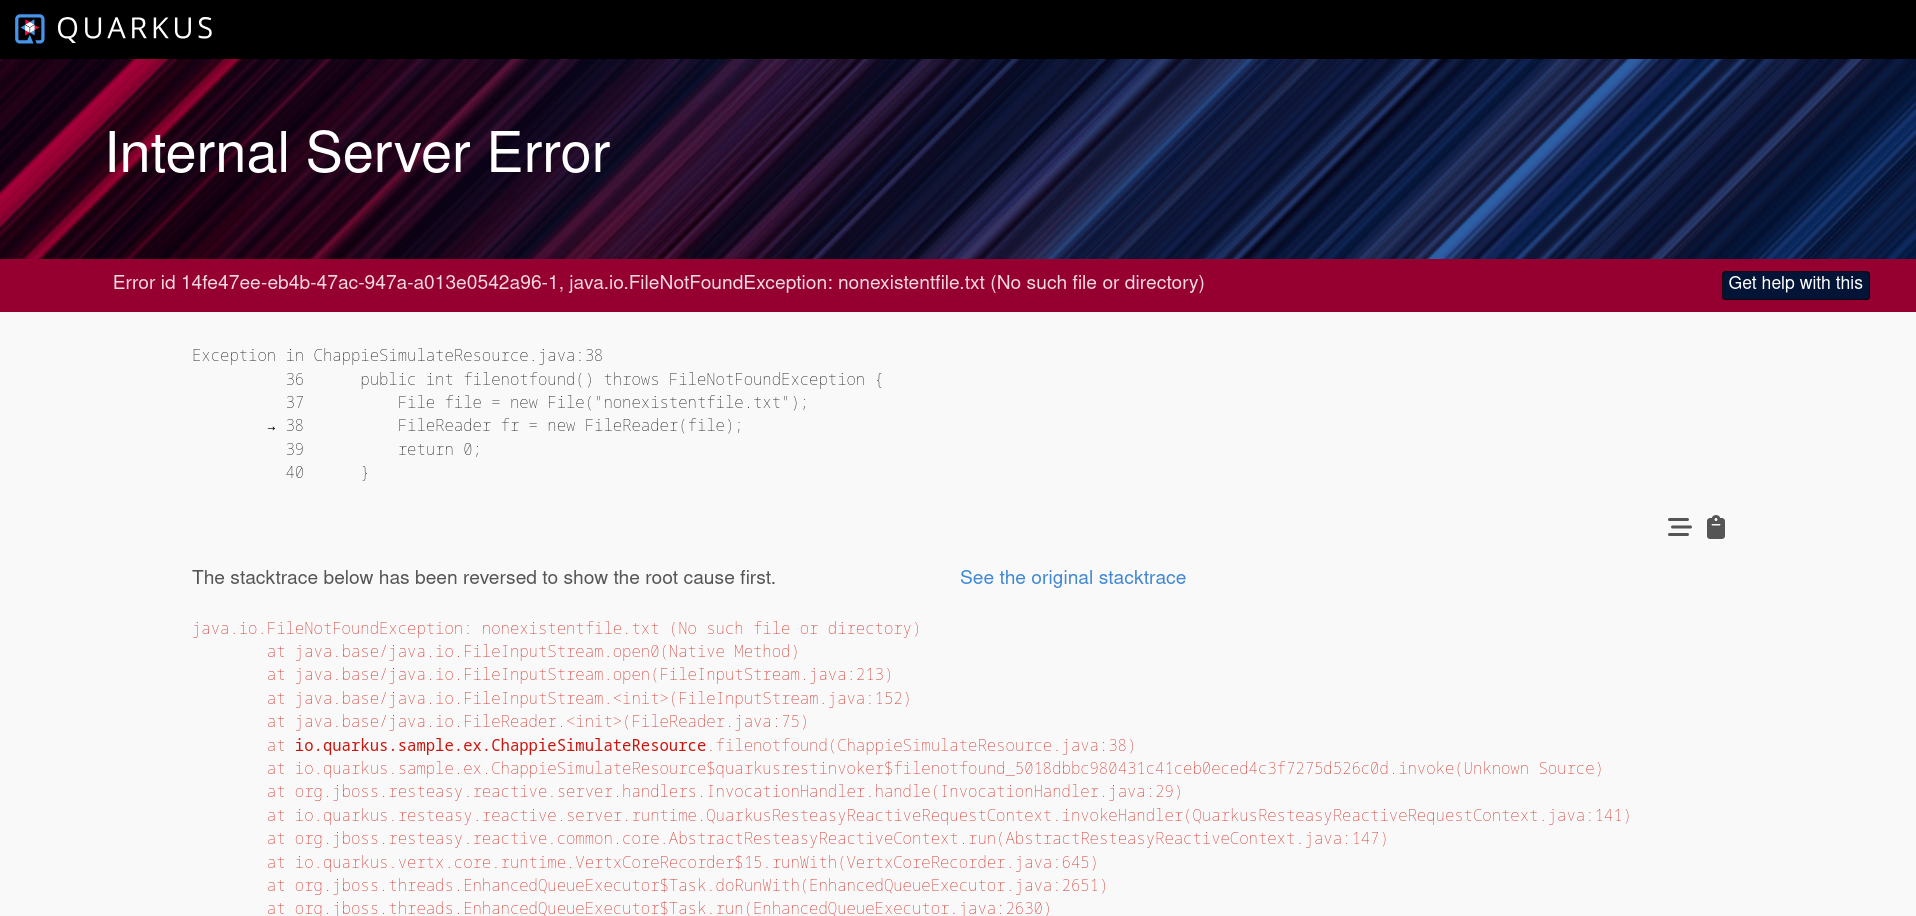
Exception help
When an error or exception occurs, the error page includes a Get help with this button.
Clicking it takes you directly to the Dev UI’s Assistant panel, pre-filled with relevant error context. This allows the assistant to help you:
-
Understand what the exception means
-
Suggest likely causes
-
Recommend how to fix the issue
This provides a fast and focused troubleshooting workflow without needing to copy and paste logs manually.
Exception Help in the Log
In addition to error page support, the Dev Assistant can also help with exceptions via the quarkus log.
When an exception is detected, you can press the h key in the quarkus log to open the shortcut menu. Under the Assistant heading, you’ll see a new option like:
== Assistant

[a] - Help with the latest exception (Cannot invoke "String.length()" because "str" is null)
Press a to send the exception to the assistant for analysis.
This is especially useful if the exception occurred outside a visible page or during startup. The assistant will analyze the error and suggest potential causes or fixes — without needing to navigate elsewhere.

Guide for Extension Developers
Quarkus extensions can enhance the developer experience by contributing to the Dev Assistant. This section explains how to integrate your extension with the Dev Assistant, covering:
-
Workspace-based assistant actions
-
Assistant-specific pages
-
Backend integration via JSON-RPC
-
UI features for assistant-aware components
-
Quarkus log participation
An extension can define Assistant features without depending on Chappie directly. The interfaces and associated structures are located in the assistant extension.
Workspace participation
You can add an assistant function to a workspace item using the same approach as regular workspace actions, with one key difference: instead of using .function(…), you use .assistantFunction(…).
    Action.actionBuilder()
        .label("Joke AI")
        .assistantFunction((a, p) -> { (1)
            Assistant assistant = (Assistant) a;
            Map params = (Map) p;

            return assistant.assistBuilder()
                    .systemMessage(JOKE_SYSTEM_MESSAGE) (2)
                    .userMessage(JOKE_USER_MESSAGE) (3)
                    .variables(params)
                    .responseType(ExpectedResponse.class) (4)
                    .assist();

        })
        .display(Display.split)
        .displayType(DisplayType.markdown)
        .filter(Patterns.JAVA_SRC));


        //...

        final record ExpectedResponse(String result, String markdown) {
}| 1 | Use assistantFunction to receive the Assistant instance and input parameters. |
| 2 | Provide an optional system message to guide the assistant’s behavior. |
| 3 | Provide a user message as the primary prompt. |
| 4 | Provide a class defining your expected response structure. |
Assistant pages
To add a standalone assistant-powered page to the Dev UI, use the CardPageBuildItem and Page.assistantPageBuilder():
cardPageBuildItem.addPage(Page.assistantPageBuilder() (1)
                .title("AI Joke")
.componentLink("qwc-jokes-ai.js"));| 1 | Use the assistant page builder. |
Communicating to the backend
You can invoke the assistant from backend code using standard Dev UI JSON-RPC patterns — both against the runtime and deployment classpaths.
JsonRPC against the Runtime classpath
To use the assistant in a JsonRpcService on the runtime classpath, you need to make sure the Assistant interface is available:
    <dependency>
        <groupId>io.quarkus</groupId>
        <artifactId>quarkus-assistant-dev</artifactId>
    </dependency>
Then you can inject the Assistant like this:
public class JokesJsonRPCService {

    @Inject
Optional<Assistant> assistant; (1)| 1 | Inject the assistant as optional, it will only be present if a provider is added and configured. |
You can now use this assistant in any JsonRPC method, example:
    public CompletionStage<Map<String, String>> getAiJoke() {
        if (assistant.isPresent()) {
            return assistant.get().assistBuilder()
                    .userMessage("Tell me a funny joke")
                    .responseType(JokeResponse.class) (1)
                    .assist();
        }
        return CompletableFuture.failedStage(new RuntimeException("Assistant is not available"));
    }

    //...
final record JokeResponse(String joke) {}| 1 | Provide a class defining your expected response structure. |
JsonRPC against the Deployment classpath
In deployment-time code, you need to add the assistant-deployment-spi:
    <dependency>
        <groupId>io.quarkus</groupId>
        <artifactId>quarkus-assistant-deployment-spi</artifactId>
    </dependency>
Then use the BuildTimeActionBuildItem and register assistant actions via .addAssistantAction(…):
    BuildTimeActionBuildItem bta = new BuildTimeActionBuildItem();

    bta.actionBuilder()
            .methodName("getAIJokeInDeployment")
            .assistantFunction((a, p) -> { (1)
                Assistant assistant = (Assistant) a;

                return assistant.assistBuilder()
                        .userMessage(USER_MESSAGE)
                        .variables(p)
                        .responseType(JokeResponse.class) (2)
                        .assist();
            }).build());
        buildTimeActionProducer.produce(bta);

        //...
final record JokeResponse(String joke) {}| 1 | Use assistantFunction instead of function to access the assistant context. |
| 2 | Provide a class defining your expected response structure. |
Assistant State in the UI
To conditionally render assistant UI in your Web Component, you can use the assistant state to check the state of the assistant. The state can be:
-
notAvailable: No assistant implementation (like Chappie) is present.
-
available: Assistant is available but not yet configured.
-
ready: Assistant is configured and ready to use.
To use this state in your page:
import { observeState } from 'lit-element-state'; (1)
import { assistantState } from 'assistant-state'; (2)

export class QwcExtensionPage extends observeState(LitElement) { (3)| 1 | import observeState from the LitState library. |
| 2 | import the state you are interested in, in this case assistant state. |
| 3 | Wrap the LitElement in observerState |
Now you can access the assistant state anywhere in your page, and when that state changes, it will act exactly the same as a local state - re-render the relevant parts of the page:
render() {
    if(assistantState.current.isConfigured){
        return html`<div class="assistantfeature">
                        <span> Magic happends here</span>
                    </div>`;
    }
}
Assistant themes and UI Components
To maintain visual consistency with other Dev Assistant features, use the following components and styles:
-
<qui-assistant-button>: A pre-styled pink button with a robot icon. -
<qui-assistant-warning>: A standard warning message with the text:"Quarkus assistant can make mistakes. Check responses." -
<qui-assistant-chat>: A button that deep-link to the chat screen with the current chat.`
You can also use the CSS var --quarkus-assistant anywhere you want to apply the assistant’s theme color.
Quarkus Log Participation
Extensions can contribute entries to the interactive Quarkus log menu by integrating with the Dev Assistant. This allows developers to invoke assistant-powered actions directly from the quarkus log using keyboard shortcuts.
First, add the quarkus-assistant-deployment-spi to the deployment module of your extension:
<dependency>
    <groupId>io.quarkus</groupId>
    <artifactId>quarkus-assistant-deployment-spi</artifactId>
</dependency>
Next, produce a AssistantConsoleBuildItem in a @BuildStep:
@BuildStep
AssistantConsoleBuildItem createCliAssistantEntry() {
    return AssistantConsoleBuildItem.builder()
            .description("Let assistant tell you a joke") (1)
            .key('@')                                     (2)
            .function((a) -> {
                return a.assistBuilder()
                        .userMessage("Tell a funny joke")
                        .responseType(JokeResponse.class) (3)
                        .assist();
            })
            .build();
}
//...
final record JokeResponse(String joke) {}| 1 | This is the description that appears in the Assistant section of the log menu. |
| 2 | This is the keyboard shortcut that triggers the assistant function. |
| 3 | Provide a class defining your expected response structure. |
When added, this will result in a new entry under the Assistant heading in the log shortcut menu:
== Assistant

[a] - Help with the latest exception (none)
[@] - Let assistant tell you a joke
When the user presses @, the Dev Assistant is invoked and responds in the log:
=========================================
Talking to Quarkus Assistant, please wait
..
  .

Why do programmers prefer dark mode? Because light attracts bugs!
This feature provides a simple and delightful way to offer quick-access AI actions through the Quarkus log.