Getting started with WebSockets Next
This guide explains how your Quarkus application can utilize web sockets to create interactive web applications. In this guide, we will develop a very simple chat application using web sockets to receive and send messages to the other connected users.
Prerequisites
To complete this guide, you need:
-
Roughly 15 minutes
-
An IDE
-
JDK 17+ installed with
JAVA_HOMEconfigured appropriately -
Apache Maven 3.9.16
-
Optionally the Quarkus CLI if you want to use it
-
Optionally Mandrel or GraalVM installed and configured appropriately if you want to build a native executable (or Docker if you use a native container build)
Quarkus WebSockets vs. Quarkus WebSockets Next
This guide uses the quarkus-websockets-next extension.
This extension is a new implementation of the WebSocket API that is more efficient and easier to use than the original quarkus-websockets extension. The original quarkus-websockets extension is still available and will continue to be supported.
Unlike quarkus-websockets, quarkus-web-socket-next does NOT implement Jakarta WebSocket.
Instead, it provides a simplified and more modern API that is easier to use.
It is also designed to work efficiently with Quarkus' reactive programming model and the Quarkus' networking layer.
What you’ll learn
-
How to use the
quarkus-websockets-nextextension -
How to declare a web socket endpoint
-
How to send and receive messages using web sockets
-
How to broadcast messages to all connected users
-
How to be notified of new connections and disconnections
-
How to use path parameters in web socket URLs
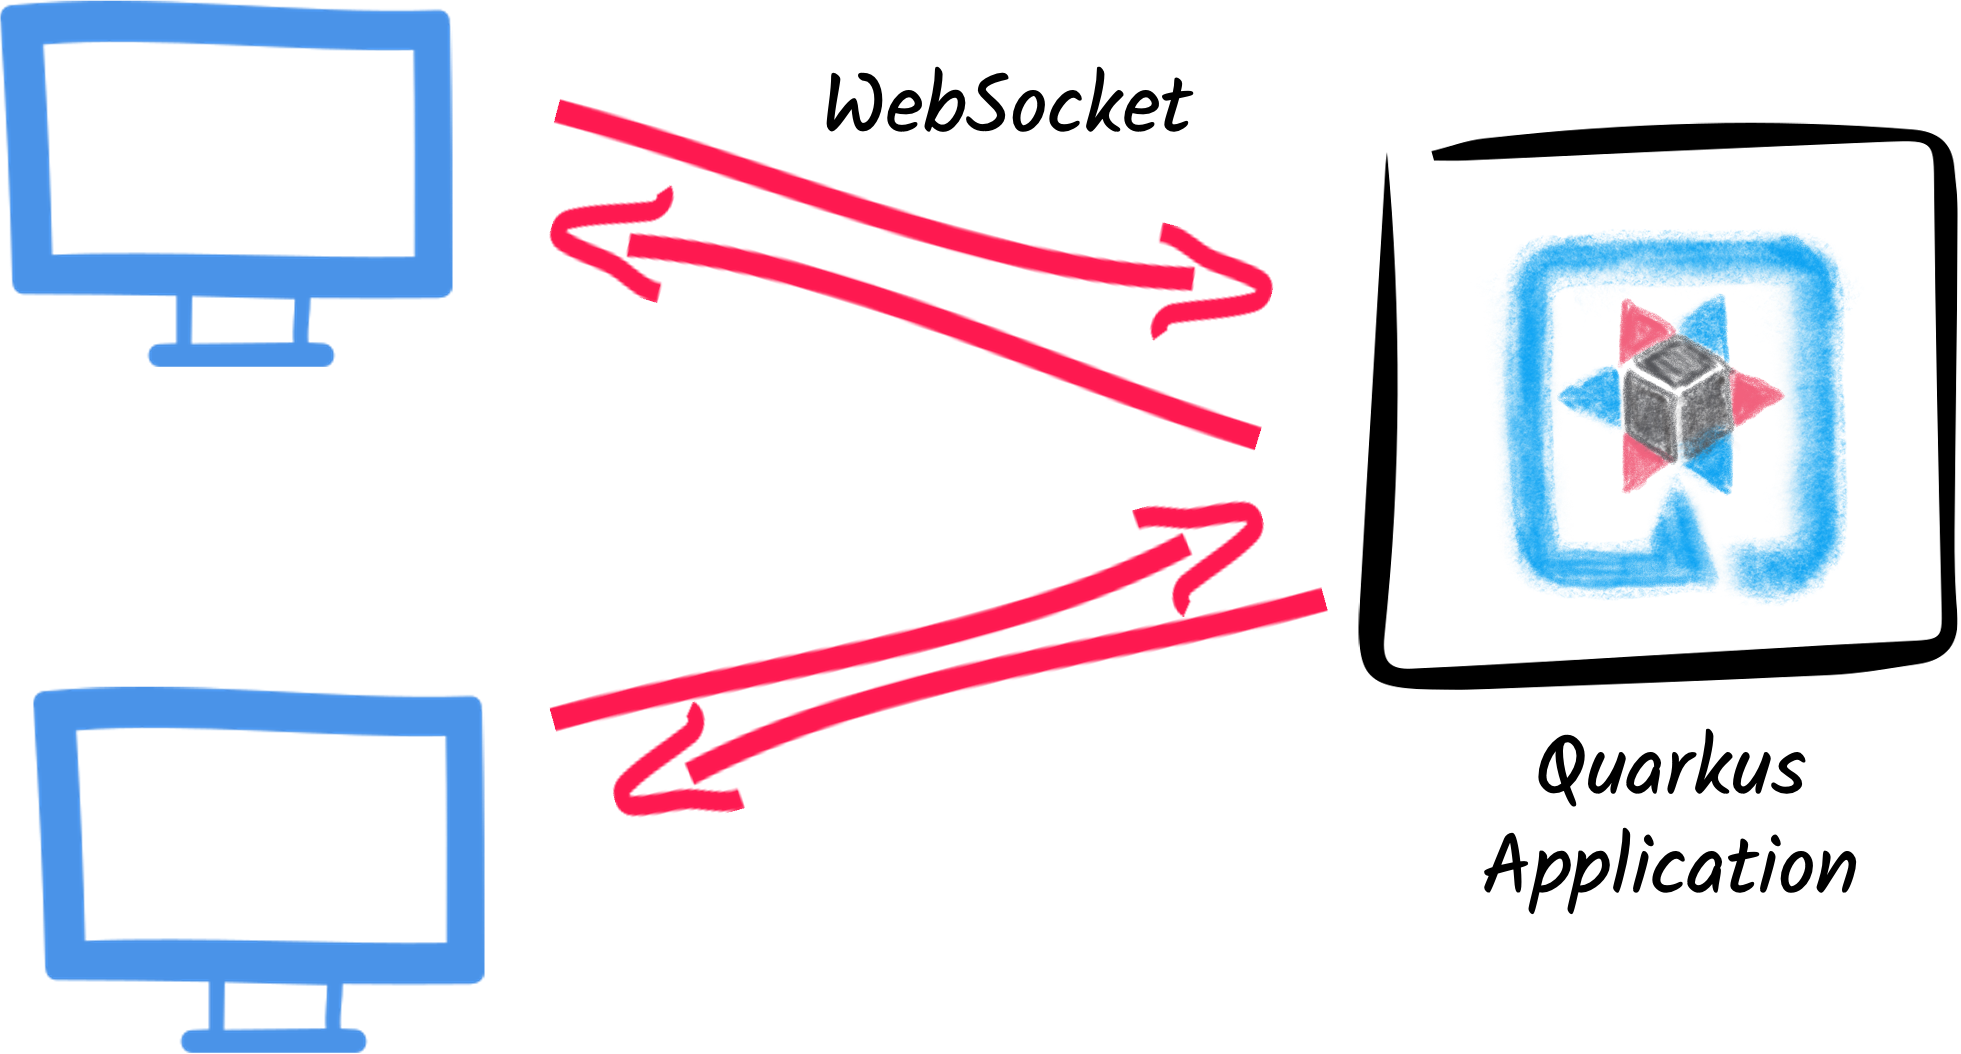
Architecture
In this guide, we create a straightforward chat application using web sockets to receive and send messages to the other connected users.
Solution
We recommend that you follow the instructions in the next sections and create the application step by step. However, you can skip right to the completed example.
Clone the Git repository: git clone https://github.com/quarkusio/quarkus-quickstarts.git, or download an archive.
The solution is located in the websockets-next-quickstart directory.
Creating the Maven project
First, we need a new project. Create a new project with the following command:
For Windows users:
-
If using cmd, (don’t use backward slash
\and put everything on the same line) -
If using Powershell, wrap
-Dparameters in double quotes e.g."-DprojectArtifactId=websockets-next-quickstart"
This command generates the project (without any classes) and imports the websockets-next extension.
If you already have your Quarkus project configured, you can add the websockets-next extension
to your project by running the following command in your project base directory:
quarkus extension add websockets-next./mvnw quarkus:add-extension -Dextensions='websockets-next'./gradlew addExtension --extensions='websockets-next'This will add the following to your build file:
<dependency>
    <groupId>io.quarkus</groupId>
    <artifactId>quarkus-websockets-next</artifactId>
</dependency>implementation("io.quarkus:quarkus-websockets-next")Declaring a WebSocket endpoint
Our application contains a single class that handles the web sockets.
Create the org.acme.websockets.ChatWebSocket class in the src/main/java directory.
Copy the following content into the created file:
package org.acme.websockets;

import io.quarkus.websockets.next.OnClose;
import io.quarkus.websockets.next.OnOpen;
import io.quarkus.websockets.next.OnTextMessage;
import io.quarkus.websockets.next.WebSocket;
import io.quarkus.websockets.next.WebSocketConnection;
import jakarta.inject.Inject;

@WebSocket(path = "/chat/{username}")  (1)
public class ChatWebSocket {

    // Declare the type of messages that can be sent and received
    public enum MessageType {USER_JOINED, USER_LEFT, CHAT_MESSAGE}
    public record ChatMessage(MessageType type, String from, String message) {
    }

    @Inject
    WebSocketConnection connection;  (2)

    @OnOpen(broadcast = true)       (3)
    public ChatMessage onOpen() {
        return new ChatMessage(MessageType.USER_JOINED, connection.pathParam("username"), null);
    }

    @OnClose                    (4)
    public void onClose() {
        ChatMessage departure = new ChatMessage(MessageType.USER_LEFT, connection.pathParam("username"), null);
        connection.broadcast().sendTextAndAwait(departure);
    }

    @OnTextMessage(broadcast = true)  (5)
    public ChatMessage onMessage(ChatMessage message) {
        return message;
    }

}| 1 | Declares the web socket endpoint and configure the path. Note that the path can contain a path parameter: username. |
| 2 | A session scoped bean that represents the connection to the client. It allows sending messages programmatically and retrieve the path parameters. |
| 3 | This method is called when a new client connects. The broadcast = true attribute indicates that the returned message should be sent to all connected clients. |
| 4 | This method is called when a client disconnects. The method uses the WebSocketConnection to broadcast a message to all remaining connected clients. |
| 5 | This method is called when a client sends a message. The broadcast = true attribute indicates that the returned message should be sent to all connected clients. Here, we just returns the received (text) message. |
As you can see, Quarkus handles the web socket lifecycle and message handling using annotations. It also serializes and deserializes messages using JSON automatically.
A slick web frontend
All chat applications need a nice UI, well, this one may not be that nice, but does the work.
Quarkus automatically serves static resources contained in the META-INF/resources directory.
Create the src/main/resources/META-INF/resources directory and copy this index.html file in it.
Run the application
Now, let’s see our application in action. Run it with:
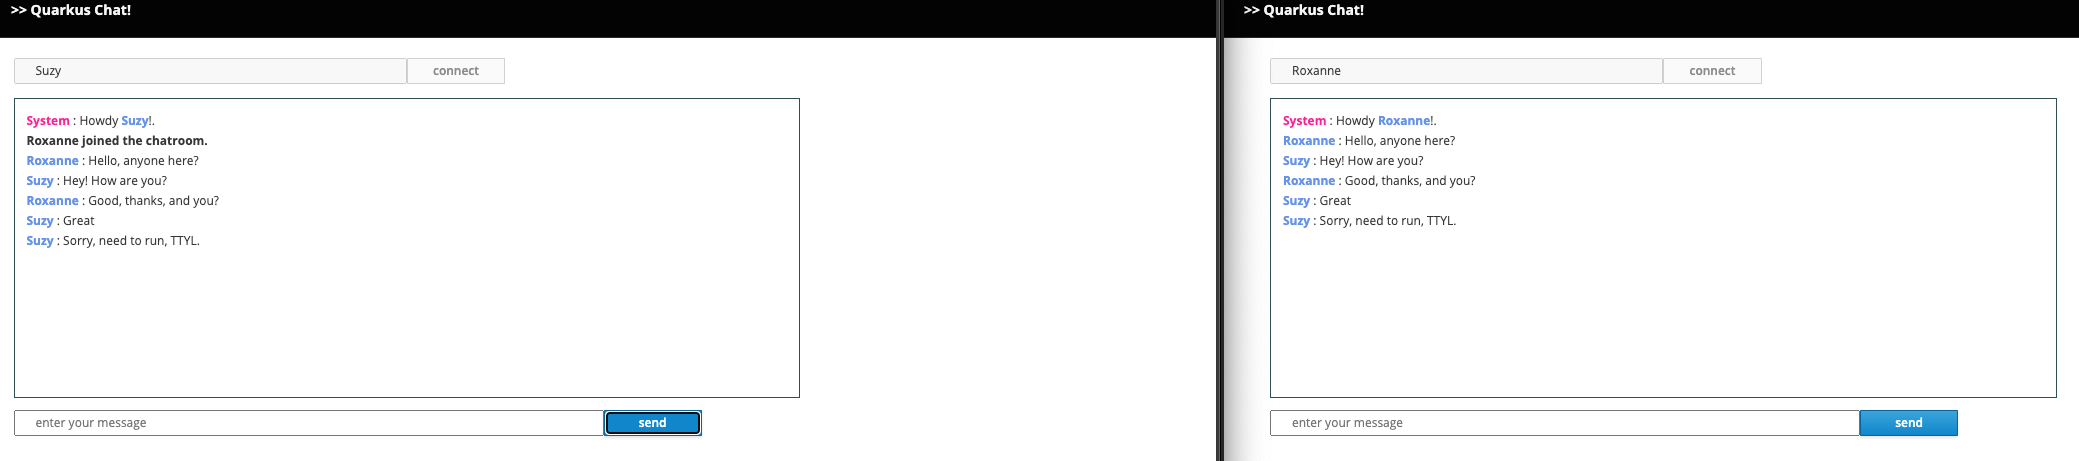
quarkus dev./mvnw quarkus:dev./gradlew --console=plain quarkusDevThen open your 2 browser windows to http://localhost:8080/:
-
Enter a name in the top text area (use 2 different names).
-
Click on connect
-
Send and receive messages
As usual, the application can be packaged using:
quarkus build./mvnw install./gradlew buildAnd executed using java -jar target/quarkus-app/quarkus-run.jar.
You can also build the native executable using:
quarkus build --native./mvnw install -Dnative./gradlew build -Dquarkus.native.enabled=trueConclusion
This short getting started guide has shown you how to create a simple chat application using the quarkus-websockets-next extension.
Learn more about this extension on the dedicated reference guide.