Adding Eyecandy to your Quarkus App with React and Patternfly

A common pattern for containerized and distributed Quarkus applications is to serve as an efficient and scalable backend for a separate frontend application. In the Kubernetes world a frontend application could be a pure web layer pod such as React, Angular or Vue.js, delegating all REST calls to these Quarkus service layer pods.
While this approach has the benefit of independent container scaling as well as an independent lifecycle it may sometimes be over engineered for small applications.
Perhaps you just want to create a small self-contained CRUD application without compromising in modern web GUI technologies? We have seen how to achieve this with Angular but what about React which at least according to GitHub stars has surpassed Angular in terms of popularity? It is all about choice and I will show you how you can not only integrate React but also use a web component framework called Patternfly. Patternfly is a collection of patterns, components and styles for creating rich, consistent and interactive GUIs.
Let’s create a Quarkus App with a REST endpoint that serves atomic particle objects to be displayed in a React/Patternfly table. The sourcecode for the final application can be found here.
Step 1 - Generate the Quarkus Project
To generate a starter project go to https://code.quarkus.io. Enter 'io.quarkus' as Maven Group and 'quarkus-react' as Artifact. In the list of extensions choose RESTEasy JAX-RS and RESTEasy JSON-B. Then generate and download the project, unzip it on your local machine and open the project folder in your favorite IDE.
Step 2 - Add the Quarkus REST Endpoint
In the Java package folder /src/main/java/io/quarkus where the sample GreetingResource.java resides, create a new bean class called Particle.java with the following content:
package io.quarkus;

public class Particle {

    private String name;

    public void setName(String name)
    {
        this.name = name;
    }

    public String getName()
    {
        return this.name;
    }

}
Now create a new REST resource class called ParticleResource.java where we return some test particles (neglecting any atomic physics implications here).
package io.quarkus;

import java.util.Collections;
import java.util.LinkedHashMap;
import java.util.Set;

import javax.ws.rs.GET;
import javax.ws.rs.Path;

@Path("/particles")
public class ParticleResource {

    @GET
    public Set<Particle> getUsers() {

        Set <Particle> particleList = Collections.newSetFromMap(Collections.synchronizedMap(new LinkedHashMap<>()));

        Particle particle = new Particle();
        particle.setName("Graviton");
        particleList.add(particle);

        Particle particle2 = new Particle();
        particle2.setName("Pentaquark");
        particleList.add(particle2);
        return particleList;
    }
}
Test if everything works by starting up Quarkus in dev mode:
$ mvn quarkus:devIn a new terminal call the endpoint to see your particle response:
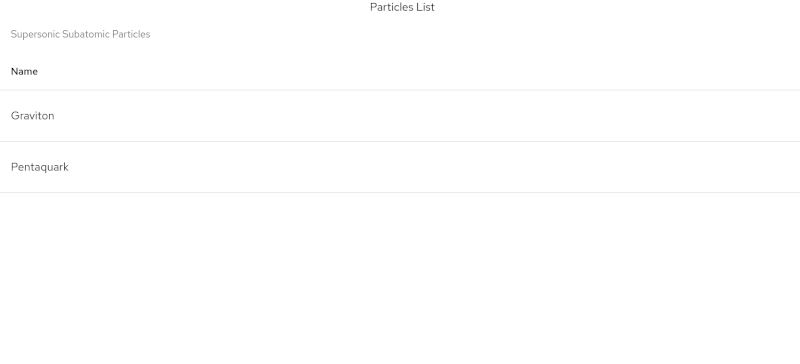
$ curl http://localhost:8080/particles

[{"name":"Graviton"},{"name":"Pentaquark"}]
Our Quarkus data layer is now ready, so let’s create the React GUI next.
Step 3 - Generate the React Project
Make sure you have installed Node.js and npm on your system. Refer to the official documentation for more information if required.
Create a new folder in your project /src/main/webapp which will be the base folder for your React project. Now open another terminal in this folder, run the React project initializer and then add the Patternfly node module:
$ npx create-react-app .
$ npm install @patternfly/patternfly --save| When starting the React app it will run on port 3000 by default. When we then try to access our Quarkus endpoint on port 8080 the browser will prevent this due to CORS security policies. In production this will not matter as the compiled static React app will be served from Quarkus over port 8080 as well but during development this is an issue. |
Fortunately React has a neat little feature called proxy which forwards all requests for unknown endpoints to another URL. In the /webapp folder open the file package.json and add the proxy line forwarding everything to our Quarkus port on 8080:
{
  "name": "webapp",
  "version": "0.1.0",
  "private": true,
  "dependencies": {
    "@testing-library/jest-dom": "^5.11.4",
    "@testing-library/react": "^11.1.0",
    "@testing-library/user-event": "^12.1.10",
    "react": "^17.0.1",
    "react-dom": "^17.0.1",
    "react-scripts": "4.0.3",
    "web-vitals": "^1.0.1"
  },
  "scripts": {
    "start": "react-scripts start",
    "build": "react-scripts build",
    "test": "react-scripts test",
    "eject": "react-scripts eject"
  },
  "proxy": "http://localhost:8080/",
  "eslintConfig": {
    "extends": [
      "react-app",
      "react-app/jest"
    ]
  },
  "browserslist": {
    "production": [
      ">0.2%",
      "not dead",
      "not op_mini all"
    ],
    "development": [
      "last 1 chrome version",
      "last 1 firefox version",
      "last 1 safari version"
    ]
  }
}
Step 4 - Create a Patternfly Table Component to Populate with our Data
Import the Patternfly CSS in the React project in /webapp/src/index.js
...
import './index.css';
import '@patternfly/patternfly/patternfly.css';
import App from './App';
...
In /webapp/src create a new folder called components, inside create a file called particles.js and generate a Patternfly table by looping over a list of particle objects:
import React from 'react'

const Particles = ({ particles }) => {
    return (
        <div>
            <center><h1>Particles List</h1></center>
            <table class="pf-c-table pf-m-grid-md" role="grid" aria-label="Supersonic Subatomic Particles" id="table-basic">
                <caption>Supersonic Subatomic Particles</caption>
                <thead>
                    <tr role="row">
                        <th role="columnheader" scope="col">Name</th>
                    </tr>
                </thead>
                {particles.map((particle) => (
                    <tbody role="rowgroup">
                        <tr role="row">
                            <td role="cell" data-label="Particle name">{particle.name}</td>
                        </tr>
                    </tbody>
                ))}
            </table>
        </div>

    )
};

export default Particles
Next adjust /webapp/src/App.js to call our Quarkus service endpoint and render our particle component with the response data:
import React, {Component} from 'react';
import Particles from './components/particles'

class App extends Component {
  state = {
    particles: []
  }

  componentDidMount() {
    fetch('/particles')
    .then(res => res.json())
    .then((data) => {
      this.setState({ particles: data })
    })
    .catch(console.log)
  }

  render () {
    return (
      <Particles particles={this.state.particles} />
    );
  }
}

export default App;
We are now ready to test our GUI in React development mode.
Make sure Quarkus is still running in another terminal.
In the /webapp folder execute :
$ npm startA browser will open to http://localhost:3000. If not navigate to that URL. You should see our table dynamically populated from your Quarkus particle backend. In the developer tools of your browser you will see that the data is actually retrieved from http://localhost:3000/particles
We are running in a double developer mode now. Any changes made to either your Java or Javascript code will be applied immediately. Isn’t that developer bliss?
But what about containerized deployment you ask? Well, once your shiny new GUI app is ready for primetime there are some last adjustments that we need to build runnable jars and images.
Step 5 - Prepare our Project for Production Build
In /webapp/package.json add a prod build phase:
...
 "eject": "react-scripts eject",
 "prod": "react-scripts build --dest && rsync -a build/* ../resources/META-INF/resources"
  },
  "proxy": "http://localhost:8080/",
...
This will do a production build of the static React assets and copy them over into the default Quarkus directory for static files.
| The rsync command is specific for Linux. For other operating systems please substitute with an equivalent command. |
For the last step we will add the excellent frontend-maven-plugin to our pom.xml that will trigger these React build phases from a normal maven build. Adjust the npm and node versions to match your locally installed ones. The maven install phase would actually install these two packages which can be handy for a CI/CD build or when starting with this project.
<build>
...
 <plugin>
  <groupId>com.github.eirslett</groupId>
  <artifactId>frontend-maven-plugin</artifactId>
  <version>1.11.2</version>
  <configuration>
    <workingDirectory>${project.basedir}/src/main/webapp</workingDirectory>
    <installDirectory>target</installDirectory>
  </configuration>
  <executions>
    <execution>
      <id>install node and npm</id>
      <goals>
        <goal>install-node-and-npm</goal>
      </goals>
      <configuration>
        <nodeVersion>v14.15.4</nodeVersion>
        <npmVersion>6.14.10</npmVersion>
      </configuration>
    </execution>
    <execution>
      <id>npm install</id>
      <goals>
        <goal>npm</goal>
      </goals>
      <configuration>
        <arguments>install</arguments>
      </configuration>
    </execution>
    <execution>
      <id>npm run build</id>
      <goals>
        <goal>npm</goal>
      </goals>
      <configuration>
        <arguments>run prod</arguments>
      </configuration>
    </execution>
  </executions>
</plugin>
</build>
Now let’s build our runnable jar:
$ mvn clean packageStop all other running environments to free up the ports and run:
$ java -jar target/quarkus-app/quarkus-run.jarOpen your browser to http://localhost:8080 to see you table again, now running from a single optimized Quarkus jar.
Take Away
There you go. With just a few easy steps you can use the power of React and Patternfly to add slick looking interactive GUIs to your Quarkus apps.
How about compiling this app to native next to deploy an extremely lightweight webapp? Or you may want to look at some of other Patternfly components to create a more sophisticated web interface. Either way there no boundaries except for your creativity to make you Quarkus apps shine.