Welcome
Let’s start from the beginning. Quarkus. What’s Quarkus? That’s a pretty good question and probably a good start. If you go to the Quarkus web site, you’ll read that Quarkus is "Supersonic Subatomic Java." This is a way of saying that Quarkus is really fast, and it’s really light. But what does Quarkus do?
In practice, Quarkus is a stack to develop distributed systems and modern applications in Java or Kotlin. Quarkus applications are tailored for the Cloud, containers, and Kubernetes. That does not mean you can’t use Quarkus in other environments, there are no limits, but the principles infused in Quarkus have made containerization of applications more efficient. In this workshop, we will explain what Quarkus is and because the best way to understand Quarkus is to use it, build a set of microservices with it. Again, Quarkus is not limited to microservices, but it’s a generally well-understood type of architecture.
This workshop offers attendees an intro-level, hands-on session with Quarkus, from the first line of code to making services, to consuming them, and finally to assembling everything in a consistent system. But, what are we going to build? Well, it’s going to be a set of microservices:
-
Using Quarkus
-
Using blocking and non-blocking HTTP invocations
-
With some parts of the dark side of microservices (resilience, health, etc)
-
Use an event-based architecture using Apache Kafka
-
Use OpenAI to introduce some artificial intelligence
-
Answer the ultimate question: are super-heroes stronger than super-villains?
This workshop is a BYOL (Bring Your Own Laptop) session, so bring your Windows, OSX, or Linux laptop. You just need JDK 17 on your machine and Docker (having Apache Maven 3.9.x installed is optional as you will rely on the Apache Maven Wrapper). On Mac and Windows, Docker for x is recommended instead of the Docker toolbox setup. On Windows it is also recommended to have WSL (Windows Subsystem for Linux) installed.
What you are going to learn:
-
What is Quarkus, and how you can use it
-
How to build an HTTP endpoint (REST API) with Quarkus
-
How to access a relational database
-
How you can use Swagger and OpenAPI
-
How you test your microservice
-
How to build a reactive microservice, including reactive data access
-
How you improve the resilience of your service
-
How to invoke OpenAI using Quarkus LangChain4j
-
How to build event-driven microservices with Kafka
-
How to build native executable
-
How to containerize our microservices
-
How to deploy the microservices to Kubernetes
-
How to use Quarkus CLI to create a command-line application to load stress our microservices
-
And much more!
Ready? Here we go! Check the workshop at http://quarkus.io/quarkus-workshops/super-heroes/ or flash the QR Code if you don’t want to type.

Presenting the Workshop
This workshop should give you a practical introduction to Quarkus. You will practice all the needed tools to develop an entire microservice architecture, mixing classical HTTP, reactive and event-based microservices. You will finish by extending the capabilities of Quarkus and learn more about the ability to create native executables.
The idea is that you leave this workshop with a good understanding of what Quarkus is, what it is not, and how it can help you in your projects. Then, you’ll be prepared to investigate a bit more and, hopefully, contribute.
|
Get this workshop from http://github.com/quarkusio/quarkus-workshops/tree/refs/heads/main/quarkus-workshop-super-heroes. |
What Will You Be Developing?
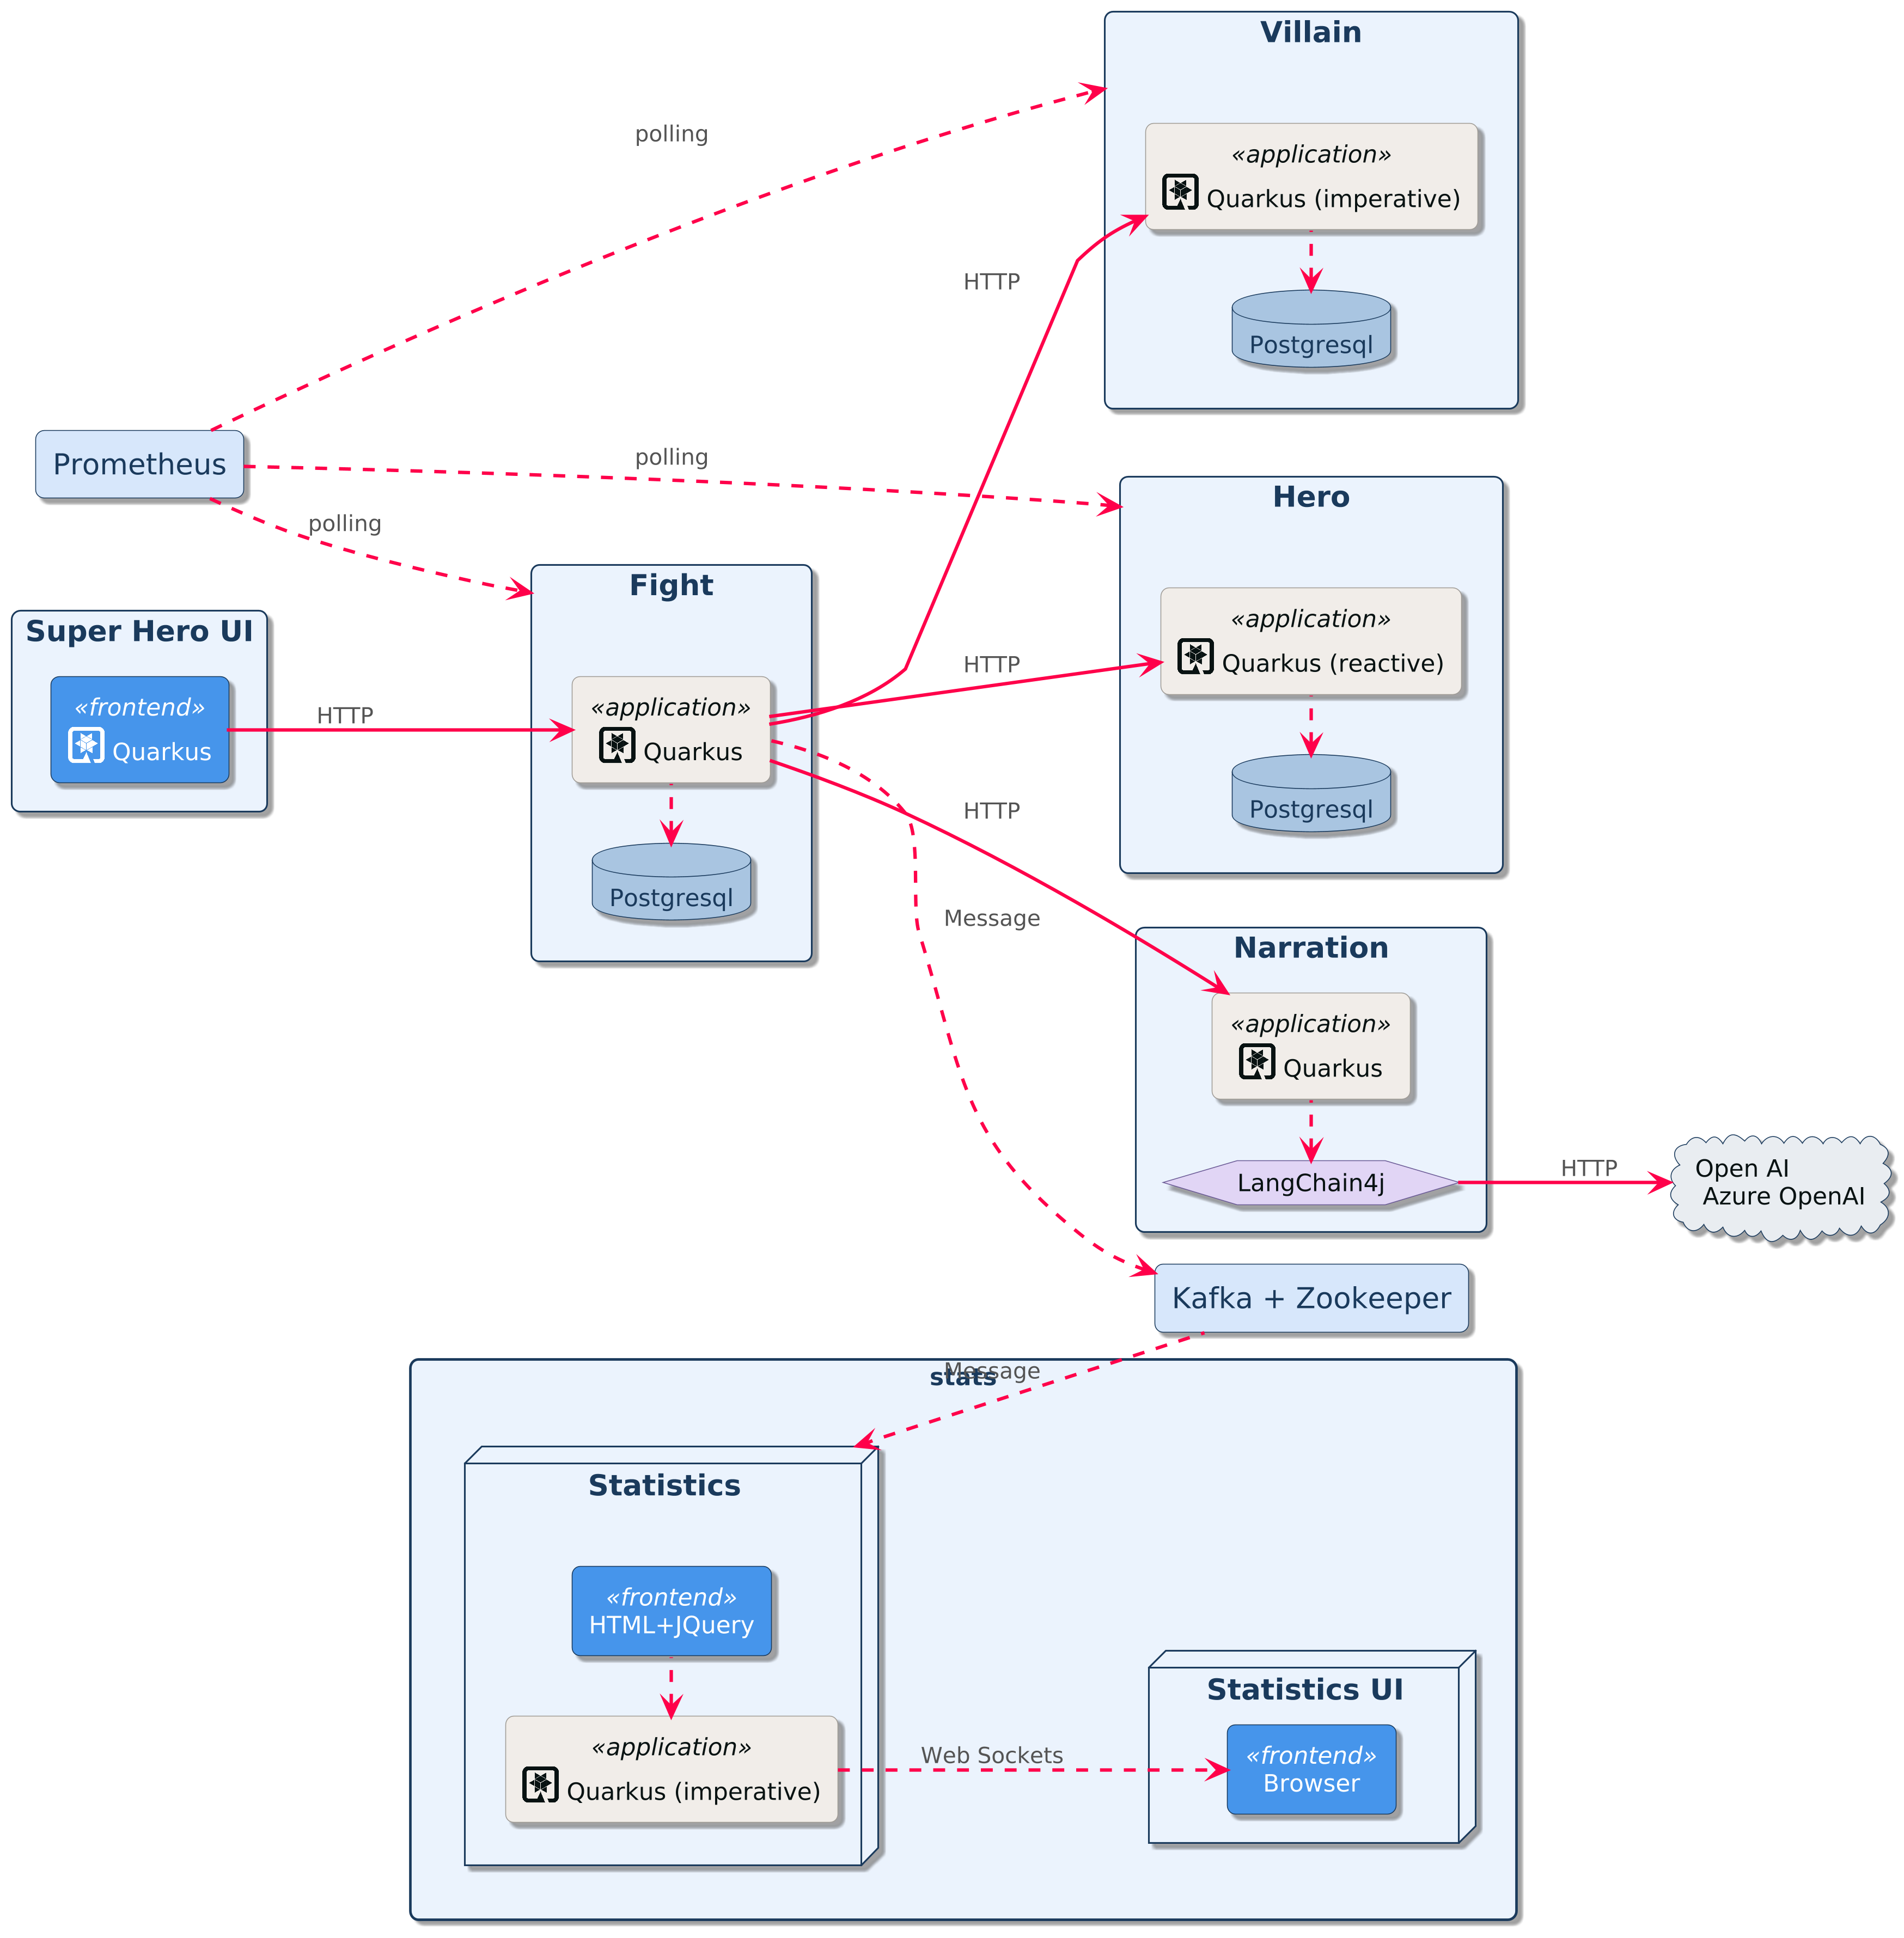
In this workshop, you will develop an application that allows superheroes to fight against supervillains. You will be developing several microservices communicating with each other:
-
Super Hero UI: a React application to pick up a random superhero, a random supervillain, and makes them fight. The Super Hero UI is exposed via Quarkus and invokes the Fight REST API
-
Villain REST API: A classical HTTP microservice exposing CRUD operations on Villains, stored in a PostgreSQL database
-
Hero REST API: A reactive HTTP microservice exposing CRUD operations on Heroes, stored in a Postgres database
-
Narration REST API: This microservice talks to OpenAI to generate a random narration of the fight using Quarkus LangChain4j.
-
Fight REST API: This REST API invokes the Hero and Villain APIs to get a random superhero and supervillain. It also invokes the Narration API to get a random narration of the fight. Each fight is, then, stored in a PostgreSQL database. This microservice can be developed using both the classical (imperative) or reactive approach. Invocations to the other microservices are protected using resilience patterns (retry, timeout, circuit-breakers)
-
Statistics: Each fight is asynchronously sent (via Kafka) to the Statistics microservice. It has an HTML + JQuery UI displaying all the statistics.
-
Command Line Interface: Quarkus can also be used to create CLI applications. You will create a CLI application that adds load to the Fight, Hero, and Villain microservices.
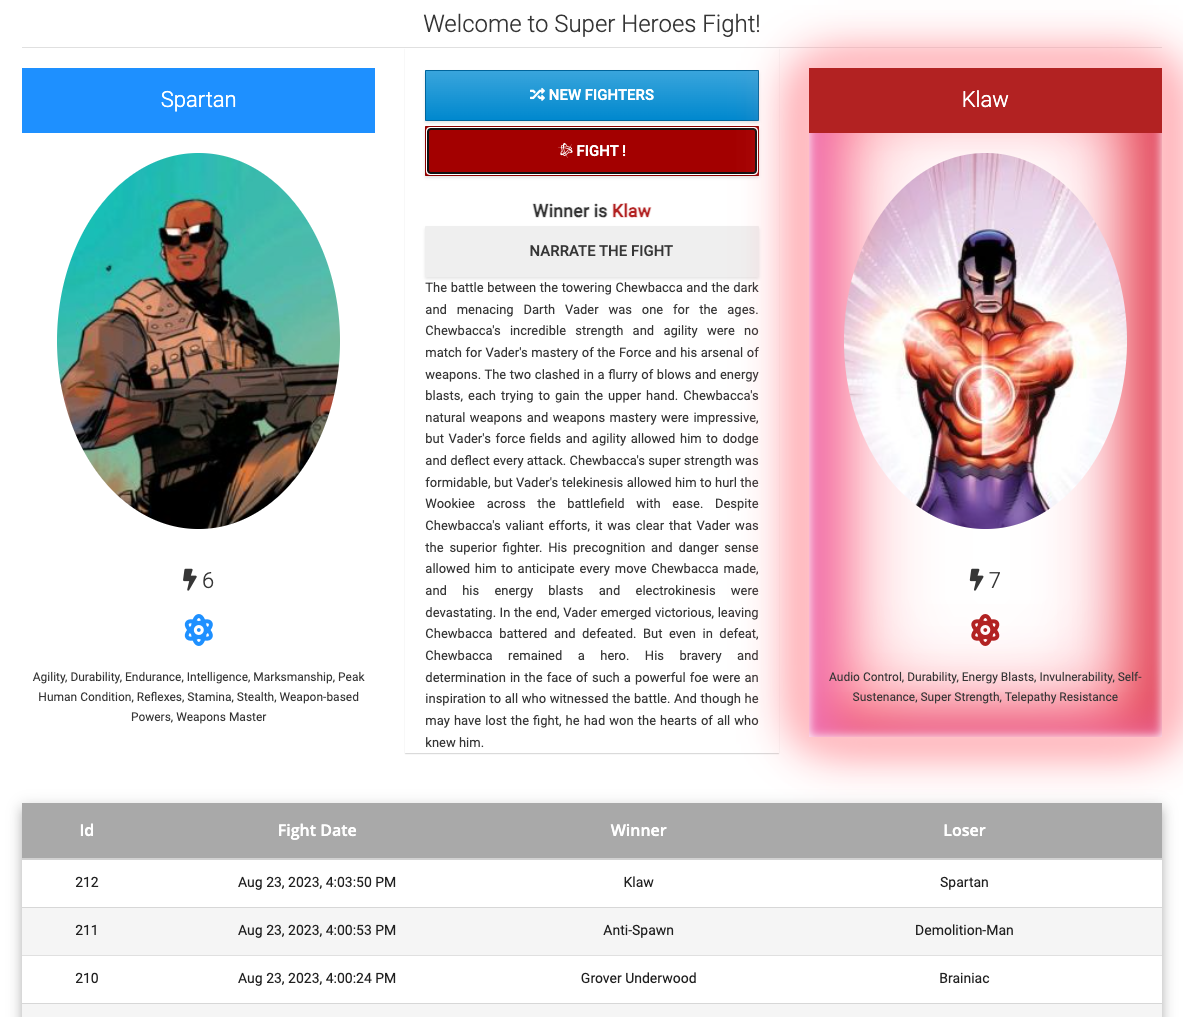
The main UI allows you to pick up one random Hero and Villain by clicking on "New Fighters." Then it’s just a matter of clicking on "Fight!" to get them to fight. If you click on "Narrate the Fight", you will have some AI-generated text describing the fight. The table at the bottom shows the list of the previous fights.
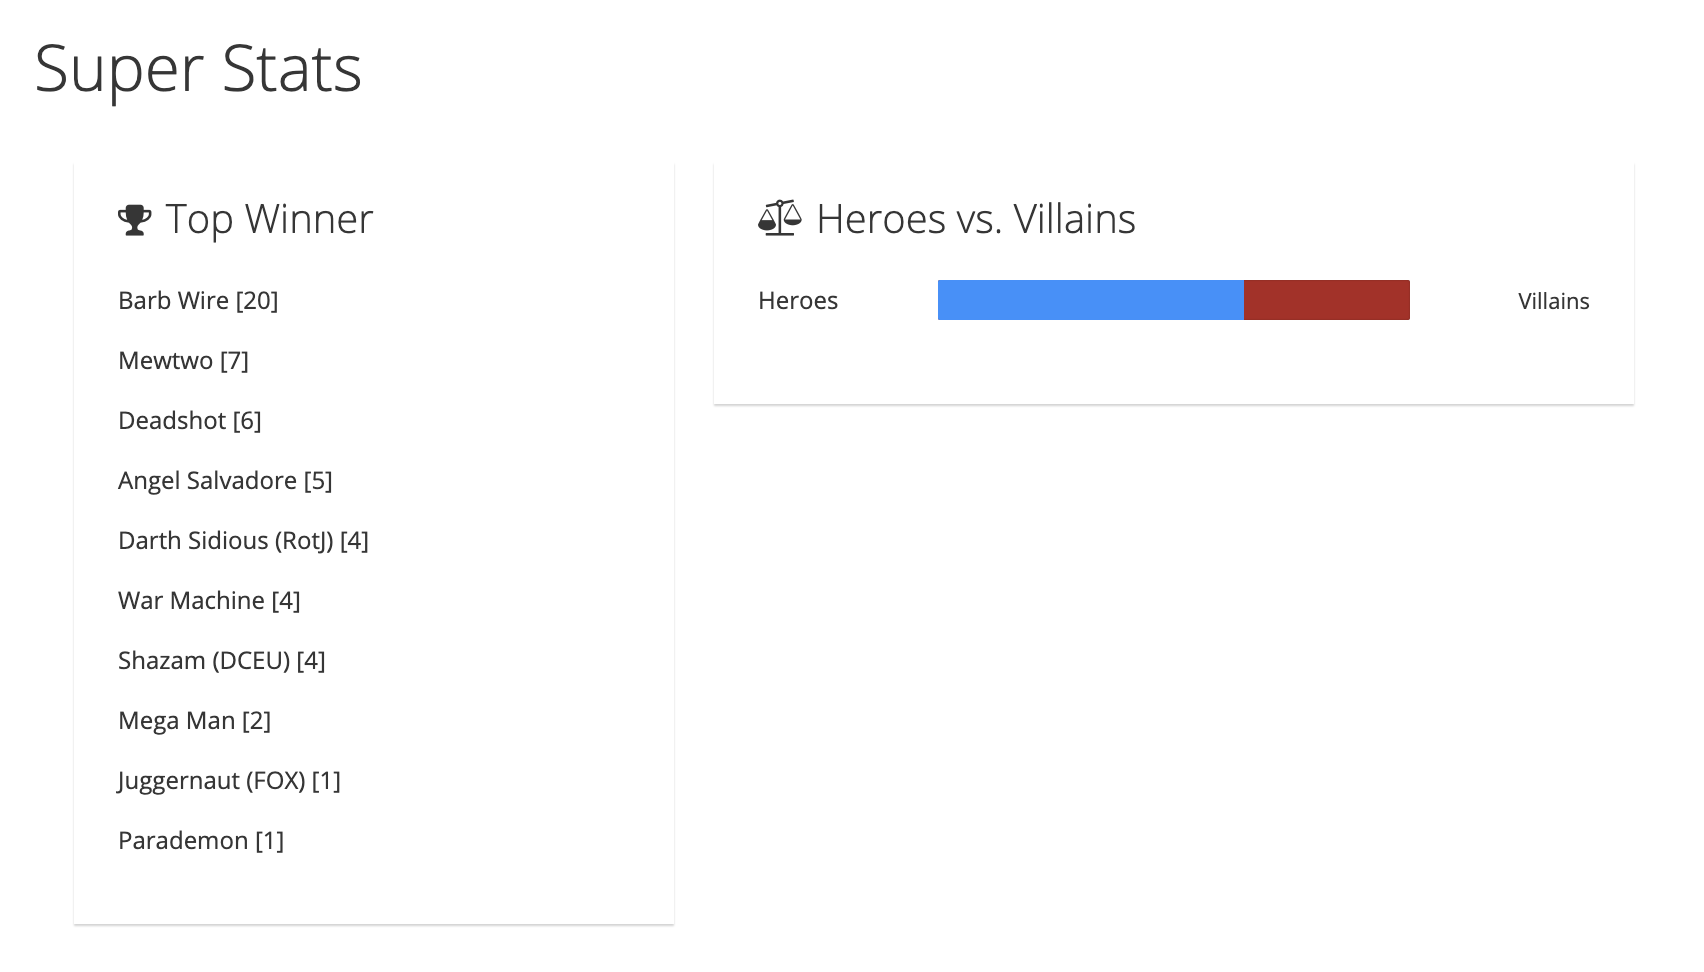
The Statistics UI shows the number of fights per hero and villain.
How Does This Workshop Work?
You have this material in your hands (either electronically or printed), and you can now follow it step by step. The structure of this workshop is as follows:
-
Installing all the needed tools: in this section, you will install all the tools and code to be able to develop, compile and execute our application
-
Developing microservices with Quarkus: in this section, you will develop a microservice architecture by creating several projects, write some Java code, add JPA entities, JAX-RS REST endpoints, write some tests, use a React web application, and all that on Quarkus
-
Artificial Intelligence: in this section, you will use Quarkus LangChain4j with OpenAI to generate a random narration of the fight
-
Event-driven and Reactive microservices: in this section, you will create a reactive microservice and an event-driven microservice using Kafka
-
Build native executables: in this section, you will build native executables of all the microservices thanks to GraalVM
-
Containers: in this section, you will create Docker images of all the microservices
-
Cloud: once the microservices are all containerize, you can deploy them to Kubernetes
-
Command Line Interface: in this section, you will create a command line application with Quarkus
If you already have the tools installed, skip the Installing all the needed tools section and jump to the section Developing with Quarkus, and start hacking some code and add-ons. This "à la carte" mode lets you make the most of this 6-hour long hands-on lab.
What Do You Have to Do?
This workshop should be as self-explanatory as possible. So your job is to follow the instructions by yourself, do what you are supposed to do, and do not hesitate to ask for any clarification or assistance; that’s why the team is here.
You will download a zip file (quarkus-super-heroes-workshop.zip) containing some of the code and you will need to complete it.
Oh, and be ready to have some fun!
Software Requirements
First of all, make sure you have a 64-bit computer with admin rights (so you can install all the needed tools) and at least 8Gb of RAM (as some tools need a few resources).
|
If you are using Mac OS X, make sure the version is greater than 10.11.x (El Capitan). |
This workshop will make use of the following software, tools, frameworks that you will need to install and know (more or less) how it works:
-
Any IDE you feel comfortable with (eg. Intellij IDEA, Eclipse IDE, VS Code..)
-
JDK 17
-
GraalVM 21
-
Docker or Podman
-
cURL (should already be installed in your OS, if not, check the appendix for installation instructions) and
jq -
An OpenAI API key
We will also be using Maven 3.9.x, but there is no need to install it.
Instead, the workshop scaffolding includes a Maven wrapper, mvnw.
If you’d prefer to install your own Maven and don’t already have it, see the instructions at the end of the workshop.
The following section focuses on how to install and set up the needed software. You can skip the next section if you have already installed all the prerequisites.
|
This workshop assumes a bash shell. If you run on Windows, in particular, adjust the commands accordingly or install WSL. |
Installing Software
JDK 17
Essential for the development and execution of this workshop is the Java Development Kit (JDK).[1]
The JDK includes several tools such as a compiler (javac), a virtual machine, a documentation generator (`JavaDoc), monitoring tools (Visual VM) and so on[2].
The code in this workshop is based on JDK 17, but any JDK version higher will work as well.
Installing the JDK
We recommend installing Java using SDKMAN!. It provides a convenient Command Line Interface (CLI) and API for installing, switching, removing and listing JDKs. It also avoids the hassle of manually setting the PATH variable.
Installing SDKMAN!
Installing SDKMAN! is easy. On Bash and ZSH shells simply open a new terminal and enter:
$ curl -s "https://get.sdkman.io" | bashFollow the instructions on-screen to complete installation.
Listing Java Versions
To install Java, we need to list the available versions on SDKMAN! using the list command.
The result is a table of entries grouped by the vendor and sorted by version:
$ sdk list java

==========================================================================
Available Java Versions for macOS ARM 64bit
==========================================================================
Vendor        | Use | Version      | Dist    | Status     | Identifier
--------------------------------------------------------------------------
Corretto      |     | 19.0.1       | amzn    |            | 19.0.1-amzn
....
Microsoft     |     | 17.0.5       | ms      |            | 17.0.5-ms
...
Oracle        |     | 19.0.1       | oracle  |            | 19.0.1-oracle
...
Temurin       | >>> | 25.0.2       | tem     | installed  | 25.0.2-tem
              | >>> | 17.0.19      | tem     | installed  | 17.0.19-tem
==========================================================================
If you have any Java candidate installed, you should see installed in the Status column.
If you don’t have any Java candidate installed, use SDKMAN! to install one or several.
Installing Java 17
There are several different vendors of Java, and each vendor has its own distribution. Most of these distributions are available on SDKMAN! and can easily be installed. Let’s install Temurin.
To install Temurin 17, we copy its identifier (17-tem), which is the version from the table, and we add it as an argument in the install command:
$ sdk install java 17.x-temChecking for Java Installation
Once the installation is complete, it is necessary to set the JAVA_HOME variable and the $JAVA_HOME/bin directory to the PATH variable.
Check that your system recognizes Java by entering java -version and the Java compiler with javac -version.
$ java -version
openjdk version "17.0.19" 2025-10-21
OpenJDK Runtime Environment Temurin-17.0.19+10 (build 17.0.19+10)
OpenJDK 64-Bit Server VM Temurin-17.0.19+10 (build 17.0.19+10, mixed mode, sharing)
openjdk 25.0.2 2026-01-20
OpenJDK Runtime Environment GraalVM CE 25.0.2+10.1 (build 25.0.2+10-jvmci-b01)
OpenJDK 64-Bit Server VM GraalVM CE 25.0.2+10.1 (build 25.0.2+10-jvmci-b01, mixed mode, sharing)

$ javac -version
javac 17.0.19
Docker or Podman
Docker is a set of utilities that use OS-level virtualization to deliver software in packages called containers. Containers are isolated from one another and bundle their software, libraries, and configuration files; they can communicate with each other through well-defined channels.
Installing Docker
Quarkus use Testcontainers, and therefore also Docker, to ease the management of different technical services (database, monitoring…) during development.
Our workshop also uses Docker to manage these services in a production-style deployment.
So for this, we need to install docker and docker compose
Installation instructions are available on the following page:
-
Mac OS X - https://docs.docker.com/docker-for-mac/install/ (version 20+)
-
Windows - https://docs.docker.com/docker-for-windows/install/ (version 20+)
-
CentOS - https://docs.docker.com/install/linux/docker-ce/centos/
-
Debian - https://docs.docker.com/install/linux/docker-ce/debian/
-
Fedora - https://docs.docker.com/install/linux/docker-ce/fedora/
-
Ubuntu - https://docs.docker.com/install/linux/docker-ce/ubuntu/
On Linux, don’t forget the post-execution steps described on https://docs.docker.com/install/linux/linux-postinstall/.
If you do not have a Docker licence, you might prefer podman (https://podman.io/) instead of docker. To install podman and podman-compose please follow the instructions at https://quarkus.io/guides/podman. Do not forget the extra steps to configure the testcontainers library. As a convenience you can even alias docker to podman.
|
Checking for Docker Installation
Once installed, check that both docker and docker compose are available in your PATH.
For that, execute the following commands:
$ docker versionYou should see something like this:
Docker version 20.10.8, build 3967b7d
Cloud integration: v1.0.24
Version:           20.10.14
API version:       1.41
Then, check the Docker Compose version:
$ docker compose versionDocker compose being a separate utility, you should get a different version than Docker itself:
Docker Compose version v2.5.0Finally, run your first container as follows:
$ docker run hello-worldFor the first time, this will download the hello-world image from the Docker Hub and run it.
You should get something like this:
Hello from Docker!
This message shows that your installation appears to be working correctly.

To generate this message, Docker took the following steps:
1. The Docker client contacted the Docker daemon.
2. The Docker daemon pulled the "hello-world" image from the Docker Hub.
(amd64)
3. The Docker daemon created a new container from that image which runs the
executable that produces the output you are currently reading.
4. The Docker daemon streamed that output to the Docker client, which sent it
to your terminal.

To try something more ambitious, you can run an Ubuntu container with:
$ docker run -it ubuntu bash

Share images, automate workflows, and more with a free Docker ID:
 https://hub.docker.com/

For more examples and ideas, visit:
 https://docs.docker.com/get-started/
Some Docker Commands
Docker is a command-line utility where you can use several parameters and options to start/stop a container.
You invoke docker with zero, one, or several command-line options with the container or image ID you want to work with.
Docker comes with several options that are described in the documentation if you need more help.[3]
To get some help on the commands and options, you can type, use the following command:
$ docker help

Usage:  docker [OPTIONS] COMMAND

$ docker help attach

Usage:  docker attach [OPTIONS] CONTAINER

Attach local standard input, output, and error streams to a running container
Here are some commands that you will be using to start/stop containers in this workshop.
-
docker container ls: Lists containers. -
docker container start CONTAINER: Starts one or more stopped containers. -
docker compose -f docker-compose.yaml up -d: Starts all containers defined in a Docker Compose file. -
docker compose -f docker-compose.yaml down: Stops all containers defined in a Docker Compose file.
jq
Very often, when using cURL to invoke a RESTful web service, we get some JSON payload. cURL does not format this JSON so that you will get a flat String such as:
curl http://localhost:8083/api/heroes
[{"id":"1","name":"Chewbacca","level":"14"},{"id":"2","name":"Wonder Woman","level":"15"},{"id":"3","name":"Anakin Skywalker","level":"8"}]
But what we want is to format the JSON payload, so it is easier to read.
For that, there is a neat utility tool called jq that we could use.
jq is a tool for processing JSON inputs, applying the given filter to its JSON text inputs, and producing the filter’s results as JSON on standard output.[4]
Installing jq
You can install it on Mac OSX with a simple brew install jq.
Checking for jq Installation
Once installed, it’s just a matter of piping the cURL output to jq like this:
curl http://localhost:8083/api/heroes | jq

[
  {
    "id": "1",
    "name": "Chewbacca",
    "lastName": "14"
  },
  {
    "id": "2",
    "name": "Wonder Woman",
    "lastName": "15"
  },
  {
    "id": "3",
    "name": "Anakin Skywalker",
    "lastName": "8"
  }
]
GraalVM 21
GraalVM extends the Java Virtual Machine (JVM) to support more languages and several execution modes.[5] It supports a large set of languages: Java of course, other JVM-based languages (such as Groovy, Kotlin etc.) but also JavaScript, Ruby, Python, R and C/C++. It includes a high-performance Java compiler, which can be used in a Just-In-Time (JIT) configuration on the HotSpot VM or in an Ahead-Of-Time (AOT) configuration with the GraalVM native compiler. One objective of GraalVM is to improve the performance of Java virtual machine-based languages to match the performance of native languages.
Prerequisites for GraalVM
On Linux, you need GCC and the Glibc and zlib headers. Examples for common distributions:
# dnf (rpm-based)
sudo dnf install gcc glibc-devel zlib-devel libstdc++-static

# Debian-based distributions:
sudo apt-get install build-essential libz-dev zlib1g-dev

# Arch Linux
sudo pacman -S freetype2 gcc glibc lib32-gcc-libs zlib
On macOS X there are several ways to install GraalVM. But using SDKMAN! is the preferred option, as it allows you to easily switch between different versions of GraalVM if needed.
xcode-select --installOn Windows, you need the Developer Command Prompt for Microsoft Visual C++. Check the Windows prerequisites page for details.
Installing GraalVM
Listing GraalVM Versions
First of all, check if you already have the GraalVM Candidates installed on your machine.
To list the available versions of GraalVM, use the SDKMAN! list java command.
The result is a table of entries grouped by the vendor and sorted by version.
GraalVM has its own group and is listed under the GraalVM vendor:
$ sdk list java

================================================================================
Available Java Versions for macOS ARM 64bit
================================================================================
 Vendor        | Use | Version      | Dist    | Status     | Identifier
--------------------------------------------------------------------------------
 GraalVM CE    |     | 25.0.2       | graalce |   | 25.0.2-graalce
               |     | 21.0.2       | graalce |   | 21.0.2-graalce
=======================================================================
If you have any GraalVM candidate installed, you should see installed in the Status column.
If you don’t have any GraalVM candidate installed, use SDKMAN! to install one or several.
Installing a GraalVM Version
There are several versions of GraalVM available for different versions of the JDK. Because we are using Java 17 in this fascicle, we will install the version of GraalVM that is compatible with Java 17. Pick one of the 21.x-graalce versions from SDKMAN!
$ sdk install java 21.x-graalceOnce installed, define the GRAALVM_HOME environment variable to point to the directory where GraalVM is installed (eg. on Mac OS X it could be ~/.sdkman/candidates/java/21.x-graalce).
|
Mac OS X - Catalina
On Mac OS X Catalina, the installation of the |
Checking for GraalVM Installation
Once installed and set up, you should be able to run the following command and get something like the following output.
$ $GRAALVM_HOME/bin/native-image --versionYou should get something like:
native-image 21.0.2 2024-01-16
GraalVM Runtime Environment GraalVM CE 21.0.2+13.1 (build 21.0.2+13-jvmci-23.1-b30)
Substrate VM GraalVM CE 21.0.2+13.1 (build 21.0.2+13, serial gc)
Rancher Desktop
|
You only need Rancher Desktop if you want to deploy the applications to a local Kubernetes instance. You can also use minikube for the latter. |
Rancher Desktop runs Kubernetes and container management on your desktop. You can choose the version of Kubernetes you want to run. You can build, push, pull, and run container images using either containerd or Moby (dockerd). The container images you build can be run by Kubernetes immediately without the need for a registry.
Installing Rancher Desktop
To install Rancher Desktop, follows the instructions. Rancher Desktop is available on MacOS, Windows and various Linux distributions.
Checking for Rancher Desktop Installation
Once installed, check that both docker and kubectl are available in your PATH:
$ docker version
Docker version 20.10.16, build aa7e414

$ kubectl version
Client Version: version.Info{Major:"1", Minor:"23", GitVersion:"v1.23.3", GitCommit:"816c97ab8cff8a1c72eccca1026f7820e93e0d25", GitTreeState:"clean", BuildDate:"2022-01-25T21:25:17Z", GoVersion:"go1.17.6", Compiler:"gc", Platform:"darwin/amd64"}
Server Version: version.Info{Major:"1", Minor:"23", GitVersion:"v1.23.3+k3s1", GitCommit:"5fb370e53e0014dc96183b8ecb2c25a61e891e76", GitTreeState:"clean", BuildDate:"2022-01-27T02:12:21Z", GoVersion:"go1.17.5", Compiler:"gc", Platform:"linux/amd64"}
Rancher Desktop installs its own docker CLI too in ~/.rd/bin
|
Finally, run your first container as follows:
$ docker run hello-world

Hello from Docker!
This message shows that your installation appears to be working correctly.

To generate this message, Docker took the following steps:
1. The Docker client contacted the Docker daemon.
2. The Docker daemon pulled the "hello-world" image from the Docker Hub.
(amd64)
3. The Docker daemon created a new container from that image which runs the
executable that produces the output you are currently reading.
4. The Docker daemon streamed that output to the Docker client, which sent it
to your terminal.

To try something more ambitious, you can run an Ubuntu container with:
$ docker run -it ubuntu bash

Share images, automate workflows, and more with a free Docker ID:
 https://hub.docker.com/

For more examples and ideas, visit:
 https://docs.docker.com/get-started/
Some Docker Commands
Docker is a command-line utility where you can use several parameters and options to start/stop a container.
You invoke docker with zero, one, or several command-line options with the container or image ID you want to work with.
Docker comes with several options that are described in the documentation if you need more help [6].
To get some help on the commands and options, you can type, use the following command:
$ docker help

Usage:  docker [OPTIONS] COMMAND

$ docker help attach

Usage:  docker attach [OPTIONS] CONTAINER

Attach local standard input, output, and error streams to a running container
Here are some commands that you will be using to start/stop containers in this workshop.
-
docker container ls: Lists containers. -
docker container start CONTAINER: Starts one or more stopped containers. -
docker compose -f docker-compose.yaml up -d: Starts all containers defined in a Docker Compose file. -
docker compose -f docker-compose.yaml down: Stops all containers defined in a Docker Compose file.
Checking for Rancher Desktop Kubernetes support
If you use Kubernetes already, make sure that kubectl uses the rancher-desktop context.
This can be done from the Rancher Desktop UI.
|
$ kubectl run hello-ngnix --image=nginx:alpine --port=80
$ kubectl port-forward pods/hello-ngnix 8080:80
If you open a browser to http://localhost:8080, you should see the "Welcome to nginx!" page.
Stop the port forwarding using CTRL+C, and delete the pod:
(CTRL+C)
$ kubectl delete pod hello-ngnix
OpenAI
OpenAI is a leading artificial intelligence research organization creating cutting-edge AI technologies. OpenAI offers a range of APIs that enable developers to integrate AI capabilities into their applications.
We will be using the GPT API to generate the text narrating the fight.
First, you need to have an OpenAI subscription and then generate an API key. To get the API key, go to OpenAI API keys and create a new API key:
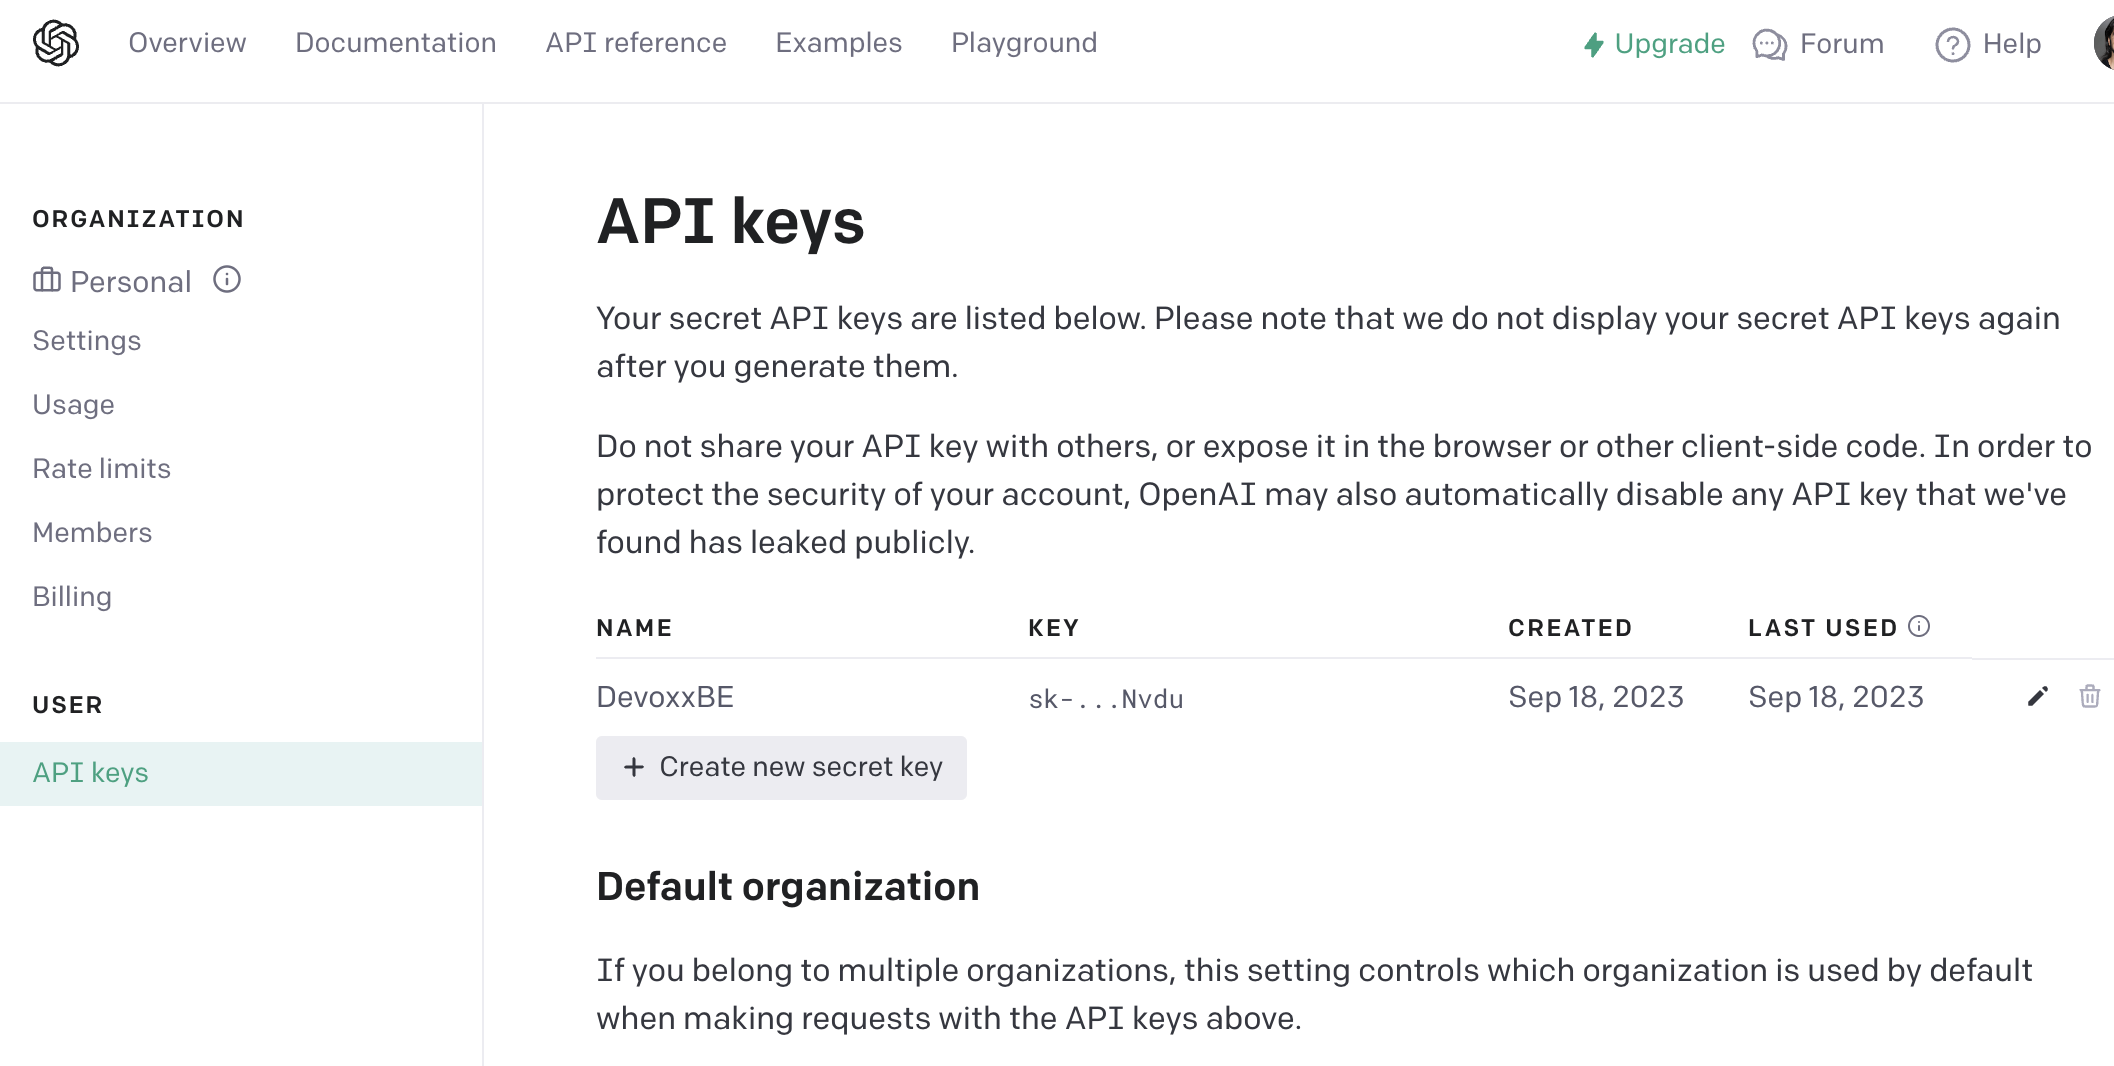
You will have to credit your OpenAI account with some money to be able to use the API.
Keep your API key handy — you will need it when configuring the Narration microservice.
WSL
Windows Subsystem for Linux (WSL) lets developers run a GNU/Linux environment — including most command-line tools, utilities, and applications — directly on Windows, unmodified, without the overhead of a traditional virtual machine or dual-boot setup.
|
If you are using Windows, it is recommended to install WSL as all the commands use bash. |
Installing WSL
You can install everything you need to run Windows Subsystem for Linux (WSL) by entering this command in an administrator PowerShell or Windows Command Prompt and then restarting your machine:
wsl --installThis command will enable the required optional components, download the latest Linux kernel, set WSL 2 as your default, and install a Linux distribution for you (Ubuntu by default).
The first time you launch a newly installed Linux distribution, a console window will open and you’ll be asked to wait for files to de-compress and be stored on your machine. All future launches should take less than a second.
Recap
Before going further, make sure the following commands work on your machine.
java -version
$GRAALVM_HOME/bin/native-image --version
curl --version
docker version
docker compose version
kubectl version # If you used Rancher Desktop and plan to use Kubernetes
We have not mentioned cURL up to now, because most modern operating systems ship with it pre-installed. If your system is missing cURL, the appendix includes instructions for installing cURL.
And also make sure to have your OpenAI or Azure credentials ready if you want to develop the "Narration" microservice.
Preparing for the Workshop
In this workshop, you will be developing an application dealing with Super Heroes (and Super-Villains 🦹) as well as Quarkus extensions. The code will be separated into two different directories:
Download the workshop scaffolding
We’ve done some of the layout for you. First, download the zip file https://raw.githubusercontent.com/quarkusio/quarkus-workshops/main/quarkus-workshop-super-heroes/dist/quarkus-super-heroes-workshop.zip, and unzip it wherever you want. This zip file contains some of the code of the workshop, along with assets you will need to complete it.
Super Heroes Application
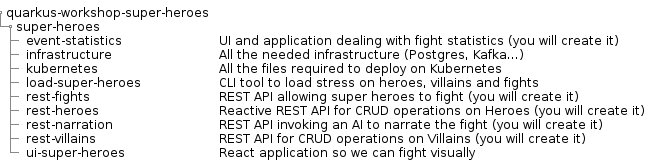
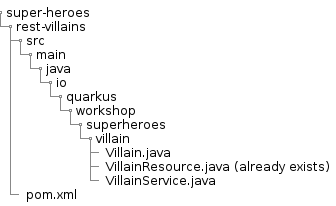
Under the super-heroes directory you will find the entire Super Hero application spread throughout a set of subdirectories, each one containing a microservice or some tooling.
The final structure will be the following (don’t worry if you don’t have all this yet, this is what we’re aiming towards):
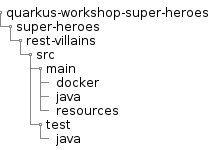
Most of these subdirectories are Maven projects and follow the Maven directory structure:
Checking Ports
During this workshop, we will use several ports.
Use lsof to make sure the following ports are free, so you don’t run into any conflicts.
lsof -i tcp:8080    # UI
lsof -i tcp:8082    # Fight REST API
lsof -i tcp:8083    # Hero REST API
lsof -i tcp:8084    # Villain REST API
lsof -i tcp:8085    # Statistics REST API
lsof -i tcp:8086    # Narration REST API
lsof -i tcp:5432    # Postgres
lsof -i tcp:2181    # Zookeeper
lsof -i tcp:9092    # Kafka
Ready?
After the prerequisites have been installed and the environment has been checked, it’s now time to write some code!
Creating a classical REST/HTTP Microservice
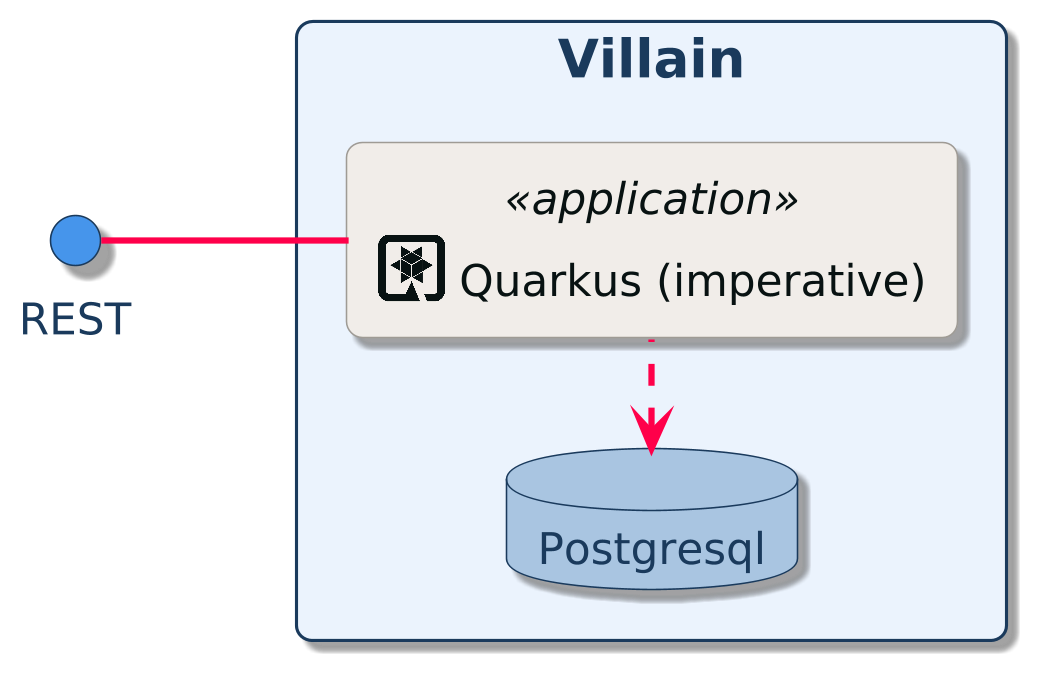
At the heart of the Super-Hero application comes Villains! You can’t have superheroes without super-villains.
We need to expose a REST API allowing CRUD operations on villains. This microservice is, let’s say, a classical REST microservice. It uses HTTP to expose a REST API and internally store data into a database. It’s using the imperative development model.
The fight microservice will use this service.
In the following sections, you learn:
-
How to create a new Quarkus application
-
How to implement REST API using JAX-RS and the Quarkus REST extension [7]
-
How to compose your application using beans
-
How to access your database using Hibernate ORM with Panache
-
How to use transactions
-
How to enable OpenAPI and Swagger-UI
| This service is exposed on the port 8084. |
But first, let’s describe our service. The Super-Villains microservice manages villains with their names, powers, and so on. The REST API allows adding, removing, listing, and picking a random villain from the stored set. Nothing outstanding but a good first step to discover Quarkus.
Villain Microservice
First thing first, we need a project. That’s what you are going to see in this section.
Bootstrapping the Villain REST Endpoint
The easiest way to create a new Quarkus project is to use the Quarkus Maven plugin.
Open a terminal and run the following command under the quarkus-workshop-super-heroes/super-heroes directory:
|
Notice that we scaffold the project with Quarkus REST ( |
Remember that mvnw is the Maven wrapper.
It behaves like mvn, but allows a project’s build dependencies to be encapsulated.
The last line selects the extension we want to use.
As a start, we only select rest-jackson, which will also import rest.
If you want your IDE to manage this new Maven project, you can declare it in the parent POM (quarkus-super-heroes/pom.xml) by adding this new module in the <modules> section:
<module>super-heroes/rest-villains</module>|
Prefer a Web UI?
Instead of the Maven command, you can use https://code.quarkus.io and select the |
Directory Structure
Once you bootstrap the project, you get the following directory structure with a few Java classes and other artifacts :

The Maven archetype generates the following rest-villains sub-directory:
-
The Maven structure with a
pom.xml -
An
io.quarkus.workshop.superheroes.villain.VillainResourceresource exposed on/api/villains -
An associated unit test
VillainResourceTest -
The landing page
index.htmlthat is accessible on http://localhost:8080 after starting the application -
Example
Dockerfilefiles for both native and JVM modes insrc/main/docker -
The
application.propertiesconfiguration file
Once generated, look at the pom.xml.
You will find the import of the Quarkus BOM, allowing you to omit the version on the different Quarkus dependencies.
In addition, you can see the quarkus-maven-plugin responsible for the packaging of the application and providing the development mode.
<project>
  <!-- ... -->
  <properties>
    <compiler-plugin.version>3.15.0</compiler-plugin.version>
    <maven.compiler.release>17</maven.compiler.release>
    <project.build.sourceEncoding>UTF-8</project.build.sourceEncoding>
    <project.reporting.outputEncoding>UTF-8</project.reporting.outputEncoding>
    <quarkus.platform.artifact-id>quarkus-bom</quarkus.platform.artifact-id>
    <quarkus.platform.group-id>io.quarkus</quarkus.platform.group-id>
    <quarkus.platform.version>3.33.2</quarkus.platform.version>
    <skipITs>true</skipITs>
    <surefire-plugin.version>3.5.4</surefire-plugin.version>
  </properties>
  <!-- ... -->
  <dependencyManagement>
    <dependencies>
      <dependency>
        <groupId>${quarkus.platform.group-id}</groupId>
        <artifactId>${quarkus.platform.artifact-id}</artifactId>
        <version>${quarkus.platform.version}</version>
        <type>pom</type>
        <scope>import</scope>
      </dependency>
    </dependencies>
  </dependencyManagement>
  <!-- ... -->
  <build>
    <plugins>
      <plugin>
        <groupId>${quarkus.platform.group-id}</groupId>
        <artifactId>quarkus-maven-plugin</artifactId>
        <version>${quarkus.platform.version}</version>
        <extensions>true</extensions>
        <executions>
          <execution>
            <goals>
              <goal>build</goal>
              <goal>generate-code</goal>
              <goal>generate-code-tests</goal>
            </goals>
          </execution>
        </executions>
      </plugin>
     <!-- ... -->
    </plugins>
  </build>
<!-- ... -->
</project>
If we focus on the dependencies section, you can see the extensions allowing the development of REST applications (rest and rest-jackson)
<dependencies>
    <dependency>
      <groupId>io.quarkus</groupId>
      <artifactId>quarkus-arc</artifactId>
    </dependency>
    <dependency>
      <groupId>io.quarkus</groupId>
      <artifactId>quarkus-rest</artifactId>
    </dependency>
    <dependency>
      <groupId>io.quarkus</groupId>
      <artifactId>quarkus-rest-jackson</artifactId>
    </dependency>
    <!-- ... -->
</dependencies>-
quarkus-arcis the dependency injection framework integrated into Quarkus. It’s designed to perform build-time injections. We will see later why this is essential for Quarkus. -
quarkus-restis the framework we will use to implement our REST API. It uses JAX-RS annotations such as@Path,@GET… -
quarkus-rest-jacksonadds JSON object mapping capabilities to Quarkus REST.
The Villain Resource
During the project creation, the VillainResource.java file has been created with the following content:
package io.quarkus.workshop.superheroes.villain;

import jakarta.ws.rs.GET;
import jakarta.ws.rs.Path;
import jakarta.ws.rs.Produces;
import jakarta.ws.rs.core.MediaType;

@Path("/api/villains")
public class VillainResource {

    @GET
    @Produces(MediaType.TEXT_PLAIN)
    public String hello() {
        return "Hello from Quarkus REST";
    }
}
It’s a very simple REST endpoint returning a "Hello World" to requests on /api/villains.
It uses JAX-RS annotations:
-
@Pathindicates the HTTP path handled by the resource, -
@GETindicates that the method should be called when receiving aGETrequest on/api/villains.
Methods can also have their own @Path annotation suffixed to the class one (if any).
|
Running the Application
Now we are ready to run our application.
Use: ./mvnw quarkus:dev in the rest-villains directory:
Then check that the endpoint returns hello as expected:
curl http://localhost:8080/api/villainsYou should see the following
Hello from Quarkus RESTAlternatively, you can open http://localhost:8080/api/villains in your browser.
Development Mode
quarkus:dev runs Quarkus in development mode.
It enables hot deployment with background compilation, which means that when you modify your Java files or your resource files and invoke a REST endpoint (i.e., cURL command or refresh your browser), these changes will automatically take effect.
It works too for resource files like the configuration property and HTML files.
Refreshing the browser triggers a scan of the workspace, and if any changes are detected, the Java files are recompiled and the application is redeployed; your request is then serviced by the redeployed application.
If there are any issues with compilation or deployment an error page will let you know.
The development mode also allows debugging and listens for a debugger on port 5005.
If you want to wait for the debugger to attach before running, you can pass -Dsuspend=true on the command line.
If you don’t want the debugger at all, you can use -Ddebug=false.
Alright, time to change some code.
Open your favorite IDE and import the project.
To check that the hot reload is working, update the VillainResource.hello() method by returning the String "Hello Villain Resource".
Now, execute the cURL command again:
curl http://localhost:8080/api/villainsThe output has changed ("Hello Villain Resource") without you having to stop and restart Quarkus!
Testing the Application
All right, so far, so good, but wouldn’t it be better with a few tests, just in case.
In the generated pom.xml file, you can see two test dependencies:
<dependencies>
    <!-- ... -->
    <dependency>
        <groupId>io.quarkus</groupId>
        <artifactId>quarkus-junit</artifactId>
        <scope>test</scope>
    </dependency>
    <dependency>
        <groupId>io.rest-assured</groupId>
        <artifactId>rest-assured</artifactId>
        <scope>test</scope>
    </dependency>
</dependencies>
So, we will use Junit 5 combined with RESTAssured, which eases the testing of REST applications.
If you look at the maven-surefire-plugin configuration in the pom.xml, you will see that we set the java.util.logging system property to ensure tests will use the correct method log manager.
<plugin>
    <artifactId>maven-surefire-plugin</artifactId>
    <version>${surefire-plugin.version}</version>
    <configuration>
      <systemPropertyVariables>
        <java.util.logging.manager>org.jboss.logmanager.LogManager</java.util.logging.manager>
        <maven.home>${maven.home}</maven.home>
      </systemPropertyVariables>
    </configuration>
</plugin>
The generated project contains a simple test in VillainResourceTest.java.
package io.quarkus.workshop.superheroes.villain;

import io.quarkus.test.junit.QuarkusTest;
import org.junit.jupiter.api.Test;

import static io.restassured.RestAssured.given;
import static org.hamcrest.CoreMatchers.is;

@QuarkusTest
public class VillainResourceTest {

    @Test
    public void testHelloEndpoint() {
        given()
          .when().get("/api/villains")
          .then()
             .statusCode(200)
             .body(is("Hello from Quarkus REST"));
    }

}
By using the QuarkusTest runner, the VillainResourceTest class instructs JUnit to start the application before the tests.
Then, the testHelloEndpoint method checks the HTTP response status code and content.
Notice that these tests use RestAssured, but feel free to use your favorite library.[8]
|
Quarkus provides a RestAssured integration that updates the default port used by RestAssured before the tests are run.
So in your RestAssured tests, you don’t have to specify the default test port 8081 used by Quarkus.
You can also configure the ports used by tests by configuring the |
In the terminal running the application in dev mode (./mvnw quarkus:dev), you should see at the bottom:
Tests paused
Press [r] to resume testing, [o] Toggle test output, [:] for the terminal, [h] for more options>
Hit the r key, and watch Quarkus execute your tests automatically and even continuously.
Unfortunately, this first run didn’t end well:
2022-11-15 14:13:17,924 ERROR [io.qua.test] (Test runner thread) ==================== TEST REPORT #1 ====================
2022-11-15 14:13:17,925 ERROR [io.qua.test] (Test runner thread) Test VillainResourceTest#testHelloEndpoint() failed
: java.lang.AssertionError: 1 expectation failed.
Response body doesn't match expectation.
Expected: is "Hello from Quarkus REST"
  Actual: Hello Villain Resource

        at io.restassured.internal.ValidatableResponseImpl.body(ValidatableResponseImpl.groovy)
        at io.quarkus.workshop.superheroes.villain.VillainResourceTest.testHelloEndpoint(VillainResourceTest.java:18)


2022-11-15 14:13:17,927 ERROR [io.qua.test] (Test runner thread) >>>>>>>>>>>>>>>>>>>> Summary: <<<<<<<<<<<<<<<<<<<<
io.quarkus.workshop.superheroes.villain.VillainResourceTest#testHelloEndpoint(VillainResourceTest.java:18) VillainResourceTest#testHelloEndpoint() 1 expectation failed.
Response body doesn't match expectation.
Expected: is "Hello from Quarkus REST"
  Actual: Hello Villain Resource

2022-11-15 14:13:17,929 ERROR [io.qua.test] (Test runner thread) >>>>>>>>>>>>>>>>>>>> 1 TEST FAILED <<<<<<<<<<<<<<<<<<<<

2022-11-15 14:13:18,155 ERROR [io.qua.test] (Test runner thread) ==================== TEST REPORT #2 ====================
2022-11-15 14:13:18,155 ERROR [io.qua.test] (Test runner thread) Test VillainResourceTest#testHelloEndpoint() failed
: java.lang.AssertionError: 1 expectation failed.
Response body doesn't match expectation.
Expected: is "Hello from Quarkus REST"
  Actual: Hello Villain Resource

        at io.restassured.internal.ValidatableResponseImpl.body(ValidatableResponseImpl.groovy)
        at io.quarkus.workshop.superheroes.villain.VillainResourceTest.testHelloEndpoint(VillainResourceTest.java:18)


2022-11-15 14:13:18,156 ERROR [io.qua.test] (Test runner thread) >>>>>>>>>>>>>>>>>>>> Summary: <<<<<<<<<<<<<<<<<<<<
io.quarkus.workshop.superheroes.villain.VillainResourceTest#testHelloEndpoint(VillainResourceTest.java:18) VillainResourceTest#testHelloEndpoint() 1 expectation failed.
Response body doesn't match expectation.
Expected: is "Hello from Quarkus REST"
  Actual: Hello Villain Resource

2022-11-15 14:13:18,157 ERROR [io.qua.test] (Test runner thread) >>>>>>>>>>>>>>>>>>>> 1 TEST FAILED <<<<<<<<<<<<<<<<<<<<
It fails! It’s expected, you changed the output of VillainResource.hello() earlier.
Adjust the test body condition accordingly:
package io.quarkus.workshop.superheroes.villain;

import io.quarkus.test.junit.QuarkusTest;
import org.junit.jupiter.api.Test;

import static io.restassured.RestAssured.given;
import static org.hamcrest.CoreMatchers.is;

@QuarkusTest
public class VillainResourceTest {

    @Test
    public void testHelloEndpoint() {
        given()
          .when().get("/api/villains")
          .then()
             .statusCode(200)
             .body(is("Hello Villain Resource"));
    }

}
Save the file, and watch the dev mode automatically rerunning your test (and passing)
--
2022-11-15 14:15:22,997 INFO  [io.qua.test] (Test runner thread) All tests are now passing
--
All 1 test is passing (0 skipped), 1 test was run in 186ms. Tests completed at 14:15:23.
Press [r] to re-run, [o] Toggle test output, [:] for the terminal, [h] for more options>
Continuous testing is a big part of Quarkus development. Quarkus detects and runs the tests for you.
You can also run the tests from a terminal using:
Packaging and Running the Application
|
Before running the application, don’t forget to stop the hot reload mode (hit CTRL+C), or you will have a port conflict. |
|
Troubleshooting
You might come across the following error while developing: If this is the case, it’s just a matter of adding the node name of your machine to the /etc/hosts. For that, first, get the name of your node with the following command: Then |
In another terminal, check that the application runs using:
curl http://localhost:8080/api/villains
Hello Villain Resource
Transactions and ORM
The Villain API’s role is to allow CRUD operations on Super Villains. In this module we will create a Villain entity and persist/update/delete/retrieve it from a PostgreSQL database in a transactional way.
This microservice uses an imperative/classic execution model. Interactions with the database will uses Hibernate ORM and will block until the responses from the database are retrieved.
Directory Structure
In this module we will add extra classes to the Villain API project. You will end-up with the following directory structure:
Installing the PostgreSQL Dependency, Hibernate with Panache and Hibernate Validator
This microservice:
-
Interacts with a PostgreSQL database - so it needs a driver
-
Uses Hibernate with Panache - needs the extension providing it
-
Validates payloads and entities - needs a validator
-
Consumes and produces JSON - needs a JSON mapper
Hibernate ORM is the de-facto JPA implementation and offers you the full breadth of an Object Relational Mapper. It makes complex mappings possible, but it does not make simple and common mappings trivial. Hibernate ORM with Panache focuses on making your entities trivial and fun to write in Quarkus.[9]
Because JPA and Bean Validation work well together, we will use Bean Validation to constrain our business model.
To add the required dependencies, just run the following command under the super-heroes/rest-villains directory:
./mvnw quarkus:add-extension -Dextensions="jdbc-postgresql,hibernate-orm-panache,hibernate-validator"
No need to add an extension for JSON, we already included rest-jackson.
|
This will add the following dependencies in the pom.xml file:
<dependencies>
    <!-- ... -->
    <dependency>
      <groupId>io.quarkus</groupId>
      <artifactId>quarkus-hibernate-orm-panache</artifactId>
    </dependency>
    <dependency>
      <groupId>io.quarkus</groupId>
      <artifactId>quarkus-hibernate-validator</artifactId>
    </dependency>
    <dependency>
      <groupId>io.quarkus</groupId>
      <artifactId>quarkus-jdbc-postgresql</artifactId>
    </dependency>
    <!-- ... -->
</dependencies>
From now on, you can choose to either edit your pom directly or use the quarkus:add-extension command.
Villain Entity
To define a Panache entity, simply extend PanacheEntity, annotate it with @Entity and add your columns as public fields (no need to have getters and setters).
The Villain entity should look like this:
package io.quarkus.workshop.superheroes.villain;

import io.quarkus.hibernate.orm.panache.PanacheEntity;

import jakarta.persistence.Column;
import jakarta.persistence.Entity;
import jakarta.validation.constraints.Min;
import jakarta.validation.constraints.NotNull;
import jakarta.validation.constraints.Size;

import java.util.Random;

@Entity
public class Villain extends PanacheEntity {

    @NotNull
    @Size(min = 3, max = 50)
    public String name;

    public String otherName;

    @NotNull
    @Min(1)
    public int level;

    public String picture;

    @Column(columnDefinition = "TEXT")
    public String powers;


    @Override
    public String toString() {
        return "Villain{" +
            "id=" + id +
            ", name='" + name + '\'' +
            ", otherName='" + otherName + '\'' +
            ", level=" + level +
            ", picture='" + picture + '\'' +
            ", powers='" + powers + '\'' +
            '}';
    }
}
Notice that you can put all your JPA column annotations and Bean Validation constraint annotations on the public fields.
Adding Operations
Thanks to Panache, once you have written the Villain entity, here are the most common operations you will be able to do:
// creating a villain
Villain villain = new Villain();
villain.name = "Lex Luthor";
villain.level = 9;

// persist it
villain.persist();

// getting a list of all Villain entities
List<Villain> villains = Villain.listAll();

// finding a specific villain by ID
villain = Villain.findById(id);

// counting all villains
long countAll = Villain.count();
But we are missing a business method: we need to return a random villain.
For that it’s just a matter to add the following method to our Villain.java entity:
public static Villain findRandom() {
    long countVillains = count();
    Random random = new Random();
    int randomVillain = random.nextInt((int) countVillains);
    return findAll().page(randomVillain, 1).firstResult();
}|
You would need to add the following import statement if not done automatically by your IDE |
Picking a random villain is achieved as follows:
-
Gets the number of villains stored in the database (
count()) -
Picks a random number between 0 and
count() -
Asks Hibernate with Panache to find all villains in a paginated way and return the random page containing 1 villain.
Configuring Hibernate
Quarkus development mode is really useful for applications that mix front end or services and database access.
We use quarkus.hibernate-orm.schema-management.strategy=drop-and-create in conjunction with import.sql so every change to your app and in particular to your entities, the database schema will be properly recreated and your data (stored in import.sql) will be used to repopulate it from scratch.
This is best to perfectly control your environment and works magic with Quarkus live reload mode:
your entity changes or any change to your import.sql is immediately picked up and the schema updated without restarting the application!
For that, make sure to have the following configuration in your application.properties (located in src/main/resources):
# drop and create the database at startup (use `update` to only update the schema)
quarkus.hibernate-orm.schema-management.strategy=drop-and-create
Villain Service
To manipulate the Villain entity we will develop a transactional VillainService class.
The idea is to wrap methods modifying the database (e.g. entity.persist()) within a transaction.
Marking a CDI bean method @Transactional will do that for you and make that method a transaction boundary.
@Transactional can be used to control transaction boundaries on any bean at the method level or at the class level to ensure every method is transactional.
You can control whether and how the transaction is started with parameters on @Transactional:
-
@Transactional(REQUIRED)(default): starts a transaction if none was started, stays with the existing one otherwise. -
@Transactional(REQUIRES_NEW): starts a transaction if none was started ; if an existing one was started, suspends it and starts a new one for the boundary of that method. -
@Transactional(MANDATORY): fails if no transaction was started ; works within the existing transaction otherwise. -
@Transactional(SUPPORTS): if a transaction was started, joins it ; otherwise works with no transaction. -
@Transactional(NOT_SUPPORTED): if a transaction was started, suspends it and works with no transaction for the boundary of the method ; otherwise works with no transaction. -
@Transactional(NEVER): if a transaction was started, raises an exception ; otherwise works with no transaction.
Creates a new VillainService.java file in the same package with the following content:
package io.quarkus.workshop.superheroes.villain;

import static jakarta.transaction.Transactional.TxType.REQUIRED;
import static jakarta.transaction.Transactional.TxType.SUPPORTS;

import java.util.List;

import jakarta.enterprise.context.ApplicationScoped;
import jakarta.transaction.Transactional;
import jakarta.validation.Valid;
import org.eclipse.microprofile.config.inject.ConfigProperty;

@ApplicationScoped
@Transactional(REQUIRED)
public class VillainService {


    @Transactional(SUPPORTS)
    public List<Villain> findAllVillains() {
        return Villain.listAll();
    }

    @Transactional(SUPPORTS)
    public Villain findVillainById(Long id) {
        return Villain.findById(id);
    }

    @Transactional(SUPPORTS)
    public Villain findRandomVillain() {
        Villain randomVillain = null;
        while (randomVillain == null) {
            randomVillain = Villain.findRandom();
        }
        return randomVillain;
    }

    public Villain persistVillain(@Valid Villain villain) {
        villain.persist();
        return villain;
    }

    public Villain updateVillain(@Valid Villain villain) {
        Villain entity = Villain.findById(villain.id);
        entity.name = villain.name;
        entity.otherName = villain.otherName;
        entity.level = villain.level;
        entity.picture = villain.picture;
        entity.powers = villain.powers;
        return entity;
    }

    public void deleteVillain(Long id) {
        Villain.deleteById(id);
    }
}
The @ApplicationScoped annotation declares a bean.
The other component of the application can access this bean.
Arc, the dependency injection framework integrated in Quarkus, handles the creation and the access to this class.
Notice that both methods that persist and update a villain, pass a Villain object as a parameter.
Thanks to the Bean Validation’s @Valid annotation, the Villain object will be checked to see if it’s valid or not.
If it’s not, the transaction will be rolled back.
Accessing a database in dev mode
Our project now requires a connection to a PostgreSQL database. In dev mode, no need to start a database or configure anything. Quarkus does that for us (just make sure you have Docker up and running).
Start the application in dev mode with
./mvnw quarkus:dev.
In the log, you will see the following:
2021-09-21 15:58:44,640 INFO  [org.tes.doc.DockerClientProviderStrategy] (build-38) Loaded org.testcontainers.dockerclient.UnixSocketClientProviderStrategy from ~/.testcontainers.properties, will try it first
2021-09-21 15:58:45,068 INFO  [org.tes.doc.DockerClientProviderStrategy] (build-38) Found Docker environment with local Unix socket (unix:///var/run/docker.sock)
2021-09-21 15:58:45,070 INFO  [org.tes.DockerClientFactory] (build-38) Docker host IP address is localhost
2021-09-21 15:58:45,116 INFO  [org.tes.DockerClientFactory] (build-38) Connected to docker:
  Server Version: 20.10.8
  API Version: 1.41
  Operating System: Docker Desktop
  Total Memory: 5943 MB
2021-09-21 15:58:45,118 INFO  [org.tes.uti.ImageNameSubstitutor] (build-38) Image name substitution will be performed by: DefaultImageNameSubstitutor (composite of 'ConfigurationFileImageNameSubstitutor' and 'PrefixingImageNameSubstitutor')
2021-09-21 15:58:45,453 INFO  [org.tes.uti.RegistryAuthLocator] (build-38) Credential helper/store (docker-credential-desktop) does not have credentials for index.docker.io
2021-09-21 15:58:45,957 INFO  [org.tes.DockerClientFactory] (build-38) Ryuk started - will monitor and terminate Testcontainers containers on JVM exit
2021-09-21 15:58:45,958 INFO  [org.tes.DockerClientFactory] (build-38) Checking the system...
2021-09-21 15:58:45,958 INFO  [org.tes.DockerClientFactory] (build-38) ✔︎ Docker server version should be at least 1.6.0
2021-09-21 15:58:46,083 INFO  [org.tes.DockerClientFactory] (build-38) ✔︎ Docker environment should have more than 2GB free disk space
2021-09-21 15:58:46,143 INFO  [🐳 .2]] (build-38) Creating container for image: postgres:13.2
2021-09-21 15:58:46,217 INFO  [🐳 .2]] (build-38) Starting container with ID: a7fd54795185ab17baf487388c1e3280fdfea3f6ef8670c0336d367dba3e1d9e
2021-09-21 15:58:46,545 INFO  [🐳 .2]] (build-38) Container postgres:13.2 is starting: a7fd54795185ab17baf487388c1e3280fdfea3f6ef8670c0336d367dba3e1d9e
2021-09-21 15:58:48,043 INFO  [🐳 .2]] (build-38) Container postgres:13.2 started in PT1.959377S

2021-09-21 15:58:48,044 INFO  [io.qua.dev.pos.dep.PostgresqlDevServicesProcessor] (build-38) Dev Services for the default datasource (postgresql) started
Quarkus detects the need for a database and starts one using a Docker container. It automatically configures the application, which means we are good to go and implement our REST API.
|
If the application fails to start properly and the logs contain something like try launching the application again
after having the |
VillainResource Endpoint
The VillainResource was bootstrapped with only one method hello().
We need to add extra methods that will allow CRUD operations on villains.
Here are the new methods to add to the VillainResource class:
package io.quarkus.workshop.superheroes.villain;

import org.jboss.logging.Logger;
import org.jboss.resteasy.reactive.RestPath;
import org.jboss.resteasy.reactive.RestResponse;

import jakarta.validation.Valid;
import jakarta.ws.rs.DELETE;
import jakarta.ws.rs.GET;
import jakarta.ws.rs.POST;
import jakarta.ws.rs.PUT;
import jakarta.ws.rs.Path;
import jakarta.ws.rs.Produces;
import jakarta.ws.rs.core.Context;
import jakarta.ws.rs.core.UriBuilder;
import jakarta.ws.rs.core.UriInfo;
import java.util.List;

import static jakarta.ws.rs.core.MediaType.TEXT_PLAIN;

@Path("/api/villains")
public class VillainResource {

    Logger logger;
    VillainService service;

    public VillainResource(Logger logger, VillainService service) {
        this.service = service;
        this.logger = logger;
    }

    @GET
    @Path("/random")
    public RestResponse<Villain> getRandomVillain() {
        Villain villain = service.findRandomVillain();
        logger.debug("Found random villain " + villain);
        return RestResponse.ok(villain);
    }

    @GET
    public RestResponse<List<Villain>> getAllVillains() {
        List<Villain> villains = service.findAllVillains();
        logger.debug("Total number of villains " + villains.size());
        return RestResponse.ok(villains);
    }

    @GET
    @Path("/{id}")
    public RestResponse<Villain> getVillain(@RestPath Long id) {
        Villain villain = service.findVillainById(id);
        if (villain != null) {
            logger.debug("Found villain " + villain);
            return RestResponse.ok(villain);
        } else {
            logger.debug("No villain found with id " + id);
            return RestResponse.noContent();
        }
    }

    @POST
    public RestResponse<Void> createVillain(@Valid Villain villain, @Context UriInfo uriInfo) {
        villain = service.persistVillain(villain);
        UriBuilder builder = uriInfo.getAbsolutePathBuilder().path(Long.toString(villain.id));
        logger.debug("New villain created with URI " + builder.build().toString());
        return RestResponse.created(builder.build());
    }

    @PUT
    public RestResponse<Villain> updateVillain(@Valid Villain villain) {
        villain = service.updateVillain(villain);
        logger.debug("Villain updated with new valued " + villain);
        return RestResponse.ok(villain);
    }

    @DELETE
    @Path("/{id}")
    public RestResponse<Void> deleteVillain(@RestPath Long id) {
        service.deleteVillain(id);
        logger.debug("Villain deleted with " + id);
        return RestResponse.noContent();
    }

    @GET
    @Path("/hello")
    @Produces(TEXT_PLAIN)
    public String hello() {
        return "Hello Villain Resource";
    }
}
Note that we added @Path("/hello") to the hello method to not conflict with the getAllVillains() method.
Dependency Injection
Dependency injection in Quarkus is based on ArC which is a CDI-based dependency injection solution tailored for Quarkus' architecture.[10] You can learn more about it in the Contexts and Dependency Injection guide.[11]
ArC handles injection at build time.
You can use field injection and inject the VillainService and the logger using:
@Inject Logger logger;
@Inject VillainService service;
But in your previous class, we used constructor injection.
Both the VillainService and the Logger are injected as constructor parameter:
public VillainResource(Logger logger, VillainService service) {
    this.service = service;
    this.logger = logger;
}
Adding Data
To load some SQL statements when Hibernate ORM starts, add the following import.sql in the root of the resources directory.
It contains SQL statements terminated by a semicolon.
This is useful to have a data set ready for the tests or demos.
ALTER SEQUENCE villain_seq RESTART WITH 50;

INSERT INTO villain(id, name, otherName, picture, powers, level)
VALUES (nextval('villain_seq'), 'Buuccolo', 'Majin Buu',
        'https://www.superherodb.com/pictures2/portraits/10/050/15355.jpg',
        'Accelerated Healing, Adaptation, Agility, Flight, Immortality, Intelligence, Invulnerability, Reflexes, Self-Sustenance, Size Changing, Spatial Awareness, Stamina, Stealth, Super Breath, Super Speed, Super Strength, Teleportation',
        22);
INSERT INTO villain(id, name, otherName, picture, powers, level)
VALUES (nextval('villain_seq'), 'Darth Vader', 'Anakin Skywalker',
        'https://www.superherodb.com/pictures2/portraits/10/050/10444.jpg',
        'Accelerated Healing, Agility, Astral Projection, Cloaking, Danger Sense, Durability, Electrokinesis, Energy Blasts, Enhanced Hearing, Enhanced Senses, Force Fields, Hypnokinesis, Illusions, Intelligence, Jump, Light Control, Marksmanship, Precognition, Psionic Powers, Reflexes, Stealth, Super Speed, Telekinesis, Telepathy, The Force, Weapons Master',
        13);
INSERT INTO villain(id, name, otherName, picture, powers, level)
VALUES (nextval('villain_seq'), 'The Rival (CW)', 'Edward Clariss',
        'https://www.superherodb.com/pictures2/portraits/10/050/13846.jpg',
        'Accelerated Healing, Agility, Bullet Time, Durability, Electrokinesis, Endurance, Enhanced Senses, Intangibility, Marksmanship, Phasing, Reflexes, Speed Force, Stamina, Super Speed, Super Strength',
        10);
Ok, but that’s just a few entries.
Download the SQL file import.sql and copy it under src/main/resources.
Now, you have more than 500 villains that will be loaded in the database.
If you didn’t yet, start the application in dev mode by executing the following command under the rest-villains directory:
./mvnw quarkus:devThen, open your browser to http://localhost:8080/api/villains. You should see lots of heroes…
CRUD Tests in VillainResourceTest
To test the VillainResource endpoint, we just need to extend the VillainResourceTest we already have.
No need to configure anything, Quarkus will start a test database for you.
In io.quarkus.workshop.superheroes.villain.VillainResourceTest, you will add the following test methods to the VillainResourceTest class:
-
shouldNotGetUnknownVillain: giving a random Villain identifier, theVillainResourceendpoint should return a 204 (No content) -
shouldGetRandomVillain: checks that theVillainResourceendpoint returns a random villain -
shouldNotAddInvalidItem: passing an invalidVillainshould fail when creating it (thanks to the@Validannotation) -
shouldGetInitialItems: checks that theVillainResourceendpoint returns the list of heroes -
shouldAddAnItem: checks that theVillainResourceendpoint creates a validVillain -
shouldUpdateAnItem: checks that theVillainResourceendpoint updates a newly createdVillain -
shouldRemoveAnItem: checks that theVillainResourceendpoint deletes a villain from the database
The code is as follows:
package io.quarkus.workshop.superheroes.villain;

import io.quarkus.test.junit.QuarkusTest;
import io.restassured.common.mapper.TypeRef;
import org.hamcrest.core.Is;
import org.junit.jupiter.api.MethodOrderer;
import org.junit.jupiter.api.Order;
import org.junit.jupiter.api.Test;
import org.junit.jupiter.api.TestMethodOrder;

import java.util.List;
import java.util.Random;

import static io.restassured.RestAssured.get;
import static io.restassured.RestAssured.given;
import static jakarta.ws.rs.core.HttpHeaders.ACCEPT;
import static jakarta.ws.rs.core.HttpHeaders.CONTENT_TYPE;
import static jakarta.ws.rs.core.MediaType.APPLICATION_JSON;
import static jakarta.ws.rs.core.MediaType.TEXT_PLAIN;
import static jakarta.ws.rs.core.Response.Status.BAD_REQUEST;
import static jakarta.ws.rs.core.Response.Status.CREATED;
import static jakarta.ws.rs.core.Response.Status.NO_CONTENT;
import static jakarta.ws.rs.core.Response.Status.OK;
import static org.hamcrest.CoreMatchers.is;
import static org.junit.jupiter.api.Assertions.assertEquals;
import static org.junit.jupiter.api.Assertions.assertNotNull;
import static org.junit.jupiter.api.Assertions.assertTrue;

@QuarkusTest
@TestMethodOrder(MethodOrderer.OrderAnnotation.class)
public class VillainResourceTest {

    private static final String JSON = "application/json;charset=UTF-8";

    private static final String DEFAULT_NAME = "Super Chocolatine";
    private static final String UPDATED_NAME = "Super Chocolatine (updated)";
    private static final String DEFAULT_OTHER_NAME = "Super Chocolatine chocolate in";
    private static final String UPDATED_OTHER_NAME = "Super Chocolatine chocolate in (updated)";
    private static final String DEFAULT_PICTURE = "super_chocolatine.png";
    private static final String UPDATED_PICTURE = "super_chocolatine_updated.png";
    private static final String DEFAULT_POWERS = "does not eat pain au chocolat";
    private static final String UPDATED_POWERS = "does not eat pain au chocolat (updated)";
    private static final int DEFAULT_LEVEL = 42;
    private static final int UPDATED_LEVEL = 43;

    private static final int NB_VILLAINS = 570;
    private static String villainId;

    @Test
    public void testHelloEndpoint() {
        given().header(ACCEPT, TEXT_PLAIN).when().get("/api/villains/hello").then().statusCode(200).body(is("Hello Villain Resource"));
    }

    @Test
    void shouldNotGetUnknownVillain() {
        Long randomId = new Random().nextLong();
        given().pathParam("id", randomId).when().get("/api/villains/{id}").then().statusCode(NO_CONTENT.getStatusCode());
    }

    @Test
    void shouldGetRandomVillain() {
        given().when().get("/api/villains/random").then().statusCode(OK.getStatusCode()).contentType(APPLICATION_JSON);
    }

    @Test
    void shouldNotAddInvalidItem() {
        Villain villain = new Villain();
        villain.name = null;
        villain.otherName = DEFAULT_OTHER_NAME;
        villain.picture = DEFAULT_PICTURE;
        villain.powers = DEFAULT_POWERS;
        villain.level = 0;

        given()
            .body(villain)
            .header(CONTENT_TYPE, JSON)
            .header(ACCEPT, JSON)
            .when()
            .post("/api/villains")
            .then()
            .statusCode(BAD_REQUEST.getStatusCode());
    }

    @Test
    @Order(1)
    void shouldGetInitialItems() {
        List<Villain> villains = get("/api/villains")
            .then()
            .statusCode(OK.getStatusCode())
            .contentType(APPLICATION_JSON)
            .extract()
            .body()
            .as(getVillainTypeRef());
        assertEquals(NB_VILLAINS, villains.size());
    }

    @Test
    @Order(2)
    void shouldAddAnItem() {
        Villain villain = new Villain();
        villain.name = DEFAULT_NAME;
        villain.otherName = DEFAULT_OTHER_NAME;
        villain.picture = DEFAULT_PICTURE;
        villain.powers = DEFAULT_POWERS;
        villain.level = DEFAULT_LEVEL;

        String location = given()
            .body(villain)
            .header(CONTENT_TYPE, JSON)
            .header(ACCEPT, JSON)
            .when()
            .post("/api/villains")
            .then()
            .statusCode(CREATED.getStatusCode())
            .extract()
            .header("Location");
        assertTrue(location.contains("/api/villains"));

        // Stores the id
        String[] segments = location.split("/");
        villainId = segments[segments.length - 1];
        assertNotNull(villainId);

        given()
            .pathParam("id", villainId)
            .when()
            .get("/api/villains/{id}")
            .then()
            .statusCode(OK.getStatusCode())
            .contentType(APPLICATION_JSON)
            .body("name", Is.is(DEFAULT_NAME))
            .body("otherName", Is.is(DEFAULT_OTHER_NAME))
            .body("level", Is.is(DEFAULT_LEVEL))
            .body("picture", Is.is(DEFAULT_PICTURE))
            .body("powers", Is.is(DEFAULT_POWERS));

        List<Villain> villains = get("/api/villains")
            .then()
            .statusCode(OK.getStatusCode())
            .contentType(APPLICATION_JSON)
            .extract()
            .body()
            .as(getVillainTypeRef());
        assertEquals(NB_VILLAINS + 1, villains.size());
    }

    @Test
    @Order(3)
    void testUpdatingAnItem() {
        Villain villain = new Villain();
        villain.id = Long.valueOf(villainId);
        villain.name = UPDATED_NAME;
        villain.otherName = UPDATED_OTHER_NAME;
        villain.picture = UPDATED_PICTURE;
        villain.powers = UPDATED_POWERS;
        villain.level = UPDATED_LEVEL;

        given()
            .body(villain)
            .header(CONTENT_TYPE, JSON)
            .header(ACCEPT, JSON)
            .when()
            .put("/api/villains")
            .then()
            .statusCode(OK.getStatusCode())
            .contentType(APPLICATION_JSON)
            .body("name", Is.is(UPDATED_NAME))
            .body("otherName", Is.is(UPDATED_OTHER_NAME))
            .body("level", Is.is(UPDATED_LEVEL))
            .body("picture", Is.is(UPDATED_PICTURE))
            .body("powers", Is.is(UPDATED_POWERS));

        List<Villain> villains = get("/api/villains")
            .then()
            .statusCode(OK.getStatusCode())
            .contentType(APPLICATION_JSON)
            .extract()
            .body()
            .as(getVillainTypeRef());
        assertEquals(NB_VILLAINS + 1, villains.size());
    }

    @Test
    @Order(4)
    void shouldRemoveAnItem() {
        given().pathParam("id", villainId).when().delete("/api/villains/{id}").then().statusCode(NO_CONTENT.getStatusCode());

        List<Villain> villains = get("/api/villains")
            .then()
            .statusCode(OK.getStatusCode())
            .contentType(APPLICATION_JSON)
            .extract()
            .body()
            .as(getVillainTypeRef());
        assertEquals(NB_VILLAINS, villains.size());
    }

    private TypeRef<List<Villain>> getVillainTypeRef() {
        return new TypeRef<List<Villain>>() {
            // Kept empty on purpose
        };
    }

}
The tests and the application runs in the same JVM, meaning that the test can be injected with application beans. This feature is very useful to test specific parts of the application. However, in our case, we just execute HTTP requests to check the result.
Run the test either in the dev mode or using
./mvnw test.
They should pass.
Building production package
Our service is not completely done yet, but let’s run it in prod mode.
Configuring the application
In prod mode, the dev services won’t be used. We need to configure the application to connect to a real database.
The main way of obtaining connections to a database is to use a datasource. In Quarkus, the out of the box datasource and connection pooling implementation is Agroal.[12]
So, we need to configure the database access in the src/main/resources/application.properties file,
but only when the application runs in prod mode.
Add the following datasource configuration:
%prod.quarkus.datasource.username=superbad
%prod.quarkus.datasource.password=superbad
%prod.quarkus.datasource.jdbc.url=jdbc:postgresql://localhost:5432/villains_database
%prod.quarkus.hibernate-orm.sql-load-script=import.sql
%prod indicates that the property is only used when the application runs with the given profile.
We configure the access to the database, and force the data initialization (which would have been disabled by default in prod mode).
Running the Infrastructure
Before going further, be sure to run the infrastructure. To execute this service, you need a database. Let’s use Docker and docker compose to ease the installation of such infrastructure.
You should already have installed the infrastructure into the infrastructure directory.
Now, just execute docker compose -f docker-compose.yaml up -d under the infrastructure directory.
You should see a few logs going on and then all the containers get started.
On Linux, use the docker-compose-linux.yaml:
docker compose -f docker-compose-linux.yaml up -d|
During the workshop, just leave all the containers up and running.
Then, after the workshop, remember to shut them down using: |
Packaging and running the application
Stop the dev mode, and run:
./mvnw packageAs previously, you will get your application in target/quarkus-app, run it using:
java -jar target/quarkus-app/quarkus-run.jarOpen your browser to http://localhost:8080/api/villains, and verify it displays the expected content.
Once done, stop the application using CTRL+C.
Configuring the Villain Microservice
Hardcoded values in our code are a no go (even if we all did it at some point). In this guide, we learn how to configure our Villain API as well as some parts of Quarkus.
Configuring Logging
In the VillainResource, we injected a logger.
That’s very useful to provide meaningful information about the execution.
But you often need to adjust the configuration, such as the log level.
Runtime configuration of logging is done through the normal application.properties file:
quarkus.log.console.format=%d{HH:mm:ss} %-5p [%c{2.}] (%t) %s%e%n
quarkus.log.console.level=INFO
quarkus.log.console.darken=1
Configuring Quarkus Listening Port
Because we will end-up running several microservices, let’s configure Quarkus so it listens to a different port than 8080:
This is quite easy as we just need to add one property in the application.properties file:
## HTTP configuration
quarkus.http.port=8084
Changing the port is one of the rare configuration that cannot be done while the application is running.
You would need to restart the application to change the port.
Hit CTRL+C to stop the application if it still running and restart it in dev mode.
Then run:
curl http://localhost:8084/api/villains | jqInjecting Configuration Value
When we persist a new villain, we want to multiply the level by a value that can be configured (to reduce the level, so heroes will win the fights more easily).
For this, Quarkus uses MicroProfile Config to inject the configuration in the application.[13]
The injection uses the @ConfigProperty annotation.
|
When injecting a configured value, you can use |
Edit the VillainService, and introduce the following configuration properties:
@ConfigProperty(name = "level.multiplier", defaultValue="1.0") double levelMultiplier;|
You may need to add the following import statement if your IDE does not do it automatically: |
If you do not provide a value for this property, the application startup fails with jakarta.enterprise.inject.spi.DeploymentException: No config value of type [int] exists for: level.multiplier.
To avoid having to configure a value, we configure a default one (property defaultValue).
Now, modify the VillainService.persistVillain() method to use the injected properties:
public Villain persistVillain(@Valid Villain villain) {
        villain.level = (int) Math.round(villain.level * levelMultiplier);
        villain.persist();
        return villain;
}
Create the Configuration
By default, Quarkus reads application.properties.
Edit the src/main/resources/application.properties with the following content:
level.multiplier=0.5Running and Testing the Application
If you didn’t already, start the application in dev mode.
Once started, create a new villain with the following cUrl command (notice the verbose option -v to see the HTTP response headers):
curl -X POST -d '{"level":5, "name":"Super Bad", "powers":"Agility, Longevity"}' -H "Content-Type: application/json" http://localhost:8084/api/villains -vYou should see something like this:
< HTTP/1.1 201 Created
< Location: http://localhost:8084/api/villains/582
As you can see, we’ve passed a level of 5 to create this new villain. The cURL command returns the location of the newly created villain. Take this URL and do an HTTP GET on it. You will see that the level has been decreased.
|
The example shows a newly created Villain with id |
curl http://localhost:8084/api/villains/582 | jq

{
  "id": 582,
  "level": 3,
  "name": "Super Bad",
  "powers": "Agility, Longevity"
}|
You may not know |
Hey! Wait a minute! If you enabled continuous testing, Quarkus should have warned you:
--
Running 2/8. Running: io.quarkus.workshop.superheroes.villain.VillainResourceTest#shouldAddAnItem()
Press [o] Toggle test output, [h] for more options>WARNING: An illegal reflective access operation has occurred
2021-09-21 21:02:16,067 ERROR [io.qua.test] (Test runner thread) ==================== TEST REPORT #1 ====================
2021-09-21 21:02:16,067 ERROR [io.qua.test] (Test runner thread) Test VillainResourceTest#shouldAddAnItem() failed
: java.lang.AssertionError: 1 expectation failed.
JSON path level doesn't match.
Expected: is <42>
  Actual: <21>

        at io.restassured.internal.ValidatableResponseImpl.body(ValidatableResponseImpl.groovy)
        at io.quarkus.workshop.superheroes.villain.VillainResourceTest.shouldAddAnItem(VillainResourceTest.java:133)

2021-09-21 21:02:16,070 ERROR [io.qua.test] (Test runner thread) >>>>>>>>>>>>>>>>>>>> 1 TEST FAILED <<<<<<<<<<<<<<<<<<<<
Tests are failing now! Indeed, they don’t know the multiplier.
Press r in the dev mode to run the tests.
|
In the application.properties file, add: %test.level.multiplier=1 which set the multiplier to 1 when running the tests:
All 8 tests are passing (0 skipped), 8 tests were run in 1722ms. Tests completed at 21:03:25.Open API
A Quarkus application can expose its API description through an OpenAPI specification. Quarkus also lets you test it via a user-friendly UI named Swagger UI.
In this section, we will see how to use OpenAPI with Quarkus and introduce the dev console.
Directory Structure
In this module we will add extra class (VillainApplication) to the Villain API project.
You will end-up with the following directory structure:
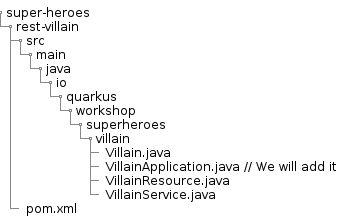
Installing the OpenAPI extension
Quarkus proposes a smallrye-openapi extension compliant with the MicroProfile OpenAPI specification in order to generate your API OpenAPI v3 specification.[14]
To install the OpenAPI dependency, just run the following command:
./mvnw quarkus:add-extension -Dextensions="smallrye-openapi"This will add the following dependency in the pom.xml file:
<dependency>
  <groupId>io.quarkus</groupId>
  <artifactId>quarkus-smallrye-openapi</artifactId>
</dependency>
Open API
Now, curl http://localhost:8084/q/openapi endpoint with the command curl http://localhost:8084/q/openapi and you will see the following OpenAPI contract:
openapi: 3.0.3
info:
  title: rest-villains API
  version: 1.0.0-SNAPSHOT
paths:
  /api/villains:
    get:
      tags:
      - Villain Resource
      responses:
        "200":
          description: OK
          content:
            application/json:
              schema:
                type: array
                items:
                  $ref: '#/components/schemas/Villain'
    put:
      tags:
      - Villain Resource
      requestBody:
        content:
          application/json:
            schema:
              $ref: '#/components/schemas/Villain'
      responses:
        "200":
          description: OK
          content:
            application/json:
              schema:
                $ref: '#/components/schemas/Villain'
    post:
      tags:
      - Villain Resource
      requestBody:
        content:
          application/json:
            schema:
              $ref: '#/components/schemas/Villain'
      responses:
        "201":
          description: Created
  /api/villains/hello:
    get:
      tags:
      - Villain Resource
      responses:
        "200":
          description: OK
          content:
            text/plain:
              schema:
                type: string
  /api/villains/random:
    get:
      tags:
      - Villain Resource
      responses:
        "200":
          description: OK
          content:
            application/json:
              schema:
                $ref: '#/components/schemas/Villain'
  /api/villains/{id}:
    get:
      tags:
      - Villain Resource
      parameters:
      - name: id
        in: path
        required: true
        schema:
          format: int64
          type: integer
      responses:
        "200":
          description: OK
          content:
            application/json:
              schema:
                $ref: '#/components/schemas/Villain'
    delete:
      tags:
      - Villain Resource
      parameters:
      - name: id
        in: path
        required: true
        schema:
          format: int64
          type: integer
      responses:
        "204":
          description: No Content
components:
  schemas:
    Villain:
      required:
      - name
      - level
      type: object
      properties:
        id:
          format: int64
          type: integer
        name:
          maxLength: 50
          minLength: 3
          type: string
        otherName:
          type: string
        level:
          format: int32
          minimum: 1
          type: integer
        picture:
          type: string
        powers:
          type: string
  securitySchemes:
    SecurityScheme:
      type: http
      description: Authentication
      scheme: basic
This contract lacks documentation. The Eclipse MicroProfile OpenAPI allows you to customize the methods of your REST endpoint as well as the application.
While having the OpenAPI specification is great, it can’t be consumed easily by humans. In your browser, go to http://localhost:8084/q/dev. This is the dev console. It provides all the tools you need to develop your Quarkus application. We will use it several times in this workshop. Note that the dev console is only available in dev mode.
The Dev Console integrates Swagger, a UI to invoke your endpoints from the comfort of your browser. Click on the "Swagger UI" button located in the "SmallRye OpenAPI" widget (http://localhost:8084/q/swagger-ui).
You will see all your endpoints listed. Click on the "GET" button for the "/api/villains" path, then click on "Try it out" and finally on "Execute". You can see the result immediately.
When developing REST APIs, this UI is very convenient. You can test your endpoint and immediately see the outcome. If something does not please you, edit the code, go back to the browser, re-execute, and voilà!
Customizing Methods
The MicroProfile OpenAPI has a set of annotations to customize each REST endpoint method so the OpenAPI contract is richer and clearer for consumers:
-
@Operation: Describes a single API operation on a path. -
@APIResponse: Corresponds to the OpenAPI Response model object which describes a single response from an API Operation -
@Parameter: The name of the parameter. -
@RequestBody: A brief description of the request body.
This is what the VillainResource endpoint should look like once you have annotated it:
package io.quarkus.workshop.superheroes.villain;

import static jakarta.ws.rs.core.MediaType.APPLICATION_JSON;

import java.net.URI;
import java.util.List;

import jakarta.validation.Valid;
import jakarta.ws.rs.DELETE;
import jakarta.ws.rs.GET;
import jakarta.ws.rs.POST;
import jakarta.ws.rs.PUT;
import jakarta.ws.rs.Path;
import jakarta.ws.rs.Produces;
import jakarta.ws.rs.core.Context;
import jakarta.ws.rs.core.MediaType;
import jakarta.ws.rs.core.Response;
import jakarta.ws.rs.core.UriBuilder;
import jakarta.ws.rs.core.UriInfo;
import org.eclipse.microprofile.openapi.annotations.Operation;
import org.eclipse.microprofile.openapi.annotations.enums.SchemaType;
import org.eclipse.microprofile.openapi.annotations.media.Content;
import org.eclipse.microprofile.openapi.annotations.media.Schema;
import org.eclipse.microprofile.openapi.annotations.responses.APIResponse;
import org.eclipse.microprofile.openapi.annotations.tags.Tag;
import org.jboss.logging.Logger;
import org.jboss.resteasy.reactive.RestPath;
import org.jboss.resteasy.reactive.RestResponse;

@Path("/api/villains")
@Tag(name = "villains")
public class VillainResource {
    Logger logger;
    VillainService service;

    public VillainResource(Logger logger, VillainService service) {
        this.service = service;
        this.logger = logger;
    }

    @Operation(summary = "Returns a random villain")
    @GET
    @Path("/random")
    @APIResponse(
        responseCode = "200",
        content = @Content(mediaType = APPLICATION_JSON, schema = @Schema(implementation = Villain.class, required = true))
    )
    public RestResponse<Villain> getRandomVillain() {
        Villain villain = service.findRandomVillain();
        logger.debug("Found random villain " + villain);
        return RestResponse.ok(villain);
    }

    @Operation(summary = "Returns all the villains from the database")
    @GET
    @APIResponse(
        responseCode = "200",
        content = @Content(mediaType = APPLICATION_JSON, schema = @Schema(implementation = Villain.class, type = SchemaType.ARRAY))
    )
    public RestResponse<List<Villain>> getAllVillains() {
        List<Villain> villains = service.findAllVillains();
        logger.debug("Total number of villains " + villains.size());
        return RestResponse.ok(villains);
    }

    @Operation(summary = "Returns a villain for a given identifier")
    @GET
    @Path("/{id}")
    @APIResponse(responseCode = "200", content = @Content(mediaType = APPLICATION_JSON, schema = @Schema(implementation = Villain.class)))
    @APIResponse(responseCode = "204", description = "The villain is not found for a given identifier")
    public RestResponse<Villain> getVillain(@RestPath Long id) {
        Villain villain = service.findVillainById(id);
        if (villain != null) {
            logger.debug("Found villain " + villain);
            return RestResponse.ok(villain);
        } else {
            logger.debug("No villain found with id " + id);
            return RestResponse.noContent();
        }
    }

    @Operation(summary = "Creates a valid villain")
    @POST
    @APIResponse(
        responseCode = "201",
        description = "The URI of the created villain",
        content = @Content(mediaType = APPLICATION_JSON, schema = @Schema(implementation = URI.class))
    )
    public RestResponse<Void> createVillain(@Valid Villain villain, @Context UriInfo uriInfo) {
        villain = service.persistVillain(villain);
        UriBuilder builder = uriInfo.getAbsolutePathBuilder().path(Long.toString(villain.id));
        logger.debug("New villain created with URI " + builder.build().toString());
        return RestResponse.created(builder.build());
    }

    @Operation(summary = "Updates an exiting  villain")
    @PUT
    @APIResponse(
        responseCode = "200",
        description = "The updated villain",
        content = @Content(mediaType = APPLICATION_JSON, schema = @Schema(implementation = Villain.class))
    )
    public RestResponse<Villain> updateVillain(@Valid Villain villain) {
        villain = service.updateVillain(villain);
        logger.debug("Villain updated with new valued " + villain);
        return RestResponse.ok(villain);
    }

    @Operation(summary = "Deletes an exiting villain")
    @DELETE
    @Path("/{id}")
    @APIResponse(responseCode = "204")
    public RestResponse<Void> deleteVillain(@RestPath Long id) {
        service.deleteVillain(id);
        logger.debug("Villain deleted with " + id);
        return RestResponse.noContent();
    }

    @GET
    @Produces(MediaType.TEXT_PLAIN)
    @Path("/hello")
    public String hello() {
        return "Hello Villain Resource";
    }
}
With this new code, go back to the Swagger UI at http://localhost:8084/q/swagger-ui and refresh. Your endpoints are organized by tags, and each annotated endpoint is documented.
Documenting REST API is essential when working with different teams. You can see OpenAPI as the JavaDoc for REST.
Customizing the Application
The previous annotations allow you to customize the contract for a given REST Endpoint. But it’s also important to document the entire application.
The Microprofile OpenAPI also has a set of annotation to do so. The difference is that these annotations cannot be used on the endpoint methods, but instead on another Java class configuring the entire application.
For this, you need to create the src/main/java/io/quarkus/workshop/superheroes/villain/VillainApplication class with the following content:
package io.quarkus.workshop.superheroes.villain;

import jakarta.ws.rs.ApplicationPath;
import jakarta.ws.rs.core.Application;
import org.eclipse.microprofile.openapi.annotations.ExternalDocumentation;
import org.eclipse.microprofile.openapi.annotations.OpenAPIDefinition;
import org.eclipse.microprofile.openapi.annotations.info.Contact;
import org.eclipse.microprofile.openapi.annotations.info.Info;
import org.eclipse.microprofile.openapi.annotations.servers.Server;

@ApplicationPath("/")
@OpenAPIDefinition(
    info = @Info(
        title = "Villain API",
        description = "This API allows CRUD operations on a villain",
        version = "1.0",
        contact = @Contact(name = "Quarkus", url = "https://github.com/quarkusio")
    ),
    servers = { @Server(url = "http://localhost:8084") },
    externalDocs = @ExternalDocumentation(url = "https://github.com/quarkusio/quarkus-workshops", description = "All the Quarkus workshops")
)
public class VillainApplication extends Application {
    // Empty body
}
Go back to the Swagger UI and refresh again. At the top of the document, you can see the version and the global API documentation.
Customized Contract
If you go back to the http://localhost:8084/q/openapi endpoint you will see the following OpenAPI contract:
openapi: 3.0.3
info:
    title: Villain API
    description: This API allows CRUD operations on a villain
    contact:
        name: Quarkus
        url: https://github.com/quarkusio
    version: "1.0"
externalDocs:
    description: All the Quarkus workshops
    url: https://github.com/quarkusio/quarkus-workshops
servers:
    -   url: http://localhost:8084
tags:
    -   name: villains
paths:
    /api/villains:
        get:
            tags:
                - villains
            summary: Returns all the villains from the database
            responses:
                "200":
                    description: OK
                    content:
                        application/json:
                            schema:
                                type: array
                                items:
                                    $ref: '#/components/schemas/Villain'
        put:
            tags:
                - villains
            summary: Updates an exiting  villain
            requestBody:
                content:
                    application/json:
                        schema:
                            $ref: '#/components/schemas/Villain'
            responses:
                "200":
                    description: The updated villain
                    content:
                        application/json:
                            schema:
                                $ref: '#/components/schemas/Villain'
        post:
            tags:
                - villains
            summary: Creates a valid villain
            requestBody:
                content:
                    application/json:
                        schema:
                            $ref: '#/components/schemas/Villain'
            responses:
                "201":
                    description: The URI of the created villain
                    content:
                        application/json:
                            schema:
                                format: uri
                                type: string
    /api/villains/hello:
        get:
            tags:
                - villains
            responses:
                "200":
                    description: OK
                    content:
                        text/plain:
                            schema:
                                type: string
    /api/villains/random:
        get:
            tags:
                - villains
            summary: Returns a random villain
            responses:
                "200":
                    description: OK
                    content:
                        application/json:
                            schema:
                                $ref: '#/components/schemas/Villain'
    /api/villains/{id}:
        get:
            tags:
                - villains
            summary: Returns a villain for a given identifier
            parameters:
                -   name: id
                    in: path
                    required: true
                    schema:
                        format: int64
                        type: integer
            responses:
                "200":
                    description: OK
                    content:
                        application/json:
                            schema:
                                $ref: '#/components/schemas/Villain'
                "204":
                    description: The villain is not found for a given identifier
        delete:
            tags:
                - villains
            summary: Deletes an exiting villain
            parameters:
                -   name: id
                    in: path
                    required: true
                    schema:
                        format: int64
                        type: integer
            responses:
                "204":
                    description: No Content
components:
    schemas:
        Villain:
            required:
                - name
                - level
            type: object
            properties:
                id:
                    format: int64
                    type: integer
                name:
                    maxLength: 50
                    minLength: 3
                    type: string
                otherName:
                    type: string
                level:
                    format: int32
                    minimum: 1
                    type: integer
                picture:
                    type: string
                powers:
                    type: string
    securitySchemes:
        SecurityScheme:
            type: http
            description: Authentication
            scheme: basic
You can expose or exchange this contract to the API consumers, so they now what to expect when using your API.
OpenAPI Tests in VillainResourceTest
Let’s add an extra test method in VillainResourceTest ensuring that the OpenAPI specification is packaged with the application:
@Test
void shouldPingOpenAPI() {
    given().header(ACCEPT, JSON).when().get("/q/openapi").then().statusCode(OK.getStatusCode());
}
Run the test:
-
From the dev mode, or
-
By executing the test using
./mvnw test.
|
If you have any problem with the code, don’t understand or feel you are running, remember to ask for some help. Also, you can get the code of this entire workshop from http://github.com/quarkusio/quarkus-workshops/tree/refs/heads/main/quarkus-workshop-super-heroes. You can also download the completed code from https://raw.githubusercontent.com/quarkusio/quarkus-workshops/main/quarkus-workshop-super-heroes/dist/quarkus-super-heroes-workshop-complete.zip. |
Quarkus
In the previous chapter, you had a quick peek at Quarkus and how you can build HTTP / REST-based applications with it. But that was just the beginning; Quarkus can do a lot more, which is the purpose of this chapter. In this chapter, you are going to see:
-
What’s Quarkus? and how does it change the Java landscape
-
What are the main Quarkus idea, and how it helps in the cloud native world
-
The Quarkus build process, in other words, the secret sauce number 1
-
The Quarkus reactive nature, in other words, the secret sauce number 2
-
Some Quarkus features such as the application lifecycle support
-
How you can use Quarkus to generate native executable
What’s Quarkus?
Java was born more than 25 years ago. The world 25 years ago was quite different. The software industry has gone through several revolutions over these two decades. Java has always been able to reinvent itself to stay relevant.
But a new revolution is happening. While for years, most applications were running on huge machines, with lots of CPU and memory, they are now running on the Cloud, in constrained environments, in containers, where the resources are shared. Density is the new optimization: crank as many mini-apps (or microservices) as possible per node. And scale by adding more instances of an app instead of a more powerful single instance.
The Java ergonomics, designed 20 years ago, do not fit well in this new environment. Java applications were designed to run 24/7 for months, even years. The JIT is optimizing the execution over time; the GC manages the memory efficiently… But all these features have a cost, and the memory required to run Java applications and startup times are showstoppers when you deploy 20 or 50 microservices instead of one application. The issue is not the JVM itself; it’s also the Java ecosystem that needs to be reinvented.
That’s where Quarkus, and other projects, enter the game. Quarkus uses a build time principle.[15] During the build of the application, tasks that usually happen at runtime are executed at build time.
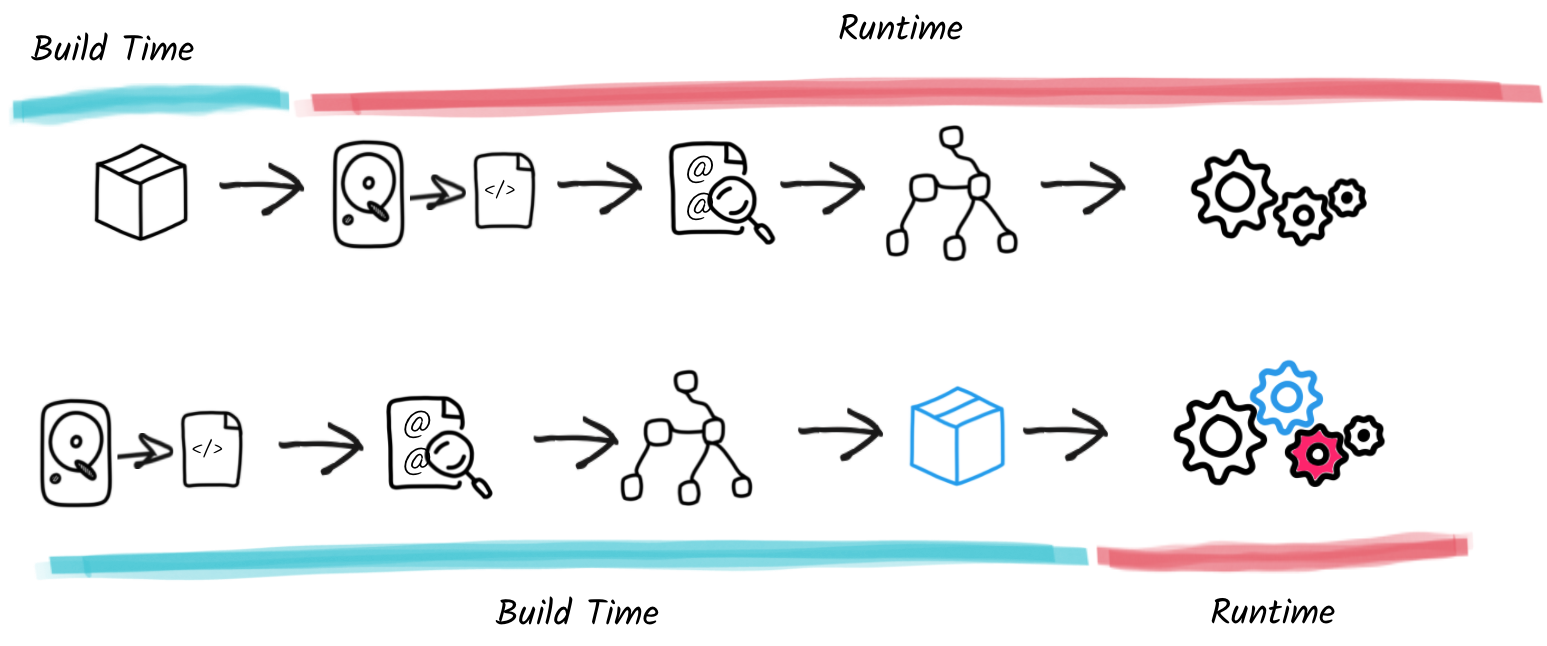
Thus, when the application runs, everything has been pre-computed, and all the annotation scanning, XML parsing, and so on won’t be executed anymore. It has two direct benefits: startup time (a lot faster) and memory consumption (a lot lower).
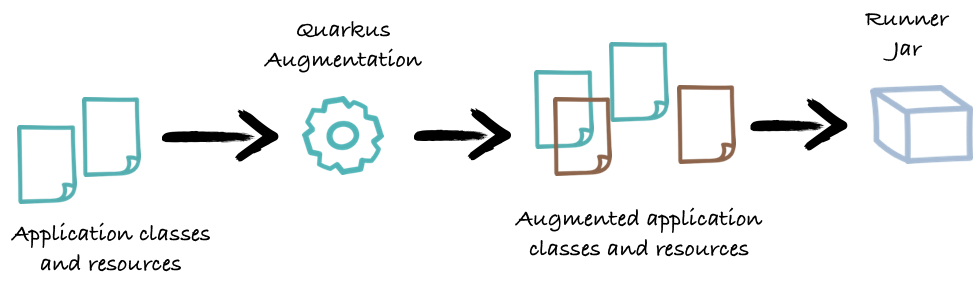
So, as depicted in the figure above, Quarkus does bring an infrastructure for frameworks to embrace build time metadata discovery (like annotations), replace proxies with generated classes, pre-configure most frameworks, and handle dependency injection at build time.
Also, during the build, Quarkus detects which class needs to be accessed by reflection at runtime, boots framework at build time to record the result, and generally offers a lot of GraalVM optimization for free (or cheap at least). Indeed, thanks to all this metadata, Quarkus can configure native compilers such as the GraalVM compiler to generate a native executable for your Java application. Thanks to an aggressive dead-code elimination, the final executable is smaller, faster to start, and uses a ridiculously small amount of memory.
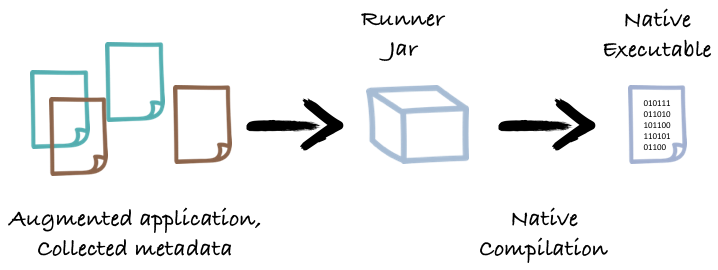
Quarkus does not stop there. As you have seen in the previous chapter, it proposes a stellar developer experience. It also unifies reactive and imperative to let you decide how you want to handle I/O. It allows implementing both REST and event-driven applications using a consistent model. To do this, Quarkus is based on a reactive core allowing high concurrency and reducing memory consumption.
Quarkus detects if your method can be called on the I/O thread and follows the reactive execution model; or if your method must be called on a worker thread and follows the imperative execution model.
Ok, but enough talking, time to see this in action.
Quarkus Augmentation
Let’s demystify all this.
So far, you have developed the super-villains microservice. This microservice is relatively simple. It still has database access, ORM support, transaction, JSON serialization, and deserialization.
Let’s now package this application using:
./mvnw packageIn the log, you can see actions happening during what Quarkus calls the augmentation phase.
[INFO] --- quarkus-maven-plugin:3.33.2:build (default) @ rest-villains ---
[INFO] [org.jboss.threads] JBoss Threads version 3.4.2.Final
[INFO] [org.hibernate.Version] HHH000412: Hibernate ORM core version 5.5.7.Final
[INFO] [io.quarkus.deployment.QuarkusAugmentor] Quarkus augmentation completed in 1932ms
In this log, you can observe the build principle. Typically, about Hibernate, it saves from having to:
-
embed an XML parser at runtime,
-
Do the actual parsing,
-
Configure Hibernate based on the content of the file.
With Quarkus, at runtime, almost everything is already configured. Only runtime configuration properties are applied at startup (such as database URLs).
Also, during this augmentation, Java classes are generated or extended.
Remember the Villain Panache entity.
The class is extended during the augmentation.
If you run javap --class-path target/quarkus-app/quarkus/transformed-bytecode.jar io.quarkus.workshop.superheroes.villain.Villain, you can see methods prefixed with $$ added to the class.
Each extension can combine build time and run time.
The following figure presents some of the extensions you already used, but there are a lot more.
We are going to learn more about extensions later in this workshop and even build one.
What’s important to understand for now is that the magic is packaged into extension, and every time you add a quarkus- dependency to your pom.xml file, you enable an extension.

Application Lifecycle
Now that you know how Quarkus is structured let’s continue using various extensions. You often need to execute custom actions when the application starts and clean up everything when the application stops. In this module, we will display a banner in the logs once the Villain microservice has started.
Directory Structure
In this section, we will add an extra class (VillainApplicationLifeCycle) to handle the Villain API lifecycle.
You will end up with the following directory structure:

Displaying a Banner
When our application starts, the logs are dull and lack a banner (any decent application must have a banner nowadays).
So the first thing that you need to do is to go to the following website and pick up your favorite "Villain API" text banner.
Create a new class named VillainApplicationLifeCycle (or pick another name, the name does not matter) in the io.quarkus.workshop.superheroes.villain package, and copy your banner, so you end up with something like the following:
package io.quarkus.workshop.superheroes.villain;

import io.quarkus.runtime.ShutdownEvent;
import io.quarkus.runtime.StartupEvent;
import io.quarkus.runtime.configuration.ConfigUtils;
import jakarta.enterprise.context.ApplicationScoped;
import jakarta.enterprise.event.Observes;
import org.jboss.logging.Logger;

@ApplicationScoped
public class VillainApplicationLifeCycle {

    private static final Logger LOGGER = Logger.getLogger(VillainApplicationLifeCycle.class);

    void onStart(@Observes StartupEvent ev) {
        LOGGER.info(" __     ___ _ _       _             _    ____ ___ ");
        LOGGER.info(" \\ \\   / (_) | | __ _(_)_ __       / \\  |  _ \\_ _|");
        LOGGER.info("  \\ \\ / /| | | |/ _` | | '_ \\     / _ \\ | |_) | | ");
        LOGGER.info("   \\ V / | | | | (_| | | | | |   / ___ \\|  __/| | ");
        LOGGER.info("    \\_/  |_|_|_|\\__,_|_|_| |_|  /_/   \\_\\_|  |___|");
    }

    void onStop(@Observes ShutdownEvent ev) {
        LOGGER.info("The application VILLAIN is stopping...");
    }
}
Thanks to the CDI @Observes, the VillainApplicationLifeCycle is invoked.
On startup with the StartupEvent so it can execute code (here, displaying the banner) when the application is starting
Run the application in dev mode, the banner is printed to the console. When the application is stopped, the second log message is printed.
|
If your application is still running, just send an HTTP request, like go to http://localhost:8084. |
The method is called by ArC, the dependency injection framework used by Quarkus. Arc embraces the build-time principle, meaning that injection happens at build time. In addition, Arc can detect and remove unused beans at runtime, saving memory.
With the application running in dev mode, open your browser to http://localhost:8084/q/dev/. In the ArC widget, you can see the number of components that have been removed ("Removed components"), and if you click on the link, see the list of removed beans. If you click on the "Observers" link, you will see the two methods we added. In the "Fired Events" view, you can see which event has been fired and when.
Configuration Profiles
Quarkus supports the notion of configuration profiles. These allow you to have multiple configurations in the same file and select between them via a profile name.
Quarkus has three profiles by default, although it is possible to use as many as you like. The default profiles are:
-
dev- Activated when in development mode (i.e.quarkus:dev) -
test- Activated when running tests -
prod- The default profile when not running in development or test mode
Let’s change the VillainApplicationLifeCycle so it displays the current profile.
For that, just add a log invoking ConfigUtils.getProfiles() in the onStart() method:
LOGGER.info("The application VILLAIN is starting with profile " + ConfigUtils.getProfiles());|
If not already done, you need to add the following import statement: |
In the application.properties file, you can prefix a property with the profile.
For example, we did add the %test.level.multiplier=1 property in the previous chapter.
It indicates that the property level.multiplier is set to 1 in the test profile.
Now, you will get the dev profile enabled if you start your application in dev mode with ./mvnw compile quarkus:dev.
If you start the tests, the test profile is enabled (the multiplier is set to 1).
You can also create your own profiles, and activate them with the quarkus.profile property.
For example, to use a profile called foo, add the datasource for foo profile
%foo.quarkus.datasource.username=superbad
%foo.quarkus.datasource.password=superbad
%foo.quarkus.datasource.jdbc.url=jdbc:postgresql://localhost:5432/villains_database
%foo.quarkus.hibernate-orm.sql-load-script=import.sql
package your application with ./mvnw package, and start it with java -Dquarkus.profile=foo -jar target/quarkus-app/quarkus-run.jar.
You will see that the foo profile is enabled.
As not overridden, the level.multiplier property has the value 0.5.
Profiles are handy to customize the configuration per environment. We are going to see an example of such customization in the next section.
Reactive
Quarkus combines the build time principle with a reactive core. The combination of these two characteristics improves the application concurrency and makes use of resources more efficiently. In this chapter, we will see the counterpart of the Villain microservice: the Hero microservice! Instead of the imperative approach used for the villains, we will use reactive programming and Hibernate Reactive. The logic of the microservice is the same.
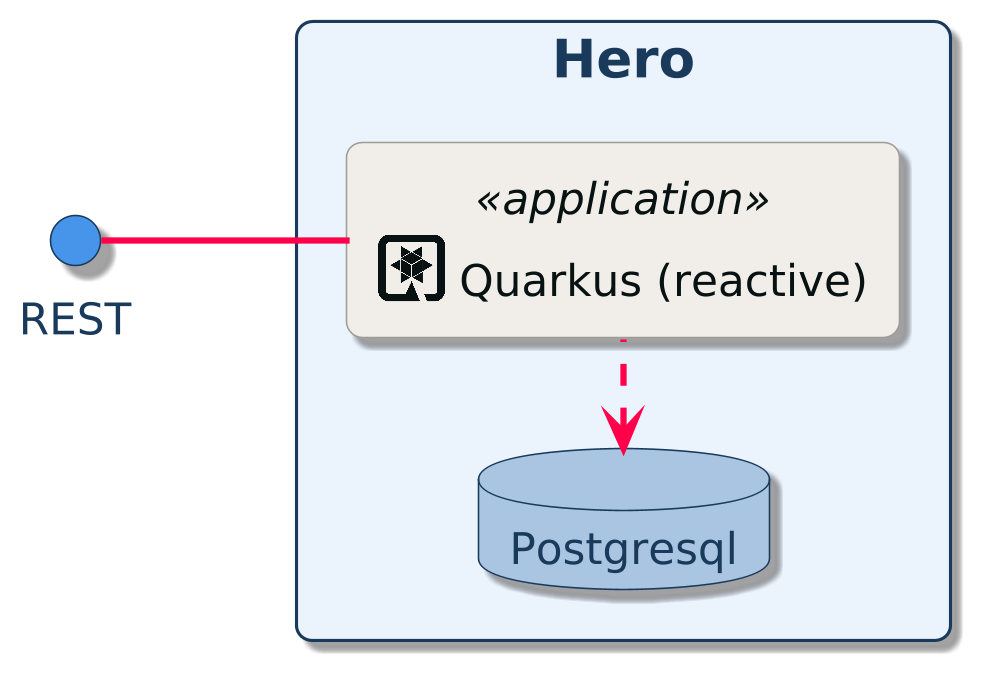
In the following sections, you will learn:
-
How to create a new reactive Quarkus application
-
How to implement REST API using JAX-RS and the Quarkus REST extension using a reactive development model
-
How to access your database using Hibernate Reactive with Panache
-
How to use transactions the reactive way
| This service is exposed on the port 8083. |
Why reactive?
"Reactive" is a set of principles to build better distributed systems. By following these principles, you create more elastic and resilient systems.
One of the central aspects of being reactive is about using non-blocking I/O to handle remote interactions efficiently. With a few threads, your application can handle many concurrent I/Os. A consequence of such usage is the need to implement applications that do not block these threads. There are multiple approaches to do so, such as callbacks, co-routines, and reactive programming.
Quarkus encourages users to use Mutiny, an intuitive and event-driven reactive programming library. In this section, we will cover the basics of Mutiny and implement an entirely reactive microservice.
Hero Microservice
New microservice, new project!
The easiest way to create this new Quarkus project is to use the Quarkus Maven plugin.
Open a terminal and run the following command under the quarkus-workshop-super-heroes/super-heroes directory
./mvnw io.quarkus:quarkus-maven-plugin:3.33.2:create \
    -DplatformVersion=3.33.2 \
    -DprojectGroupId=io.quarkus.workshop.super-heroes \
    -DprojectArtifactId=rest-heroes \
    -DclassName="io.quarkus.workshop.superheroes.hero.HeroResource" \
    -Dpath="api/heroes" \
    -Dextensions="rest-jackson,quarkus-hibernate-validator,quarkus-smallrye-openapi,quarkus-hibernate-reactive-panache,quarkus-reactive-pg-client"
As you can see, we can select multiple extensions during the project creation:
-
rest-jacksonprovides Quarkus REST and the ability to map JSON objects, -
quarkus-hibernate-validatorprovides the Hibernate Validator support, -
quarkus-smallrye-openapiprovides the OpenAPI descriptor support and the Swagger UI in the dev console, -
quarkus-hibernate-reactive-panacheprovides Panache entity supports using Hibernate Reactive, an ORM using reactive database drivers, -
quarkus-reactive-pg-clientprovides the reactive database driver used by Hibernate Reactive to interact with PostGreSQL databases.
If you want your IDE to manage this new Maven project, you can declare it in the parent POM by adding this new module in the <modules> section:
<module>super-heroes/rest-heroes</module>Directory Structure
At the end of this chapter, you will end up with the following directory structure:
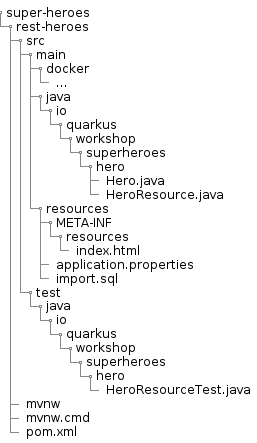
The Hero entity
Let’s start with the Hero entity class.
Create the io.quarkus.workshop.superheroes.hero.Hero class in the created project with the following content:
package io.quarkus.workshop.superheroes.hero;

import io.quarkus.hibernate.reactive.panache.PanacheEntity;
import io.smallrye.mutiny.Uni;

import jakarta.persistence.Column;
import jakarta.persistence.Entity;
import jakarta.validation.constraints.Min;
import jakarta.validation.constraints.NotNull;
import jakarta.validation.constraints.Size;

import java.util.Random;

@Entity
public class Hero extends PanacheEntity {

    @NotNull
    @Size(min = 3, max = 50)
    public String name;

    public String otherName;

    @NotNull
    @Min(1)
    public int level;
    public String picture;

    @Column(columnDefinition = "TEXT")
    public String powers;

    public static Uni<Hero> findRandom() {
        Random random = new Random();
        return count()
            .map(count -> random.nextInt(count.intValue()))
            .chain(randomHero -> findAll().page(randomHero, 1)
                .firstResult());
    }

    @Override
    public String toString() {
        return "Hero{" +
            "id=" + id +
            ", name='" + name + '\'' +
            ", otherName='" + otherName + '\'' +
            ", level=" + level +
            ", picture='" + picture + '\'' +
            ", powers='" + powers + '\'' +
            '}';
    }
}
First, note that we are extending io.quarkus.hibernate.reactive.panache.PanacheEntity.
It’s the reactive variant of import io.quarkus.hibernate.orm.panache.PanacheEntity.
As a consequence, methods are asynchronous, and instead of returning an object, they return asynchronous structure that will let you know when the object is ready to be consumed.
The field part is the same as for the Villain.
The toString method is also equivalent.
The major difference is the findRandom method.
Instead of returning a Hero, it returns a Uni<Hero.
A Uni represents an asynchronous action.
Unlike with the imperative development model, we cannot block the thread waiting for the result.
Here, we need to register a continuation invoked when the result is available.
During that time, the thread is released and can be used to handle another request.
Let’s split the findRandom method to better understand what’s going on:
-
count()returns aUni<Long>with the number of heroes stored in the database, -
when this count is retrieved from the database, it transforms the result into a random number,
-
when this is computed, it chains the processing with another asynchronous action which retrieve the hero located at the random index.
As a consequence this method returns a Uni<Hero>.
The consumer will need to register a continuation to receive the Hero.
Uni API in 2 minutes
Uni comes from Mutiny, an intuitive, event-driven reactive programming library.
There are a few method to understand to use Uni:
-
map: transforms (synchronously) an item when this item becomes available. -
chain: transforms an item, when it become available, into anotherUni. The outcome will be the outcome of the producedUni. -
replaceWith: replaces an item with something else. -
invoke: invokes the method when the item becomes available. It does not modify the item.
Uni is lazy. To trigger the computation you need to subscribe to it.
However, most of the time, Quarkus handles the subscription for us.
|
The Hero Resource
Unlike the VillainResource, the HeroResource uses the reactive development model.
It returns asynchronous structures (Uni)[16].
Open the HeroResource and update the content to be:
package io.quarkus.workshop.superheroes.hero;

import io.quarkus.hibernate.reactive.panache.common.WithTransaction;
import io.smallrye.mutiny.Uni;
import org.eclipse.microprofile.openapi.annotations.Operation;
import org.eclipse.microprofile.openapi.annotations.enums.SchemaType;
import org.eclipse.microprofile.openapi.annotations.media.Content;
import org.eclipse.microprofile.openapi.annotations.media.Schema;
import org.eclipse.microprofile.openapi.annotations.responses.APIResponse;
import org.eclipse.microprofile.openapi.annotations.tags.Tag;
import org.jboss.logging.Logger;
import org.jboss.resteasy.reactive.RestPath;
import org.jboss.resteasy.reactive.RestResponse;


import jakarta.validation.Valid;
import jakarta.ws.rs.DELETE;
import jakarta.ws.rs.GET;
import jakarta.ws.rs.POST;
import jakarta.ws.rs.PUT;
import jakarta.ws.rs.Path;
import jakarta.ws.rs.Produces;
import jakarta.ws.rs.core.Context;
import jakarta.ws.rs.core.MediaType;
import jakarta.ws.rs.core.Response;
import jakarta.ws.rs.core.UriBuilder;
import jakarta.ws.rs.core.UriInfo;

import java.net.URI;
import java.util.List;

import static jakarta.ws.rs.core.MediaType.APPLICATION_JSON;

@Path("/api/heroes")
@Tag(name = "heroes")
public class HeroResource {

    Logger logger;

    public HeroResource(Logger logger) {
        this.logger = logger;
    }

    @Operation(summary = "Returns a random hero")
    @GET
    @Path("/random")
    @APIResponse(responseCode = "200", content = @Content(mediaType = APPLICATION_JSON, schema = @Schema(implementation = Hero.class, required = true)))
    public Uni<RestResponse<Hero>> getRandomHero() {
        return Hero.findRandom()
            .onItem().ifNotNull().transform(h -> {
                this.logger.debugf("Found random hero: %s", h);
                return RestResponse.ok(h);
            })
            .onItem().ifNull().continueWith(() -> {
                this.logger.debug("No random hero found");
                return RestResponse.notFound();
            });
    }

    @Operation(summary = "Returns all the heroes from the database")
    @GET
    @APIResponse(responseCode = "200", content = @Content(mediaType = APPLICATION_JSON, schema = @Schema(implementation = Hero.class, type = SchemaType.ARRAY)))
    public Uni<List<Hero>> getAllHeroes() {
        return Hero.listAll();
    }

    @Operation(summary = "Returns a hero for a given identifier")
    @GET
    @Path("/{id}")
    @APIResponse(responseCode = "200", content = @Content(mediaType = APPLICATION_JSON, schema = @Schema(implementation = Hero.class)))
    @APIResponse(responseCode = "204", description = "The hero is not found for a given identifier")
    public Uni<RestResponse<Hero>> getHero(@RestPath Long id) {
        return Hero.<Hero>findById(id)
            .map(hero -> {
                if (hero != null) {
                    return RestResponse.ok(hero);
                }
                logger.debugf("No Hero found with id %d", id);
                return RestResponse.noContent();
            });
    }

    @Operation(summary = "Creates a valid hero")
    @POST
    @APIResponse(responseCode = "201", description = "The URI of the created hero", content = @Content(mediaType = APPLICATION_JSON, schema = @Schema(implementation = URI.class)))
    @WithTransaction
    public Uni<RestResponse<URI>> createHero(@Valid Hero hero, @Context UriInfo uriInfo) {
        return hero.<Hero>persist()
            .map(h -> {
                UriBuilder builder = uriInfo.getAbsolutePathBuilder().path(Long.toString(h.id));
                logger.debug("New Hero created with URI " + builder.build().toString());
                return RestResponse.created(builder.build());
            });
    }

    @Operation(summary = "Updates an exiting hero")
    @PUT
    @APIResponse(responseCode = "200", description = "The updated hero", content = @Content(mediaType = APPLICATION_JSON, schema = @Schema(implementation = Hero.class)))
    @WithTransaction
    public Uni<Hero> updateHero(@Valid Hero hero) {
        return Hero.<Hero>findById(hero.id)
            .map(retrieved -> {
                retrieved.name = hero.name;
                retrieved.otherName = hero.otherName;
                retrieved.level = hero.level;
                retrieved.picture = hero.picture;
                retrieved.powers = hero.powers;
                return retrieved;
            })
            .map(h -> {
                logger.debugf("Hero updated with new valued %s", h);
                return h;
            });

    }

    @Operation(summary = "Deletes an exiting hero")
    @DELETE
    @Path("/{id}")
    @APIResponse(responseCode = "204")
    @WithTransaction
    public Uni<RestResponse<Void>> deleteHero(@RestPath Long id) {
        return Hero.deleteById(id)
            .invoke(() -> logger.debugf("Hero deleted with %d", id))
            .replaceWith(RestResponse.noContent());
    }

    @GET
    @Produces(MediaType.TEXT_PLAIN)
    @Path("/hello")
    public String hello() {
        return "Hello Hero Resource";
    }
}
The resource implements the same HTTP API as the villain counterpart. It does not use a transactional service, but uses Panache method directly.
As you can see, instead of returning the result directly, it returns Uni<T>.
Quarkus retrieves the Uni and waits for the outcome to be available before writing the response.
During that time, it can handle other requests.
Notice also the @WithTransaction, which is the reactive variant of @Transactional.
Configuring the reactive access to the database
Configuring the reactive access to the database is relatively similar to configuring the JDBC url.
Open the application.properties file and add:
## HTTP configuration
quarkus.http.port=8083

## Custom banner file path
quarkus.banner.path=banner.txt

# drop and create the database at startup (use `update` to only update the schema)
quarkus.hibernate-orm.schema-management.strategy=drop-and-create

%prod.quarkus.datasource.username=superman
%prod.quarkus.datasource.password=superman
%prod.quarkus.datasource.reactive.url=postgresql://localhost:5432/heroes_database
%prod.quarkus.hibernate-orm.sql-load-script=import.sql
The prod profile contains the %prod.quarkus.datasource.reactive.url which configure the access to the database.
We also set the port to be 8083.
Importing heroes
Create the src/main/resources/import.sql and copy the content from import.sql.
ALTER SEQUENCE hero_seq RESTART WITH 50;

INSERT INTO hero(id, name, otherName, picture, powers, level)
VALUES (nextval('hero_seq'), 'Chewbacca', '', 'https://www.superherodb.com/pictures2/portraits/10/050/10466.jpg',
        'Agility, Longevity, Marksmanship, Natural Weapons, Stealth, Super Strength, Weapons Master', 5);
INSERT INTO hero(id, name, otherName, picture, powers, level)
VALUES (nextval('hero_seq'), 'Angel Salvadore', 'Angel Salvadore Bohusk',
        'https://www.superherodb.com/pictures2/portraits/10/050/1406.jpg',
        'Animal Attributes, Animal Oriented Powers, Flight, Regeneration, Toxin and Disease Control', 4);
INSERT INTO hero(id, name, otherName, picture, powers, level)
VALUES (nextval('hero_seq'), 'Bill Harken', '', 'https://www.superherodb.com/pictures2/portraits/10/050/1527.jpg',
        'Super Speed, Super Strength, Toxin and Disease Resistance', 6);
...
Testing the heroes
Time for some tests!
Open the io.quarkus.workshop.superheroes.hero.HeroResourceTest class and copy the following content:
package io.quarkus.workshop.superheroes.hero;

import io.quarkus.test.junit.QuarkusTest;
import io.restassured.common.mapper.TypeRef;
import org.hamcrest.core.Is;
import org.junit.jupiter.api.MethodOrderer;
import org.junit.jupiter.api.Order;
import org.junit.jupiter.api.Test;
import org.junit.jupiter.api.TestMethodOrder;

import java.util.List;
import java.util.Random;

import static io.restassured.RestAssured.get;
import static io.restassured.RestAssured.given;
import static jakarta.ws.rs.core.HttpHeaders.ACCEPT;
import static jakarta.ws.rs.core.HttpHeaders.CONTENT_TYPE;
import static jakarta.ws.rs.core.MediaType.APPLICATION_JSON;
import static jakarta.ws.rs.core.MediaType.TEXT_PLAIN;
import static jakarta.ws.rs.core.Response.Status.BAD_REQUEST;
import static jakarta.ws.rs.core.Response.Status.CREATED;
import static jakarta.ws.rs.core.Response.Status.NO_CONTENT;
import static jakarta.ws.rs.core.Response.Status.OK;
import static org.hamcrest.CoreMatchers.is;
import static org.junit.jupiter.api.Assertions.assertEquals;
import static org.junit.jupiter.api.Assertions.assertNotNull;
import static org.junit.jupiter.api.Assertions.assertTrue;

@QuarkusTest
@TestMethodOrder(MethodOrderer.OrderAnnotation.class)
public class HeroResourceTest {

    private static final String JSON = "application/json;charset=UTF-8";

    private static final String DEFAULT_NAME = "Super Baguette";
    private static final String UPDATED_NAME = "Super Baguette (updated)";
    private static final String DEFAULT_OTHER_NAME = "Super Baguette Tradition";
    private static final String UPDATED_OTHER_NAME = "Super Baguette Tradition (updated)";
    private static final String DEFAULT_PICTURE = "super_baguette.png";
    private static final String UPDATED_PICTURE = "super_baguette_updated.png";
    private static final String DEFAULT_POWERS = "eats baguette really quickly";
    private static final String UPDATED_POWERS = "eats baguette really quickly (updated)";
    private static final int DEFAULT_LEVEL = 42;
    private static final int UPDATED_LEVEL = 43;

    private static final int NB_HEROES = 941;
    private static String heroId;

    @Test
    void shouldPingOpenAPI() {
        given()
            .header(ACCEPT, APPLICATION_JSON)
            .when()
            .get("/q/openapi")
            .then()
            .statusCode(OK.getStatusCode());
    }

    @Test
    public void testHelloEndpoint() {
        given()
            .header(ACCEPT, TEXT_PLAIN)
            .when()
            .get("/api/heroes/hello")
            .then()
            .statusCode(200)
            .body(is("Hello Hero Resource"));
    }

    @Test
    void shouldNotGetUnknownHero() {
        Long randomId = new Random().nextLong();
        given()
            .pathParam("id", randomId)
            .when()
            .get("/api/heroes/{id}")
            .then()
            .statusCode(NO_CONTENT.getStatusCode());
    }

    @Test
    void shouldGetRandomHero() {
        given()
            .when()
            .get("/api/heroes/random")
            .then()
            .statusCode(OK.getStatusCode())
            .contentType(APPLICATION_JSON);
    }

    @Test
    void shouldNotAddInvalidItem() {
        Hero hero = new Hero();
        hero.name = null;
        hero.otherName = DEFAULT_OTHER_NAME;
        hero.picture = DEFAULT_PICTURE;
        hero.powers = DEFAULT_POWERS;
        hero.level = 0;

        given()
            .body(hero)
            .header(CONTENT_TYPE, APPLICATION_JSON)
            .header(ACCEPT, APPLICATION_JSON)
            .when()
            .post("/api/heroes")
            .then()
            .statusCode(BAD_REQUEST.getStatusCode());
    }

    @Test
    @Order(1)
    void shouldGetInitialItems() {
        List<Hero> heroes = get("/api/heroes").then()
                                              .statusCode(OK.getStatusCode())
                                              .contentType(APPLICATION_JSON)
                                              .extract()
                                              .body()
                                              .as(getHeroTypeRef());
        assertEquals(NB_HEROES, heroes.size());
    }

    @Test
    @Order(2)
    void shouldAddAnItem() {
        Hero hero = new Hero();
        hero.name = DEFAULT_NAME;
        hero.otherName = DEFAULT_OTHER_NAME;
        hero.picture = DEFAULT_PICTURE;
        hero.powers = DEFAULT_POWERS;
        hero.level = DEFAULT_LEVEL;

        String location = given()
            .body(hero)
            .header(CONTENT_TYPE, APPLICATION_JSON)
            .header(ACCEPT, APPLICATION_JSON)
            .when()
            .post("/api/heroes")
            .then()
            .statusCode(CREATED.getStatusCode())
            .extract()
            .header("Location");
        assertTrue(location.contains("/api/heroes"));

        // Stores the id
        String[] segments = location.split("/");
        heroId = segments[segments.length - 1];
        assertNotNull(heroId);

        given()
            .pathParam("id", heroId)
            .when()
            .get("/api/heroes/{id}")
            .then()
            .statusCode(OK.getStatusCode())
            .body("name", Is.is(DEFAULT_NAME))
            .body("otherName", Is.is(DEFAULT_OTHER_NAME))
            .body("level", Is.is(DEFAULT_LEVEL))
            .body("picture", Is.is(DEFAULT_PICTURE))
            .body("powers", Is.is(DEFAULT_POWERS));

        List<Hero> heroes = get("/api/heroes").then()
                                              .statusCode(OK.getStatusCode())
                                              .extract()
                                              .body()
                                              .as(getHeroTypeRef());
        assertEquals(NB_HEROES + 1, heroes.size());
    }

    @Test
    @Order(3)
    void shouldUpdateAnItem() {
        Hero hero = new Hero();
        hero.id = Long.valueOf(heroId);
        hero.name = UPDATED_NAME;
        hero.otherName = UPDATED_OTHER_NAME;
        hero.picture = UPDATED_PICTURE;
        hero.powers = UPDATED_POWERS;
        hero.level = UPDATED_LEVEL;

        given()
            .body(hero)
            .header(CONTENT_TYPE, APPLICATION_JSON)
            .header(ACCEPT, APPLICATION_JSON)
            .when()
            .put("/api/heroes")
            .then()
            .statusCode(OK.getStatusCode())
            .contentType(APPLICATION_JSON)
            .body("name", Is.is(UPDATED_NAME))
            .body("otherName", Is.is(UPDATED_OTHER_NAME))
            .body("level", Is.is(UPDATED_LEVEL))
            .body("picture", Is.is(UPDATED_PICTURE))
            .body("powers", Is.is(UPDATED_POWERS));

        List<Hero> heroes = get("/api/heroes").then()
                                              .statusCode(OK.getStatusCode())
                                              .contentType(APPLICATION_JSON)
                                              .extract()
                                              .body()
                                              .as(getHeroTypeRef());
        assertEquals(NB_HEROES + 1, heroes.size());
    }

    @Test
    @Order(4)
    void shouldRemoveAnItem() {
        given()
            .pathParam("id", heroId)
            .when()
            .delete("/api/heroes/{id}")
            .then()
            .statusCode(NO_CONTENT.getStatusCode());

        List<Hero> heroes = get("/api/heroes").then()
                                              .statusCode(OK.getStatusCode())
                                              .contentType(APPLICATION_JSON)
                                              .extract()
                                              .body()
                                              .as(getHeroTypeRef());
        assertEquals(NB_HEROES, heroes.size());
    }

    private TypeRef<List<Hero>> getHeroTypeRef() {
        return new TypeRef<List<Hero>>() {
            // Kept empty on purpose
        };
    }
}
The tests are very similar to the ones from the villain service.
Running, Testing and Packaging the Application
First, make sure the tests pass by executing the command ./mvnw test (or from your IDE).
Now that the tests are green, we are ready to run our application.
Use ./mvnw quarkus:dev to start it.
Once the application is started, create a new hero with the following cUrl command:
curl -X POST -d '{"level":2, "name":"Super level", "powers":"leaping"}' -H "Content-Type: application/json" http://localhost:8083/api/heroes -vThanks to the verbose mode (-v) you should see a similar output:
< HTTP/1.1 201 Created
< Location: http://localhost:8083/api/heroes/952
The cUrl command returns the location of the newly created hero. Take this URL and do an HTTP GET on it.
|
The example shows a newly created Hero with id |
curl http://localhost:8083/api/heroes/952 | jq{
"id": 952,
"name": "Super level",
"otherName": null,
"level": 2,
"picture": null,
"powers": "leaping"
}Remember that you can also check Swagger UI by going to the dev console: http://localhost:8083/q/dev.
Then, build the application using: ./mvnw package, and run the application using java -jar target/quarkus-app/quarkus-run.jar.
Open your browser and go to http://localhost:8083/api/heroes.
From Microservice to Microservices
So far we’ve built two microservices: the villains and heroes microservices. In the following sections you will develop an extra microservice: a fight microservice where heroes and villains fight. We will also add a React front-end, so we can fight graphically. But as you can notice in the diagram below, these microservices still not communicate with each other. You will have to wait the next chapter for that ;o)
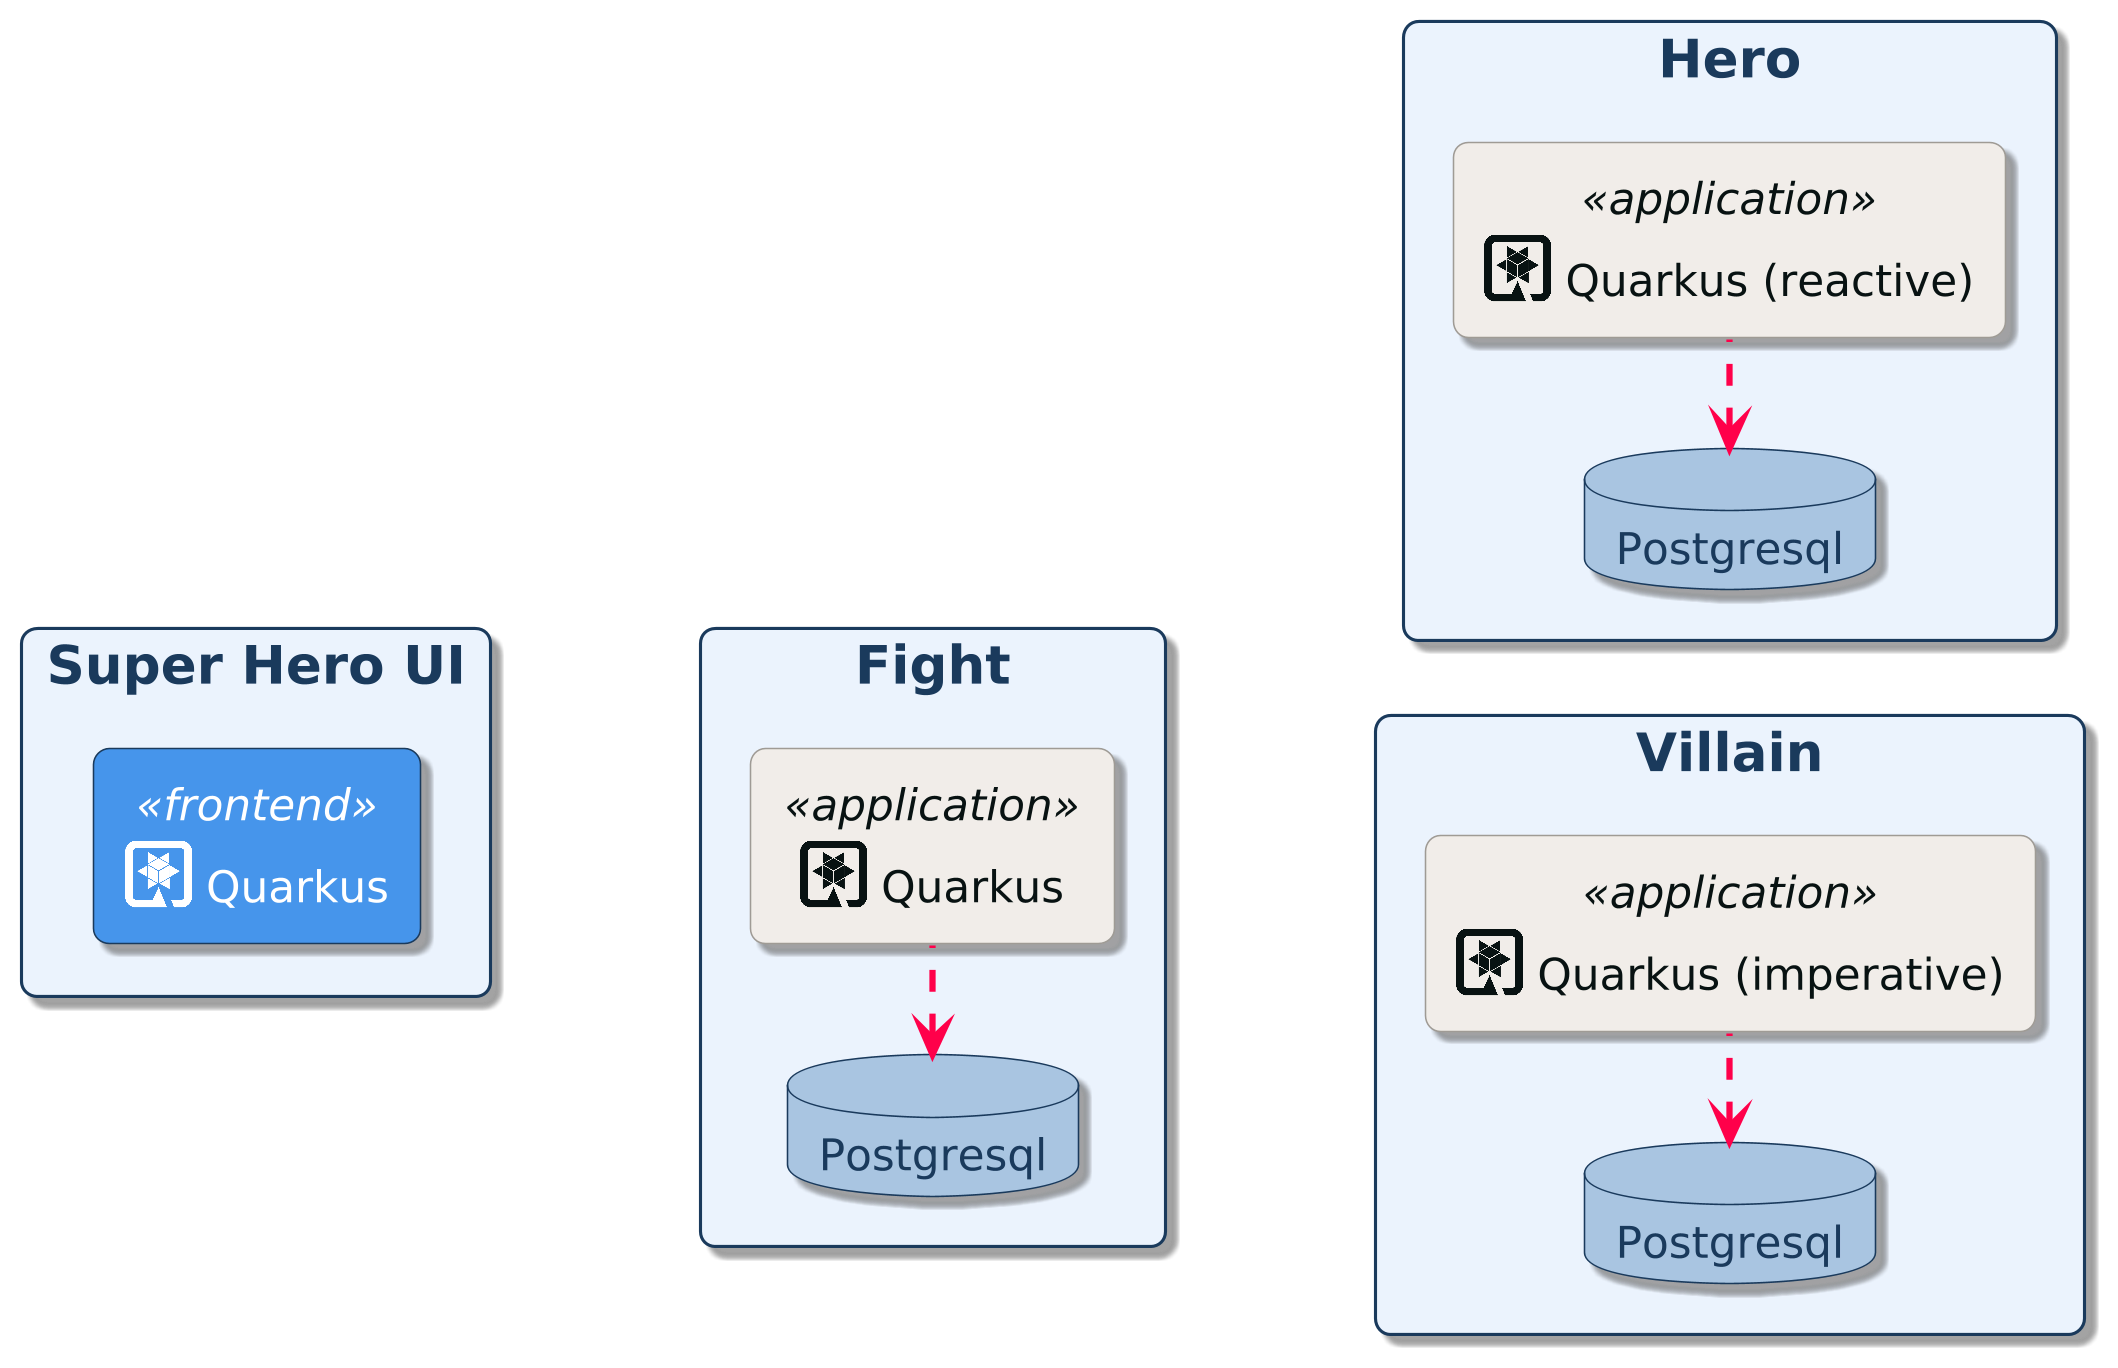
Each microservice is developed in its own directory.
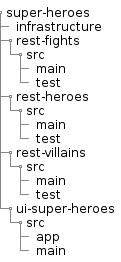
In the following sections, you will:
-
Create a new Quarkus application
-
Implement REST API using JAX-RS
-
Access your database using Hibernate ORM with Panache
-
Use transactions
| This service is exposed on the port 8082. |
Fight Microservice
Ok, let’s develop another microservice. We have a REST API that returns a random Hero. Another REST API that returns a random Villain… we need a new REST API that invokes those two, gets one random hero and one random villain and makes them fight. Let’s call it the Fight API.
| This microservice uses the imperative development model but use reactive extensions. |
Bootstrapping the Fight REST Endpoint
Like for the Hero and Villain API, the easiest way to create this new Quarkus project is to use a Maven archetype.
Under the quarkus-workshop-super-heroes/super-heroes root directory where you have all your code.
Open a terminal and run the following command:
./mvnw io.quarkus:quarkus-maven-plugin:3.33.2:create \
  -DplatformVersion=3.33.2 \
  -DprojectGroupId=io.quarkus.workshop.super-heroes \
  -DprojectArtifactId=rest-fights \
  -DclassName="io.quarkus.workshop.superheroes.fight.FightResource" \
  -Dpath="api/fights" \
  -Dextensions="jdbc-postgresql,hibernate-orm-panache,hibernate-validator,rest-jackson,smallrye-openapi,kafka"
If you open the pom.xml file, you will see that the following extensions have been imported:
-
io.quarkus:quarkus-hibernate-orm-panache -
io.quarkus:quarkus-hibernate-validator -
io.quarkus:quarkus-smallrye-openapi -
io.quarkus:quarkus-messaging-kafka -
io.quarkus:quarkus-rest-jackson -
io.quarkus:quarkus-jdbc-postgresql
You can see that beyond the extensions we have used so far, we added the Kafka support which uses Eclipse MicroProfile Reactive Messaging. Stay tuned.
The Quarkus Maven plugin has generated some code that we won’t be using.
You can delete the Java classes MyReactiveMessagingApplication and MyReactiveMessagingApplicationTest.
If you want your IDE to manage this new Maven project, you can declare it in the parent POM by adding this new module in the <modules> section:
<module>super-heroes/rest-fights</module>Directory Structure
At the end you should have the following directory structure:
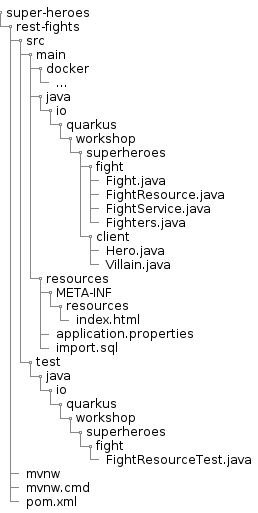
Fight Entity
A fight is between a hero and a villain.
Each time there is a fight, there is a winner and a loser.
So the Fight entity is there to store all these fights.
Create the io.quarkus.workshop.superheroes.fight.Fight class with the following content:
package io.quarkus.workshop.superheroes.fight;

import io.quarkus.hibernate.orm.panache.PanacheEntity;
import org.eclipse.microprofile.openapi.annotations.media.Schema;

import jakarta.persistence.Column;
import jakarta.persistence.Entity;
import jakarta.validation.constraints.NotNull;

import java.time.Instant;

@Entity
@Schema(description = "Each fight has a winner and a loser")
public class Fight extends PanacheEntity {

    @NotNull
    public Instant fightDate;
    @NotNull
    public String winnerName;
    @NotNull
    public int winnerLevel;
    @NotNull
    @Column(columnDefinition = "TEXT")
    public String winnerPowers;
    @NotNull
    public String winnerPicture;
    @NotNull
    public String loserName;
    @NotNull
    public int loserLevel;
    @NotNull
    @Column(columnDefinition = "TEXT")
    public String loserPowers;
    @NotNull
    public String loserPicture;
    @NotNull
    public String winnerTeam;
    @NotNull
    public String loserTeam;
}
Fighters Bean
Now comes a trick.
The Fight REST API will ultimately invoke the Hero and Villain APIs (next sections) to get two random fighters.
The Fighters class has one Hero and one Villain.
Notice that Fighters is not an entity, it is not persisted in the database, just marshalled and unmarshalled to JSon.
Create the io.quarkus.workshop.superheroes.fight.Fighters class, with the following content:
package io.quarkus.workshop.superheroes.fight;

import io.quarkus.workshop.superheroes.fight.client.Hero;
import io.quarkus.workshop.superheroes.fight.client.Villain;
import org.eclipse.microprofile.openapi.annotations.media.Schema;

import jakarta.validation.constraints.NotNull;

@Schema(description = "A fight between one hero and one villain")
public class Fighters {

    @NotNull
    public Hero hero;
    @NotNull
    public Villain villain;

}
It does not compile because it needs a Hero class and a Villain class.
The Fight REST API is just interested in the hero’s name, level, picture and powers (not the other name as described in the Hero API).
So create the Hero bean looks like this (notice the client subpackage):
package io.quarkus.workshop.superheroes.fight.client;

import org.eclipse.microprofile.openapi.annotations.media.Schema;

import jakarta.validation.constraints.NotNull;

@Schema(description = "The hero fighting against the villain")
public class Hero {

    @NotNull
    public String name;
    @NotNull
    public int level;
    @NotNull
    public String picture;
    public String powers;

}
Also create the Villain counterpart (also in the client subpackage):
package io.quarkus.workshop.superheroes.fight.client;

import org.eclipse.microprofile.openapi.annotations.media.Schema;

import jakarta.validation.constraints.NotNull;

@Schema(description = "The villain fighting against the hero")
public class Villain {

    @NotNull
    public String name;
    @NotNull
    public int level;
    @NotNull
    public String picture;
    public String powers;

}
So, these classes are just used to map the results from the Hero and Villain microservices.
FightService Transactional Service
Now, let’s create a FightService class that orchestrate the fights.
Create the io.quarkus.workshop.superheroes.fight.FightService class with the following content:
package io.quarkus.workshop.superheroes.fight;

import org.jboss.logging.Logger;

import jakarta.enterprise.context.ApplicationScoped;
import jakarta.inject.Inject;
import jakarta.transaction.Transactional;

import java.time.Instant;
import java.util.List;
import java.util.Random;

import static jakarta.transaction.Transactional.TxType.REQUIRED;
import static jakarta.transaction.Transactional.TxType.SUPPORTS;

@ApplicationScoped
@Transactional(SUPPORTS)
public class FightService {

    @Inject Logger logger;

    private final Random random = new Random();

    public List<Fight> findAllFights() {
        return Fight.listAll();
    }

    public Fight findFightById(Long id) {
        return Fight.findById(id);
    }

    public Fighters findRandomFighters() {
        // Will be implemented later
        return null;
    }

    @Transactional(REQUIRED)
    public Fight persistFight(Fighters fighters) {
        // Amazingly fancy logic to determine the winner...
        Fight fight;

        int heroAdjust = random.nextInt(20);
        int villainAdjust = random.nextInt(20);

        if ((fighters.hero.level + heroAdjust)
            > (fighters.villain.level + villainAdjust)) {
            fight = heroWon(fighters);
        } else if (fighters.hero.level < fighters.villain.level) {
            fight = villainWon(fighters);
        } else {
            fight = random.nextBoolean() ? heroWon(fighters) : villainWon(fighters);
        }

        fight.fightDate = Instant.now();
        fight.persist();

        return fight;
    }

    private Fight heroWon(Fighters fighters) {
        logger.info("Yes, Hero won :o)");
        Fight fight = new Fight();
        fight.winnerName = fighters.hero.name;
        fight.winnerPicture = fighters.hero.picture;
        fight.winnerLevel = fighters.hero.level;
        fight.winnerPowers = fighters.hero.powers;
        fight.loserName = fighters.villain.name;
        fight.loserPicture = fighters.villain.picture;
        fight.loserLevel = fighters.villain.level;
        fight.loserPowers = fighters.villain.powers;
        fight.winnerTeam = "heroes";
        fight.loserTeam = "villains";
        return fight;
    }

    private Fight villainWon(Fighters fighters) {
        logger.info("Gee, Villain won :o(");
        Fight fight = new Fight();
        fight.winnerName = fighters.villain.name;
        fight.winnerPicture = fighters.villain.picture;
        fight.winnerLevel = fighters.villain.level;
        fight.winnerPowers = fighters.villain.powers;
        fight.loserName = fighters.hero.name;
        fight.loserPicture = fighters.hero.picture;
        fight.loserLevel = fighters.hero.level;
        fight.loserPowers = fighters.hero.powers;
        fight.winnerTeam = "villains";
        fight.loserTeam = "heroes";
        return fight;
    }

}
Notice the persistFight method.
This method is the one creating a fight between a hero and a villain.
As you can see the algorithm to determine the winner is a bit random (even though it uses the levels).
If you are not happy about the way the fight operates, choose your own winning algorithm ;o)
|
For now, the |
FightResource Endpoint
To expose a REST API we also need a FightResource (with OpenAPI annotations of course).
package io.quarkus.workshop.superheroes.fight;

import jakarta.ws.rs.*;
import org.eclipse.microprofile.config.inject.ConfigProperty;
import org.jboss.logging.Logger;

import jakarta.enterprise.context.ApplicationScoped;
import jakarta.inject.Inject;
import jakarta.validation.Valid;
import jakarta.ws.rs.core.MediaType;
import jakarta.ws.rs.core.Response;
import jakarta.ws.rs.core.UriInfo;

import java.util.List;

import static jakarta.ws.rs.core.MediaType.APPLICATION_JSON;
import static jakarta.ws.rs.core.MediaType.TEXT_PLAIN;

@Path("/api/fights")
@Produces(APPLICATION_JSON)
@ApplicationScoped
public class FightResource {

    @Inject
    Logger logger;

    @Inject
    FightService service;


    @GET
    @Path("/randomfighters")
    public Response getRandomFighters() {
        Fighters fighters = service.findRandomFighters();
        logger.debug("Get random fighters " + fighters);
        return Response.ok(fighters).build();
    }

    @GET
    public Response getAllFights() {
        List<Fight> fights = service.findAllFights();
        logger.debug("Total number of fights " + fights);
        return Response.ok(fights).build();
    }

    @GET
    @Path("/{id}")
    public Response getFight(Long id) {
        Fight fight = service.findFightById(id);
        if (fight != null) {
            logger.debug("Found fight " + fight);
            return Response.ok(fight).build();
        } else {
            logger.debug("No fight found with id " + id);
            return Response.noContent().build();
        }
    }

    @POST
    public Fight fight(@Valid Fighters fighters, UriInfo uriInfo) {
        return service.persistFight(fighters);
    }

    @GET
    @Produces(MediaType.TEXT_PLAIN)
    @Path("/hello")
    public String hello() {
        return "Hello Fight Resource";
    }

}|
The OpenAPI annotations have been omitted to keep the service focused on the task. Feel free to add them if you want complete OpenAPI descriptors. Notice that most of the REST endpoints that you’ve seen so far produce or consume JSON.
JSON being the default media type in Quarkus, we could have omitted the |
Adding Data
To load some SQL statements when Hibernate ORM starts, create the src/main/resources/import.sql file with the following content:
ALTER SEQUENCE fight_seq RESTART WITH 50;

INSERT INTO fight(id, fightDate, winnerName, winnerLevel, winnerPicture, winnerPowers, loserName, loserLevel, loserPicture, loserPowers, winnerTeam, loserTeam)
VALUES (nextval('fight_seq'), current_timestamp,
        'Chewbacca', 5, 'https://www.superherodb.com/pictures2/portraits/10/050/10466.jpg', 'Agility, Longevity, Marksmanship, Natural Weapons, Stealth, Super Strength, Weapons Master',
        'Buuccolo', 3, 'https://www.superherodb.com/pictures2/portraits/10/050/15355.jpg', 'Accelerated Healing, Adaptation, Agility, Flight, Immortality, Intelligence, Invulnerability, Reflexes, Self-Sustenance, Size Changing, Spatial Awareness, Stamina, Stealth, Super Breath, Super Speed, Super Strength, Teleportation',
        'heroes', 'villains');
INSERT INTO fight(id, fightDate, winnerName, winnerLevel, winnerPicture, winnerPowers, loserName, loserLevel, loserPicture, loserPowers, winnerTeam, loserTeam)
VALUES (nextval('fight_seq'), current_timestamp,
        'Galadriel', 10, 'https://www.superherodb.com/pictures2/portraits/10/050/11796.jpg', 'Danger Sense, Immortality, Intelligence, Invisibility, Magic, Precognition, Telekinesis, Telepathy',
        'Darth Vader', 8, 'https://www.superherodb.com/pictures2/portraits/10/050/10444.jpg', 'Accelerated Healing, Agility, Astral Projection, Cloaking, Danger Sense, Durability, Electrokinesis, Energy Blasts, Enhanced Hearing, Enhanced Senses, Force Fields, Hypnokinesis, Illusions, Intelligence, Jump, Light Control, Marksmanship, Precognition, Psionic Powers, Reflexes, Stealth, Super Speed, Telekinesis, Telepathy, The Force, Weapons Master',
        'heroes', 'villains');
INSERT INTO fight(id, fightDate, winnerName, winnerLevel, winnerPicture, winnerPowers, loserName, loserLevel, loserPicture, loserPowers, winnerTeam, loserTeam)
VALUES (nextval('fight_seq'), current_timestamp,
        'Annihilus', 23, 'https://www.superherodb.com/pictures2/portraits/10/050/1307.jpg', 'Agility, Durability, Flight, Reflexes, Stamina, Super Speed, Super Strength',
        'Shikamaru', 1, 'https://www.superherodb.com/pictures2/portraits/10/050/11742.jpg', 'Adaptation, Agility, Element Control, Fire Control, Intelligence, Jump, Marksmanship, Possession, Reflexes, Shapeshifting, Stamina, Stealth, Telekinesis, Wallcrawling, Weapon-based Powers, Weapons Master',
        'villains', 'heroes');
Configuration
As usual, we need to configure the application.
In the application.properties file add:
## HTTP configuration
quarkus.http.port=8082

## Custom banner file path
quarkus.banner.path=banner.txt

## drop and create the database at startup (use `update` to only update the schema)
quarkus.hibernate-orm.schema-management.strategy=drop-and-create

## Logging configuration
quarkus.log.console.format=%d{HH:mm:ss} %-5p [%c{2.}] (%t) %s%e%n
quarkus.log.console.level=DEBUG

## Production configuration
%prod.quarkus.datasource.jdbc.url=jdbc:postgresql://localhost:5432/fights_database
%prod.quarkus.datasource.db-kind=postgresql
%prod.quarkus.datasource.username=superfight
%prod.quarkus.datasource.password=superfight
%prod.quarkus.hibernate-orm.sql-load-script=import.sql
%prod.quarkus.log.console.level=INFO
%prod.quarkus.hibernate-orm.schema-management.strategy=update


## Kafka configuration
Note that the fight service uses the port 8082.
FightResourceTest Test Class
We need to test our REST API.
For that, copy the following FightResourceTest class under the src/test/java/io/quarkus/workshop/superheroes/fight directory.
package io.quarkus.workshop.superheroes.fight;

import io.quarkus.test.junit.QuarkusTest;
import io.quarkus.workshop.superheroes.fight.client.Hero;
import io.quarkus.workshop.superheroes.fight.client.Villain;
import io.restassured.common.mapper.TypeRef;
import org.hamcrest.core.Is;
import org.junit.jupiter.api.MethodOrderer;
import org.junit.jupiter.api.Order;
import org.junit.jupiter.api.Test;
import org.junit.jupiter.api.TestMethodOrder;

import java.util.List;

import java.util.Random;
import static io.restassured.RestAssured.get;
import static io.restassured.RestAssured.given;
import static jakarta.ws.rs.core.HttpHeaders.ACCEPT;
import static jakarta.ws.rs.core.HttpHeaders.CONTENT_TYPE;
import static jakarta.ws.rs.core.MediaType.APPLICATION_JSON;
import static jakarta.ws.rs.core.Response.Status.*;
import static org.hamcrest.CoreMatchers.*;
import static org.junit.jupiter.api.Assertions.assertEquals;
import static org.junit.jupiter.api.Assertions.assertNotNull;

@QuarkusTest
@TestMethodOrder(MethodOrderer.OrderAnnotation.class)
public class FightResourceTest {

    private static final String DEFAULT_WINNER_NAME = "Super Baguette";
    private static final String DEFAULT_WINNER_PICTURE = "super_baguette.png";
    private static final int DEFAULT_WINNER_LEVEL = 42;
    private static final String DEFAULT_WINNER_POWERS = "Eats baguette in less than a second";
    private static final String DEFAULT_LOSER_NAME = "Super Chocolatine";
    private static final String DEFAULT_LOSER_PICTURE = "super_chocolatine.png";
    private static final int DEFAULT_LOSER_LEVEL = 6;
    private static final String DEFAULT_LOSER_POWERS = "Transforms chocolatine into pain au chocolat";

    private static final int NB_FIGHTS = 3;
    private static String fightId;

    @Test
    void shouldPingOpenAPI() {
        given()
            .header(ACCEPT, APPLICATION_JSON)
            .when().get("/q/openapi")
            .then()
            .statusCode(OK.getStatusCode());
    }

    @Test
    public void testHelloEndpoint() {
        given()
            .when().get("/api/fights/hello")
            .then()
            .statusCode(200)
            .body(is("Hello Fight Resource"));
    }

    @Test
    void shouldNotGetUnknownFight() {
        Long randomId = new Random().nextLong();
        given()
            .pathParam("id", randomId)
            .when().get("/api/fights/{id}")
            .then()
            .statusCode(NO_CONTENT.getStatusCode());
    }

    @Test
    void shouldNotAddInvalidItem() {
        Fighters fighters = new Fighters();
        fighters.hero = null;
        fighters.villain = null;

        given()
            .body(fighters)
            .header(CONTENT_TYPE, APPLICATION_JSON)
            .header(ACCEPT, APPLICATION_JSON)
            .when()
            .post("/api/fights")
            .then()
            .statusCode(BAD_REQUEST.getStatusCode());
    }

    @Test
    @Order(1)
    void shouldGetInitialItems() {
        List<Fight> fights = get("/api/fights").then()
            .statusCode(OK.getStatusCode())
            .extract().body().as(getFightTypeRef());
        assertEquals(NB_FIGHTS, fights.size());
    }

    @Test
    @Order(2)
    void shouldAddAnItem() {
        Hero hero = new Hero();
        hero.name = DEFAULT_WINNER_NAME;
        hero.picture = DEFAULT_WINNER_PICTURE;
        hero.level = DEFAULT_WINNER_LEVEL;
        hero.powers = DEFAULT_WINNER_POWERS;
        Villain villain = new Villain();
        villain.name = DEFAULT_LOSER_NAME;
        villain.picture = DEFAULT_LOSER_PICTURE;
        villain.level = DEFAULT_LOSER_LEVEL;
        villain.powers = DEFAULT_LOSER_POWERS;
        Fighters fighters = new Fighters();
        fighters.hero = hero;
        fighters.villain = villain;

        fightId = given()
            .body(fighters)
            .header(CONTENT_TYPE, APPLICATION_JSON)
            .header(ACCEPT, APPLICATION_JSON)
            .when()
            .post("/api/fights")
            .then()
            .statusCode(OK.getStatusCode())
            .body(containsString("winner"), containsString("loser"))
            .extract().body().jsonPath().getString("id");

        assertNotNull(fightId);

        given()
            .pathParam("id", fightId)
            .when().get("/api/fights/{id}")
            .then()
            .statusCode(OK.getStatusCode())
            .contentType(APPLICATION_JSON)
            .body("winnerName", Is.is(DEFAULT_WINNER_NAME))
            .body("winnerPicture", Is.is(DEFAULT_WINNER_PICTURE))
            .body("winnerLevel", Is.is(DEFAULT_WINNER_LEVEL))
            .body("winnerPowers", Is.is(DEFAULT_WINNER_POWERS))
            .body("loserName", Is.is(DEFAULT_LOSER_NAME))
            .body("loserPicture", Is.is(DEFAULT_LOSER_PICTURE))
            .body("loserLevel", Is.is(DEFAULT_LOSER_LEVEL))
            .body("loserPowers", Is.is(DEFAULT_LOSER_POWERS))
            .body("fightDate", Is.is(notNullValue()));

        List<Fight> fights = get("/api/fights").then()
            .statusCode(OK.getStatusCode())
            .extract().body().as(getFightTypeRef());
        assertEquals(NB_FIGHTS + 1, fights.size());
    }

    private TypeRef<List<Fight>> getFightTypeRef() {
        return new TypeRef<List<Fight>>() {
            // Kept empty on purpose
        };
    }
}
Running, Testing and Packaging the Application
First, delete the generated FightResourceIT native test class, as we won’t run native tests.
Then, make sure the tests pass by executing the command ./mvnw test (or from your IDE).
Quarkus automatically starts the PostGreSQL database.
Now that the tests are green, we are ready to run our application.
Use ./mvnw quarkus:dev to start it (notice that there is no banner yet, it will come later).
Once the application is started, just check that it returns the fights from the database with the following cURL command:
curl http://localhost:8082/api/fightsRemember that you can also check Swagger UI by going to http://localhost:8082/q/swagger-ui.
User Interface
Now that we have the three main microservices, time to have a decent user interface to start fighting. The purpose of this workshop is not to develop a web interface and learn yet another web framework. This time you will just execute another Quarkus instance with an already React application. We will be using Quinoa to handle building and serving the React application.
Quinoa?
Quinoa is a Quarkus extension which eases the development of single page apps or web components.
It lets you live code the backend and frontend together with close to no configuration.
It also helps with both packaging and serving, and if you want it to, abstracts away npm.
When enabled in development mode, Quinoa will start the UI live coding server provided by the target framework and forward relevant requests to it. In production mode, Quinoa will run the build and process the generated files to serve them at runtime.
Quinoa is framework-agnostic, and works with React, Angular, Vue, Lit, and others, alongside other Quarkus services (REST, GraphQL, Security, Events, etc).
The Web Application
Navigate to the super-heroes/ui-super-heroes directory.
It contains the code of the application.
The React application is in src/main/webui.
Being a React application, you will find a package.json file which defines all the needed dependencies.
All the React code (graphical components, model, services) is located under src/main/webui/src/app.
Running the Web Application
We don’t need to worry too much about the React code.
From the ui-super-heroes
directory, start the web application:
./mvnw quarkus:devBe sure you have the hero, villain and fights microservices running (dev mode is enough).
If you don’t have Node installed, Quinoa will install it during the start process (under the .quinoa directory).
INFO  [com.git.eir.mav.plu.fro.lib.NodeInstaller] (build-40) Installing node version v16.16.0
INFO  [com.git.eir.mav.plu.fro.lib.NodeInstaller] (build-40) Extracting NPM
INFO  [com.git.eir.mav.plu.fro.lib.NodeInstaller] (build-40) Installed node locally.
You should see console output like the following
2023-05-18 14:22:02,745 INFO  [io.qua.qui.dep.ForwardedDevProcessor] (build-5) Quinoa package manager live coding is up and running on port: 3000 (in 18118ms)
2023-05-18 14:22:02,749 INFO  [io.qua.qui.dep.ForwardedDevProcessor] (build-40) Quinoa is forwarding unhandled requests to port: 3000
__  ____  __  _____   ___  __ ____  ______
 --/ __ \/ / / / _ | / _ \/ //_/ / / / __/
 -/ /_/ / /_/ / __ |/ , _/ ,< / /_/ /\ \
--\___\_\____/_/ |_/_/|_/_/|_|\____/___/
2023-05-18 14:22:03,237 INFO  [io.quarkus] (Quarkus Main Thread) ui-super-heroes 1.0.0-SNAPSHOT on JVM (powered by Quarkus 3.33.2) started in 24.765s. Listening on: http://localhost:8080
Once the application is started, go to http://localhost:8080 (8080 is the default Quarkus port as we didn’t change it in the application.properties this time).
It should display a main web page. There won’t be much content yet,
because we need to fix a few things and add some more implementation.
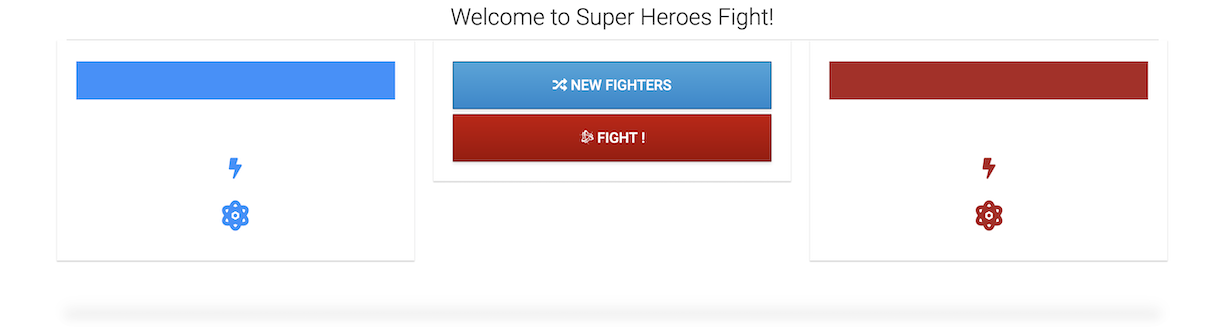
If you want, you can visit http://localhost:3000 (the usual React port) to confirm that Quinoa is forwarding what’s on port 3000 to port 8080. The version of the application on http://localhost:3000 will always stay disappointingly blank, because it’s looking for its config on the wrong port. So don’t use that one!
You might want to create a fuller Quarkus BFF for the UI, and use something like Stork for service discovery. However, that’s beyond the scope of this workshop!
Live coding the UI
Live coding works for the javascript parts of the application, just as it does for the Java ones.
Open src/main/webui/src/app/app.component.html and edit the text, perhaps by adding 'Hello there' into the welcome message.
Check localhost:8080, and your new content should appear.
(It may take a moment or two for the refresh to trigger.)
You can also change the javascript code.
For example, try updating the text in src/main/webui/src/app/app.component.ts.
CORS
Cross-origin resource sharing (CORS) is a mechanism that allows restricted resources on a web page to be requested from another domain outside the domain from which the first resource was served.[17] So when we want our heroes and villains to fight, we actually cross several origins: we go from localhost:8080 (the UI) to localhost:8082 (Fight API) which invokes localhost:8083 (Hero) and localhost:8084 (Villain). If you look at the console of your Browser you should see something similar to this:
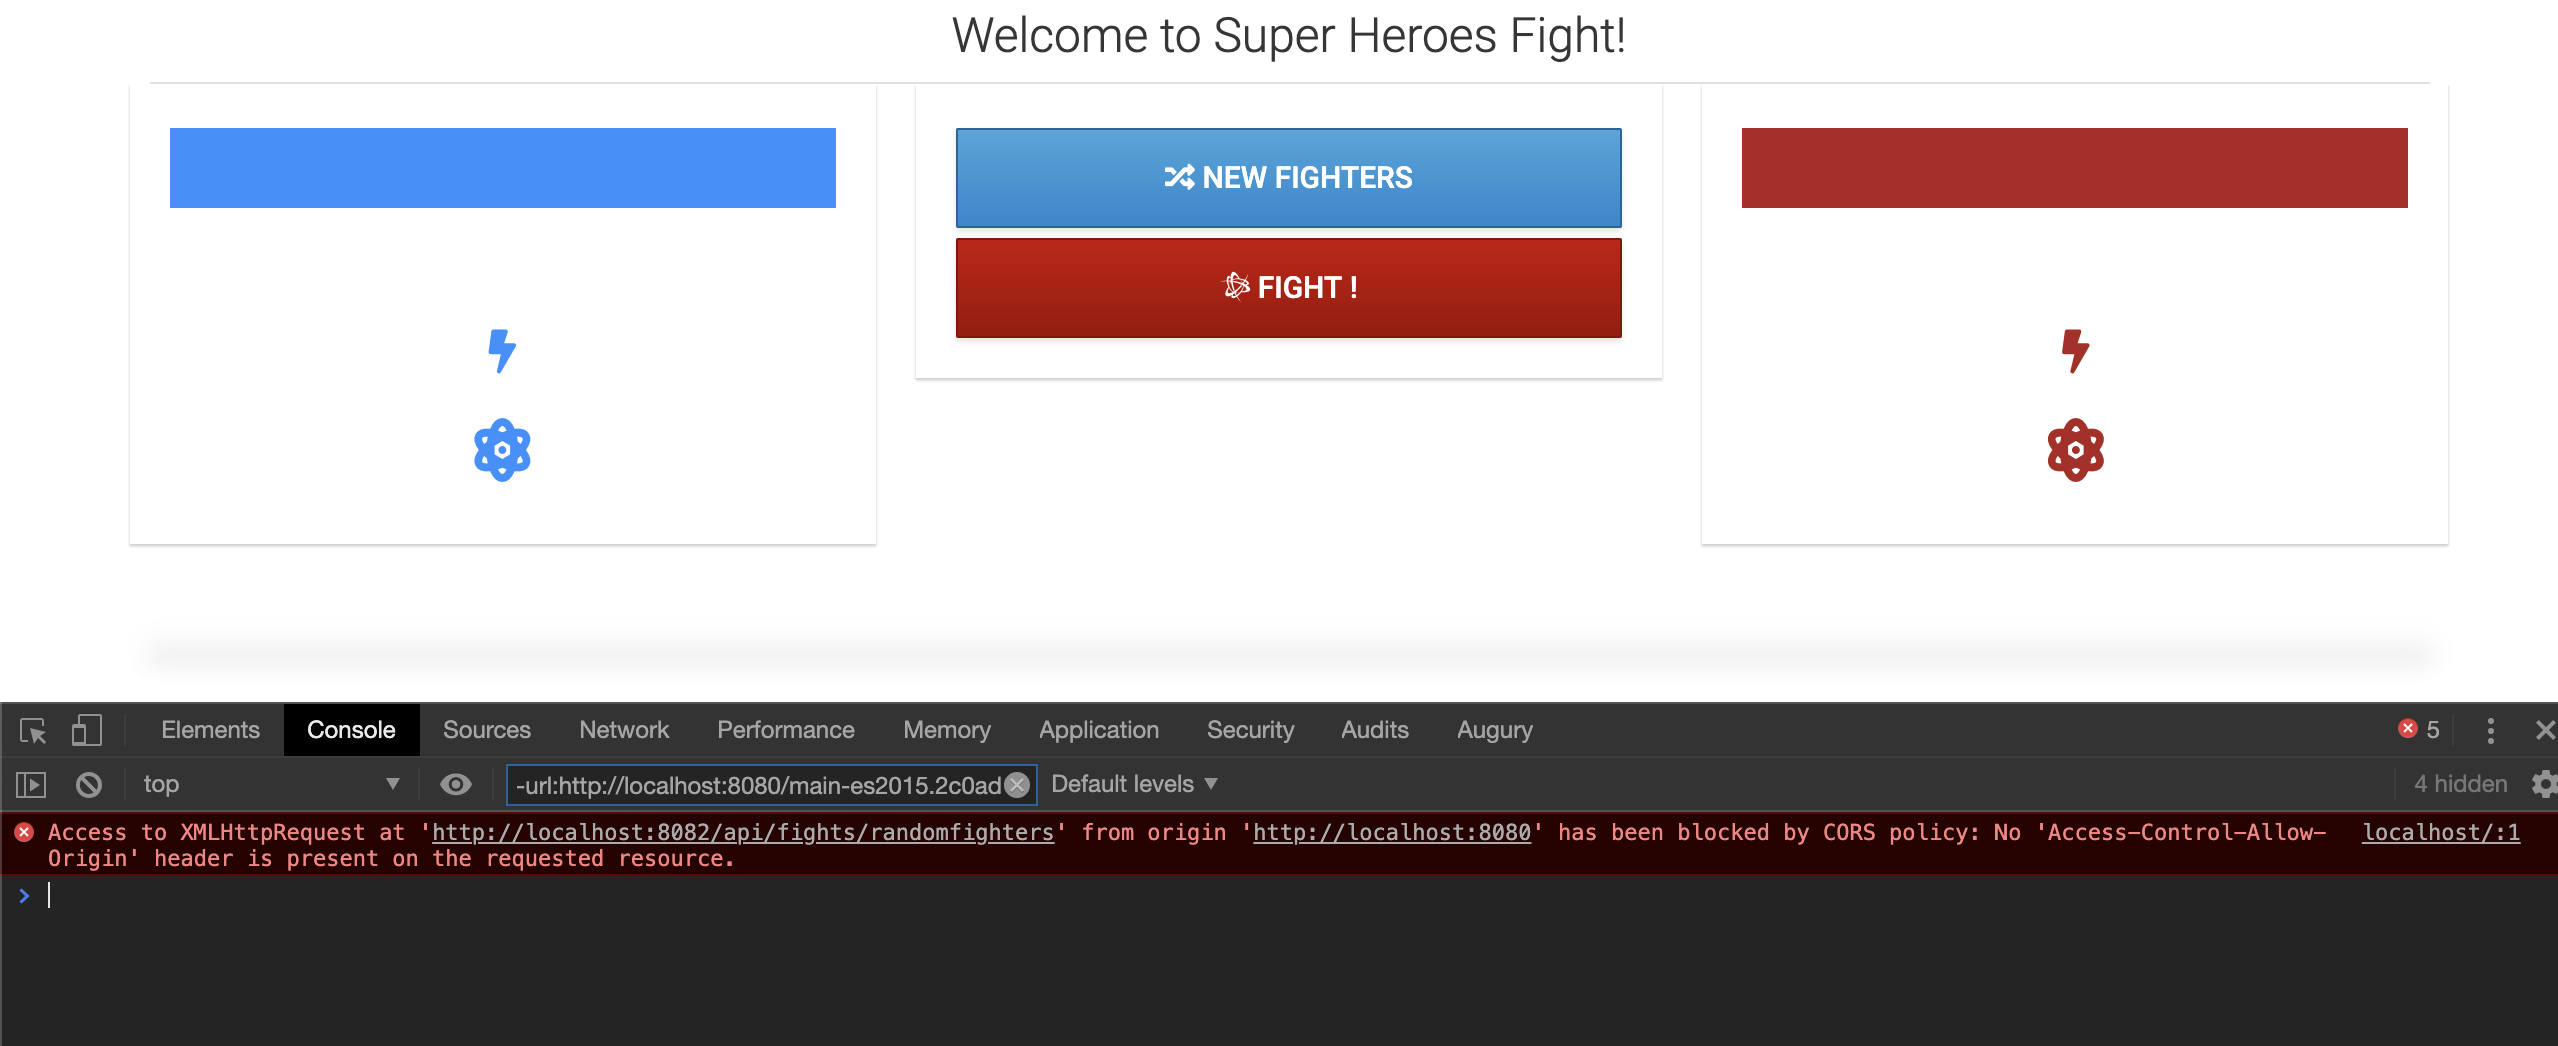
Quarkus comes with a CORS filter which intercepts all incoming HTTP requests. It can be enabled in the Quarkus configuration file:
quarkus.http.cors.enabled=trueIf the filter is enabled and an HTTP request is identified as cross-origin, the CORS policy and headers defined using the following properties will be applied before passing the request on to its actual target (servlet, JAX-RS resource, etc.):
| Property | Description |
|---|---|
|
The comma-separated list of origins allowed for CORS. The filter allows any origin if this is not set. |
|
The comma-separated list of HTTP methods allowed for CORS. The filter allows any method if this is not set. |
|
The comma-separated list of HTTP headers allowed for CORS. The filter allows any header if this is not set. |
|
The comma-separated list of HTTP headers exposed in CORS. |
|
The duration indicating how long the results of a pre-flight request can be cached. This value will be returned in a Access-Control-Max-Age response header. |
So make sure you set the following properties on the:
-
Fight microservice,
-
Hero microservice,
-
Villain microservice
quarkus.http.cors.enabled=true
quarkus.http.cors.origins=/.*/
But, even with this, the UI is still not working. The CORS errors are gone, so that’s a good step, but we forgot something else:
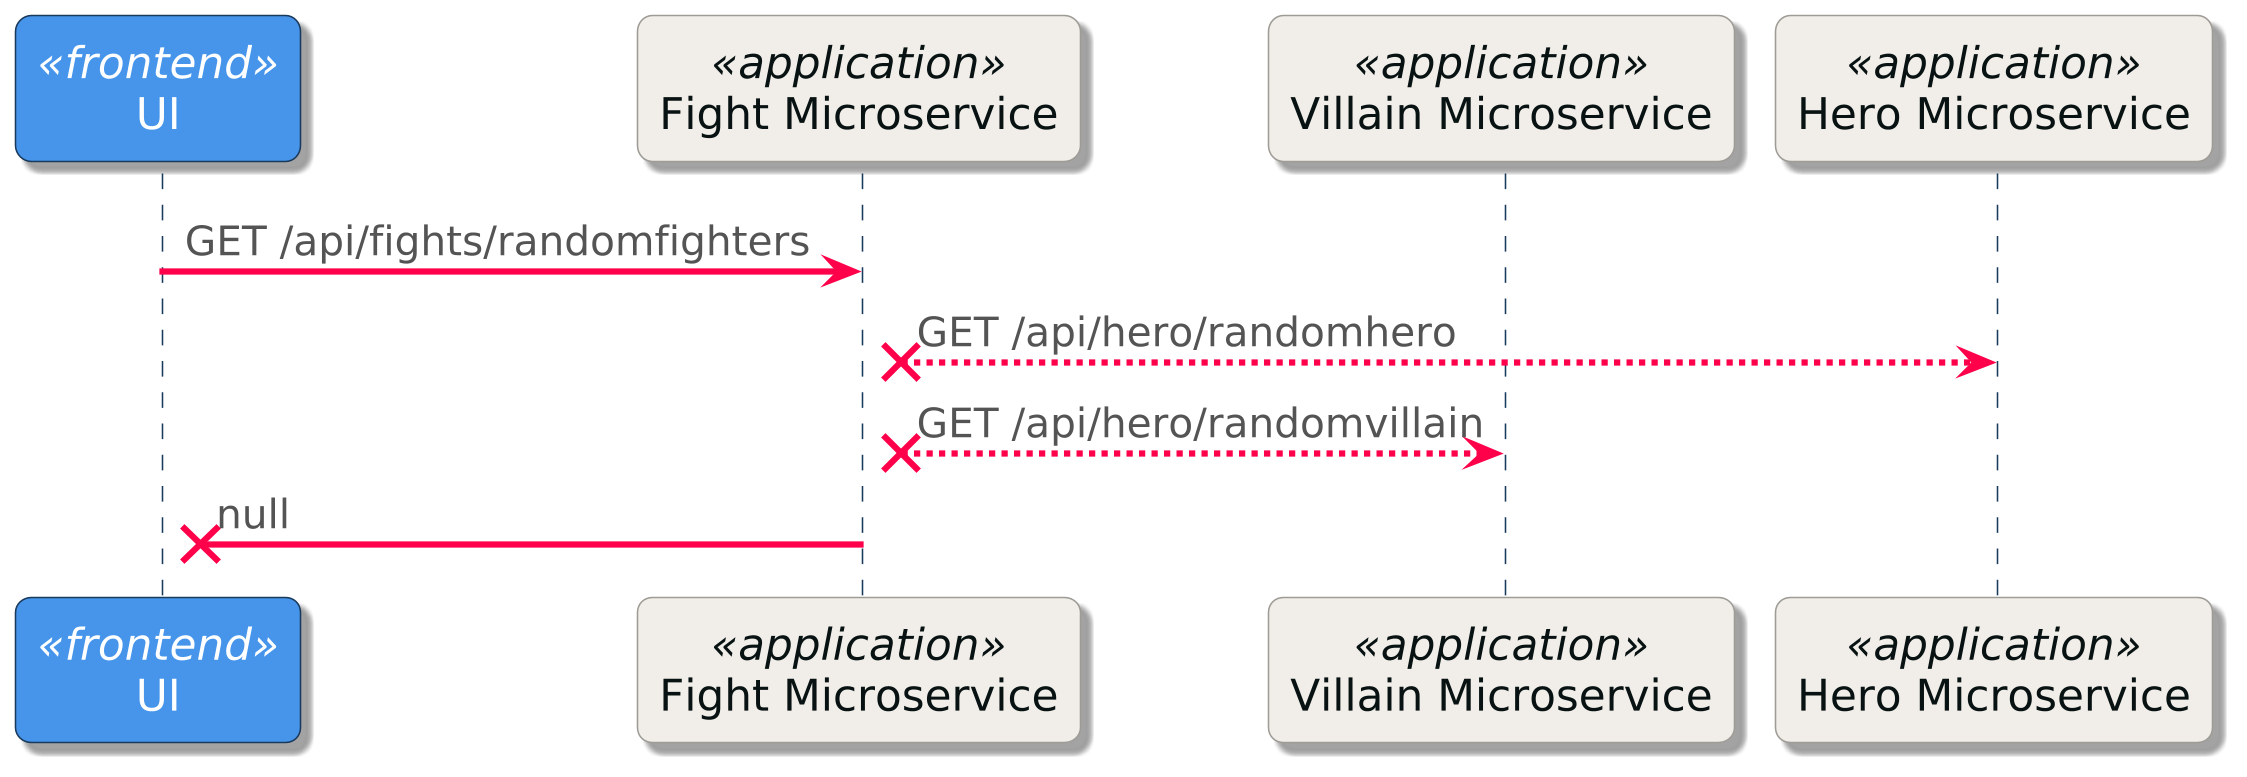
Remember the function to retrieve random fighters.
We are currently returning null.
Let’s move to the next session to see how we can implement this method.
HTTP communication & Fault Tolerance
So far we’ve built one Fight microservice which need to invoke the Hero and Villain microservices. In the following sections you will develop this invocation thanks to the MicroProfile REST Client. We will also deal with fault tolerance thanks to timeouts and circuit breaker.
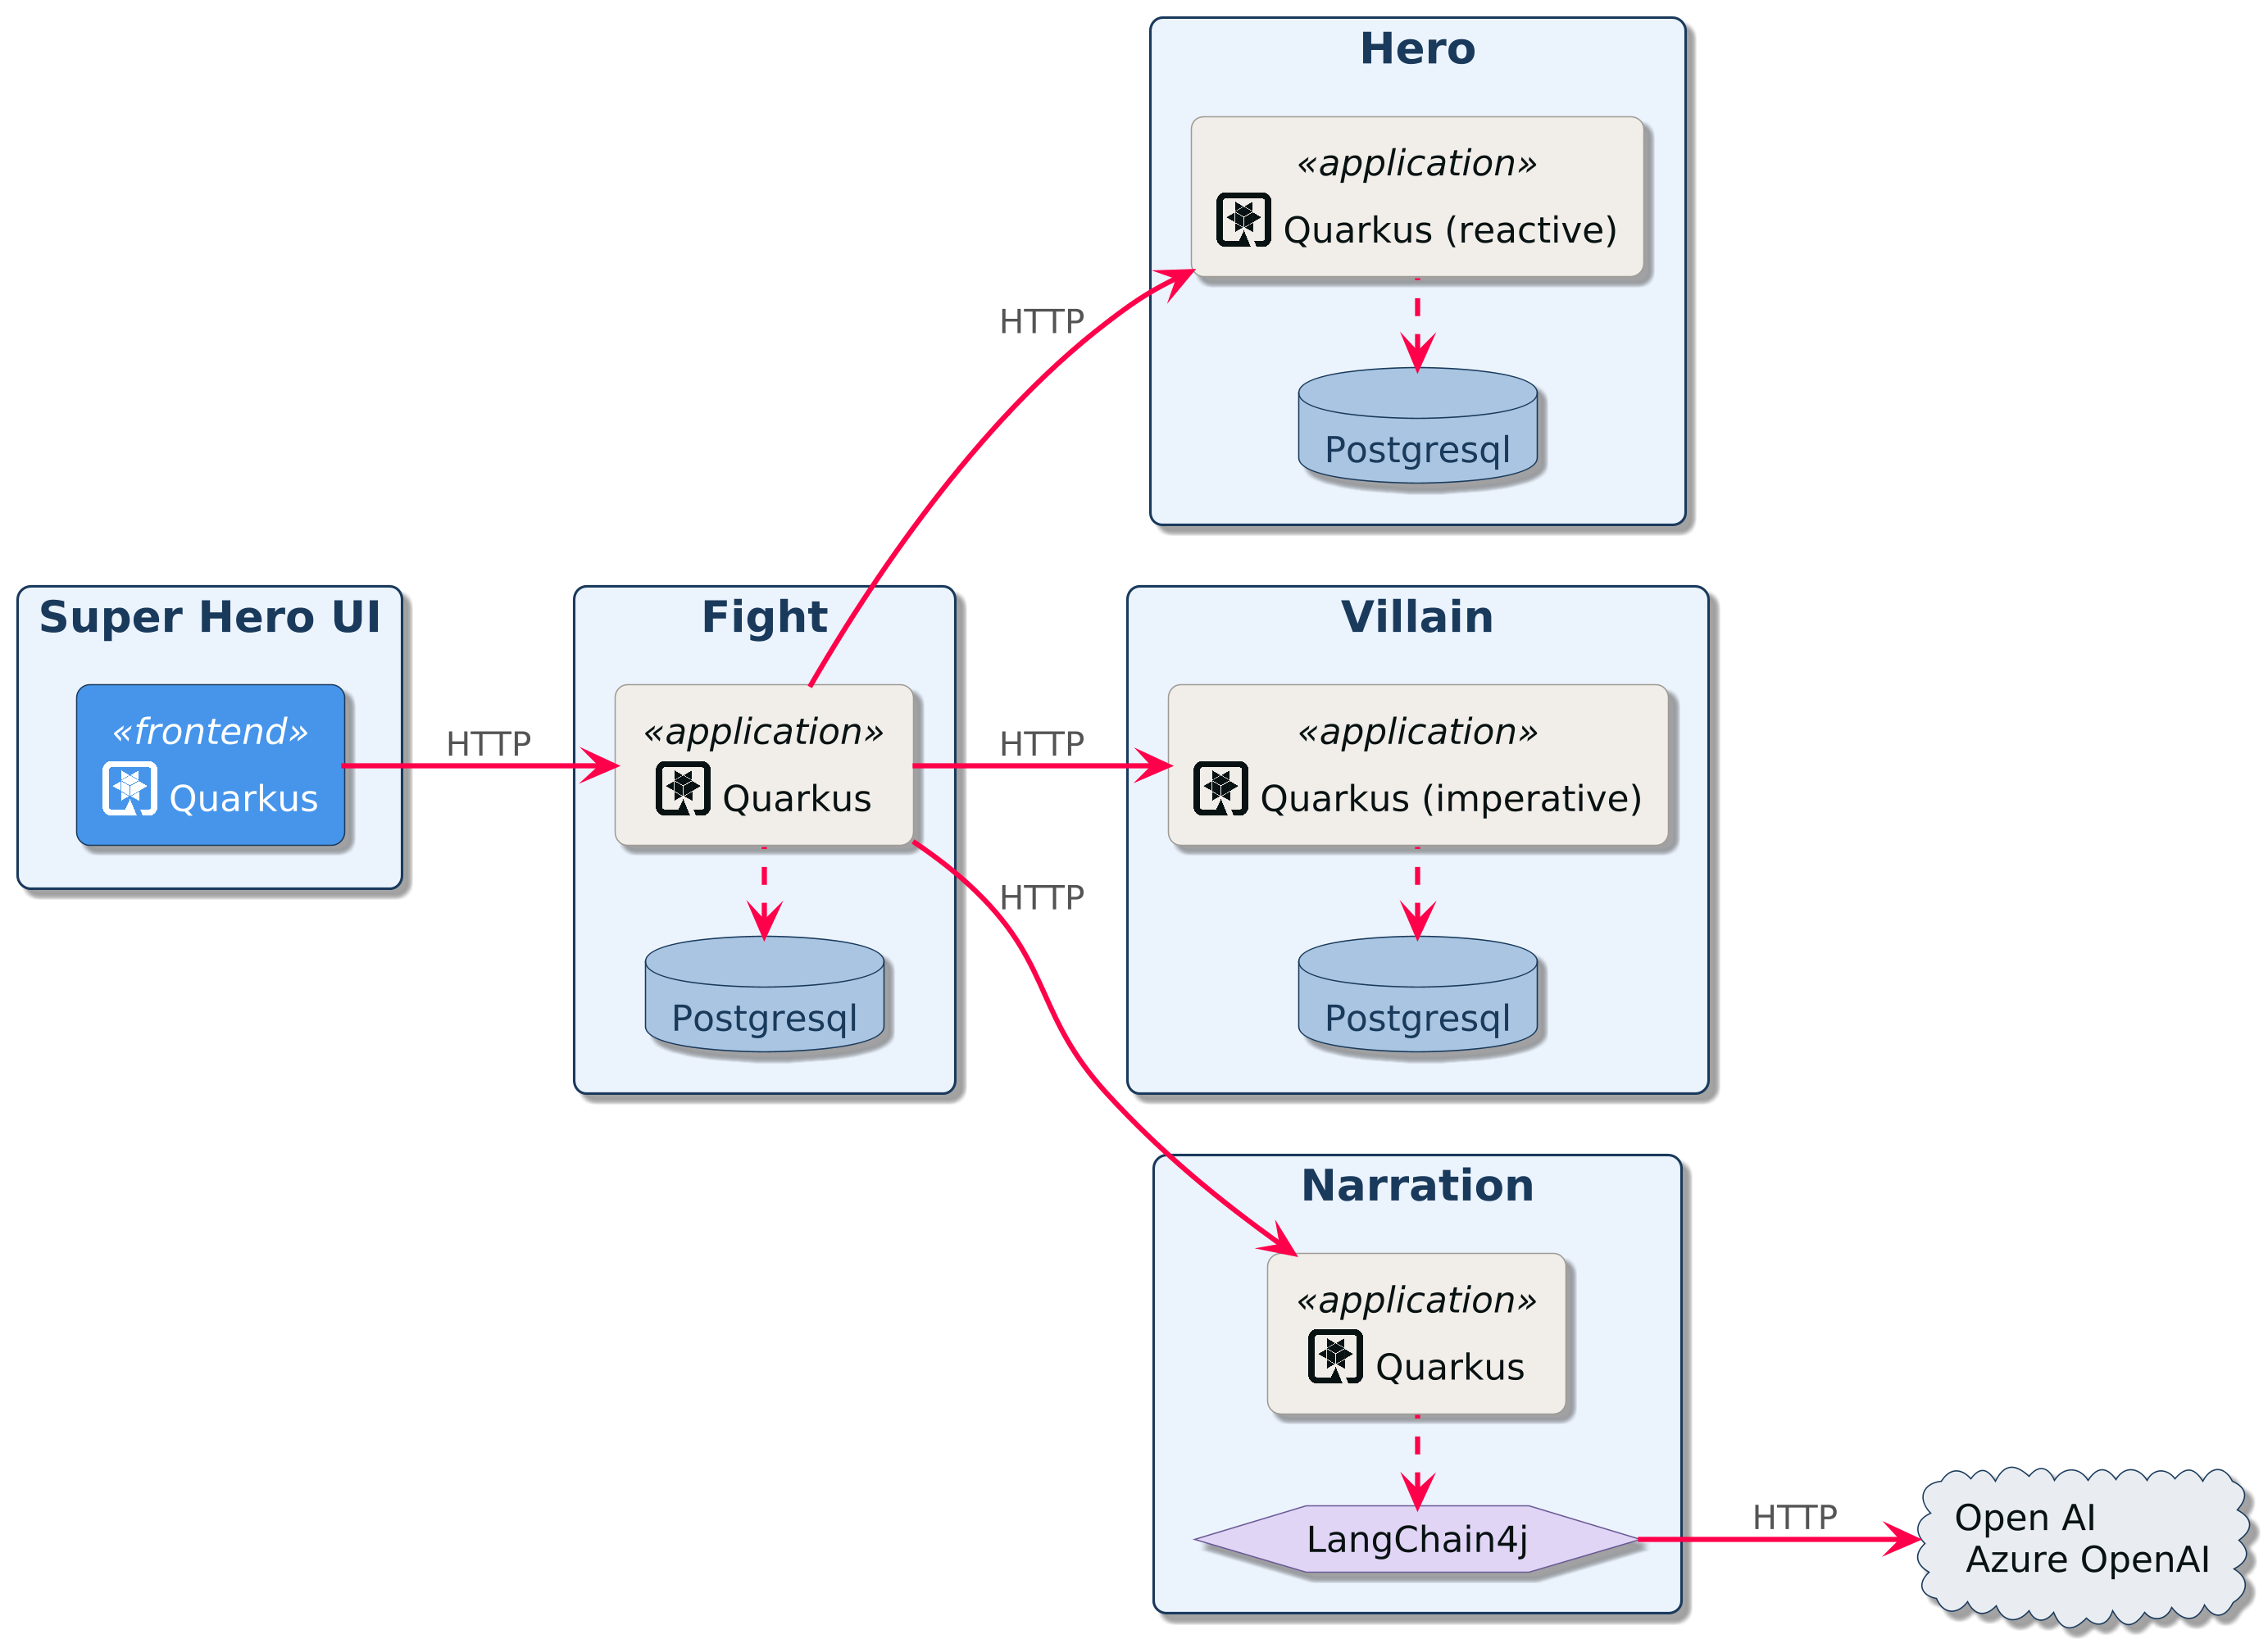
REST Client
This chapter explains how to use the MicroProfile REST Client in order to interact with REST APIs with very little effort.[18]
Directory Structure
Remember the structure of the Fight microservice:
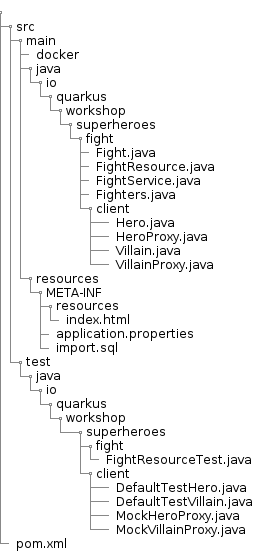
We are going to rework the:
-
FightServiceclass -
FightResourceTestclass -
application.properties
Installing the REST Client Dependency
To install the REST Client dependency, just run the following command in the Fight microservice:
./mvnw quarkus:add-extension -Dextensions="io.quarkus:quarkus-rest-client-jackson"This will add the following dependency in the pom.xml file:
<dependency>
  <groupId>io.quarkus</groupId>
  <artifactId>quarkus-rest-client-jackson</artifactId>
</dependency>
This dependency imports both the REST client implementation and the JSON mapping support (which uses Jackson).
FightService Invoking External Microservices
Remember that in the previous sections we left the FightService.findRandomFighters() method returns null.
We have to fix this.
What we actually want is to invoke both the Hero and Villain APIs, asking for a random hero and a random villain.
For that, replace the findRandomFighters method with the following code to the FightService class:
@RestClient HeroProxy heroProxy;
@RestClient VillainProxy villainProxy;

// ...

Fighters findRandomFighters() {
    Hero hero = findRandomHero();
    Villain villain = findRandomVillain();
    Fighters fighters = new Fighters();
    fighters.hero = hero;
    fighters.villain = villain;
    return fighters;
}

Villain findRandomVillain() {
    return villainProxy.findRandomVillain();
}

Hero findRandomHero() {
   return heroProxy.findRandomHero();
}
Note the Rest client injection.
They use the @RestClient qualifier, i.e. a bean selector.
With Quarkus, when you use a qualifier, you can omit @Inject.
|
If not done automatically by your IDE, add the following import statement: |
Creating the Interfaces
Using the MicroProfile REST Client is as simple as creating an interface using the proper JAX-RS and MicroProfile annotations.
In our case both interfaces should be created under the client subpackage and have the following content:
package io.quarkus.workshop.superheroes.fight.client;

import org.eclipse.microprofile.rest.client.inject.RegisterRestClient;

import jakarta.ws.rs.GET;
import jakarta.ws.rs.Path;
import jakarta.ws.rs.Produces;
import jakarta.ws.rs.core.MediaType;

@Path("/api/heroes")
@Produces(MediaType.APPLICATION_JSON)
@RegisterRestClient(configKey = "hero")
public interface HeroProxy {

    @GET
    @Path("/random")
    Hero findRandomHero();
}
The findRandomHero method gives our code the ability to query a random hero from the Hero REST API.
The client will handle all the networking and marshalling leaving our code clean of such technical details.
The purpose of the annotations in the code above is the following:
-
@RegisterRestClientallows Quarkus to know that this interface is meant to be available for CDI injection as a REST Client -
@Pathand@GETare the standard JAX-RS annotations used to define how to access the service -
@Producesdefines the expected content-type
The VillainProxy is very similar and looks like this:
package io.quarkus.workshop.superheroes.fight.client;

import org.eclipse.microprofile.rest.client.inject.RegisterRestClient;

import jakarta.ws.rs.GET;
import jakarta.ws.rs.Path;
import jakarta.ws.rs.Produces;
import jakarta.ws.rs.core.MediaType;

@Path("/api/villains")
@Produces(MediaType.APPLICATION_JSON)
@RegisterRestClient(configKey = "villain")
public interface VillainProxy {

    @GET
    @Path("/random")
    Villain findRandomVillain();
}
Once created, go back to the FightService class and add the following import statements:
import io.quarkus.workshop.superheroes.fight.client.HeroProxy;
import io.quarkus.workshop.superheroes.fight.client.VillainProxy;
Configuring REST Client Invocation
In order to determine the base URL to which REST calls will be made, the REST Client uses configuration from application.properties.
The name of the property needs to follow a certain convention which is best displayed in the following code:
quarkus.rest-client.hero.url=http://localhost:8083
quarkus.rest-client.villain.url=http://localhost:8084
Having this configuration means that all requests performed using HeroProxy will use http://localhost:8083 as the base URL.
Using this configuration, calling the findRandomHero method of HeroProxy would result in an HTTP GET request being made to http://localhost:8083/api/heroes/random.
Now, go back in the UI and refresh, you should see some pictures!
Updating the Test with Mock Support
But, now we have another problem.
To run the tests of the Fight API we need the Hero and Villain REST APIs to be up and running.
To avoid this, we need to Mock the HeroProxy and VillainProxy interfaces.
Quarkus supports the use of mock objects using the CDI @Alternative mechanism.[19]
To use this simply override the bean you wish to mock with a class in the src/test/java directory, and put the @Alternative and @Priority(1) annotations on the bean.
Alternatively, a convenient io.quarkus.test.Mock stereotype annotation could be used.
This built-in stereotype declares @Alternative, @Priority(1) and @Dependent.
Mocking a Villain service
So, to mock the VillainProxy interface we just need to implement the following MockVillainProxy class (under the client subpackage under src/test/java/io/quarkus/workshop/superheroes/fight):
package io.quarkus.workshop.superheroes.fight.client;

import io.quarkus.test.Mock;
import org.eclipse.microprofile.rest.client.inject.RestClient;

import jakarta.enterprise.context.ApplicationScoped;

@Mock
@ApplicationScoped
@RestClient
public class MockVillainProxy implements VillainProxy {

    @Override
    public Villain findRandomVillain() {
        return DefaultTestVillain.INSTANCE;
    }
}
We are using some common classes for the test data.
They don’t exist yet, so the IDE will complain!
Let your IDE’s quick fix create the classes for you, or create them manually (under the client subpackage under src/test/java/io/quarkus/workshop/superheroes/fight), and then fill in the following contents:
package io.quarkus.workshop.superheroes.fight.client;

public class DefaultTestVillain extends Villain {
    public static final String DEFAULT_VILLAIN_NAME = "Super Chocolatine";
    public static final String DEFAULT_VILLAIN_PICTURE = "super_chocolatine.png";
    public static final String DEFAULT_VILLAIN_POWERS = "does not eat pain au chocolat";
    public static final int DEFAULT_VILLAIN_LEVEL = 42;

    public static final DefaultTestVillain INSTANCE = new DefaultTestVillain();

    private DefaultTestVillain() {
        this.name = DEFAULT_VILLAIN_NAME;
        this.picture = DEFAULT_VILLAIN_PICTURE;
        this.powers = DEFAULT_VILLAIN_POWERS;
        this.level = DEFAULT_VILLAIN_LEVEL;
    }
}
Mocking a Hero service
We could create a @Mock for the HeroProxy, as we did for the Villain, but there are some drawbacks to using @Mock:
-
Any class defined by
@Mockis global in scope, and can’t be isolated to individual tests. That can result in unwanted cross-talk between tests. -
Because of how the mock is defined, it’s also harder to use Mockito to generate the mock instance.
Let’s try a different approach.
We’ll still want a class which holds test data for the hero. Create the following under the client subpackage:
package io.quarkus.workshop.superheroes.fight.client;

public class DefaultTestHero extends Hero {
    public static final String DEFAULT_HERO_NAME = "Super Baguette";
    public static final String DEFAULT_HERO_PICTURE = "super_baguette.png";
    public static final String DEFAULT_HERO_POWERS = "eats baguette really quickly";
    public static final int DEFAULT_HERO_LEVEL = 42;

    public static final DefaultTestHero INSTANCE = new DefaultTestHero();

    private DefaultTestHero() {
        this.name = DEFAULT_HERO_NAME;
        this.picture = DEFAULT_HERO_PICTURE;
        this.powers = DEFAULT_HERO_POWERS;
        this.level = DEFAULT_HERO_LEVEL;
    }
}
Add the extended Quarkus Mockito support to the fight service’s pom.xml:
<dependency>
    <groupId>io.quarkus</groupId>
    <artifactId>quarkus-junit-mockito</artifactId>
    <scope>test</scope>
</dependency>
Now we can add the following to the top of the FightResourceTest:
@InjectMock
@RestClient
HeroProxy heroProxy;

@BeforeEach
public void setup() {
    when(heroProxy.findRandomHero()).thenReturn(DefaultTestHero.INSTANCE);
}
The when call is a static import of Mockito.when.
The @InjectMock annotation results in a mock being created and made available in test methods of the test class.
Importantly, other test classes are not affected by this.
import io.quarkus.test.InjectMock;
import static org.mockito.Mockito.when;
import org.eclipse.microprofile.rest.client.inject.RestClient;
Finally, edit the FightResourceTest and add the following method:
@Test
void shouldGetRandomFighters() {
    Fighters fighters = given()
        .when()
        .get("/api/fights/randomfighters")
        .then()
        .statusCode(OK.getStatusCode())
        .contentType(APPLICATION_JSON)
        .extract()
        .as(Fighters.class);

    Hero hero = fighters.hero;
    assertEquals(hero.name, DefaultTestHero.DEFAULT_HERO_NAME);
    assertEquals(hero.picture, DefaultTestHero.DEFAULT_HERO_PICTURE);
    assertEquals(hero.level, DefaultTestHero.DEFAULT_HERO_LEVEL);
    assertEquals(hero.powers, DefaultTestHero.DEFAULT_HERO_POWERS);

    Villain villain = fighters.villain;
    assertEquals(villain.name, DefaultTestVillain.DEFAULT_VILLAIN_NAME);
    assertEquals(villain.picture, DefaultTestVillain.DEFAULT_VILLAIN_PICTURE);
    assertEquals(villain.level, DefaultTestVillain.DEFAULT_VILLAIN_LEVEL);
    assertEquals(villain.powers, DefaultTestVillain.DEFAULT_VILLAIN_POWERS);
}
Now, run the test from the dev mode, or from your IDE. You can shutdown the hero and villain services to verify that the tests still pass.
Time to play.
Start the Hero, Villain and Fight microservices as well as the user interface (using ./mvnw quarkus:dev on each project) and select random fighters.
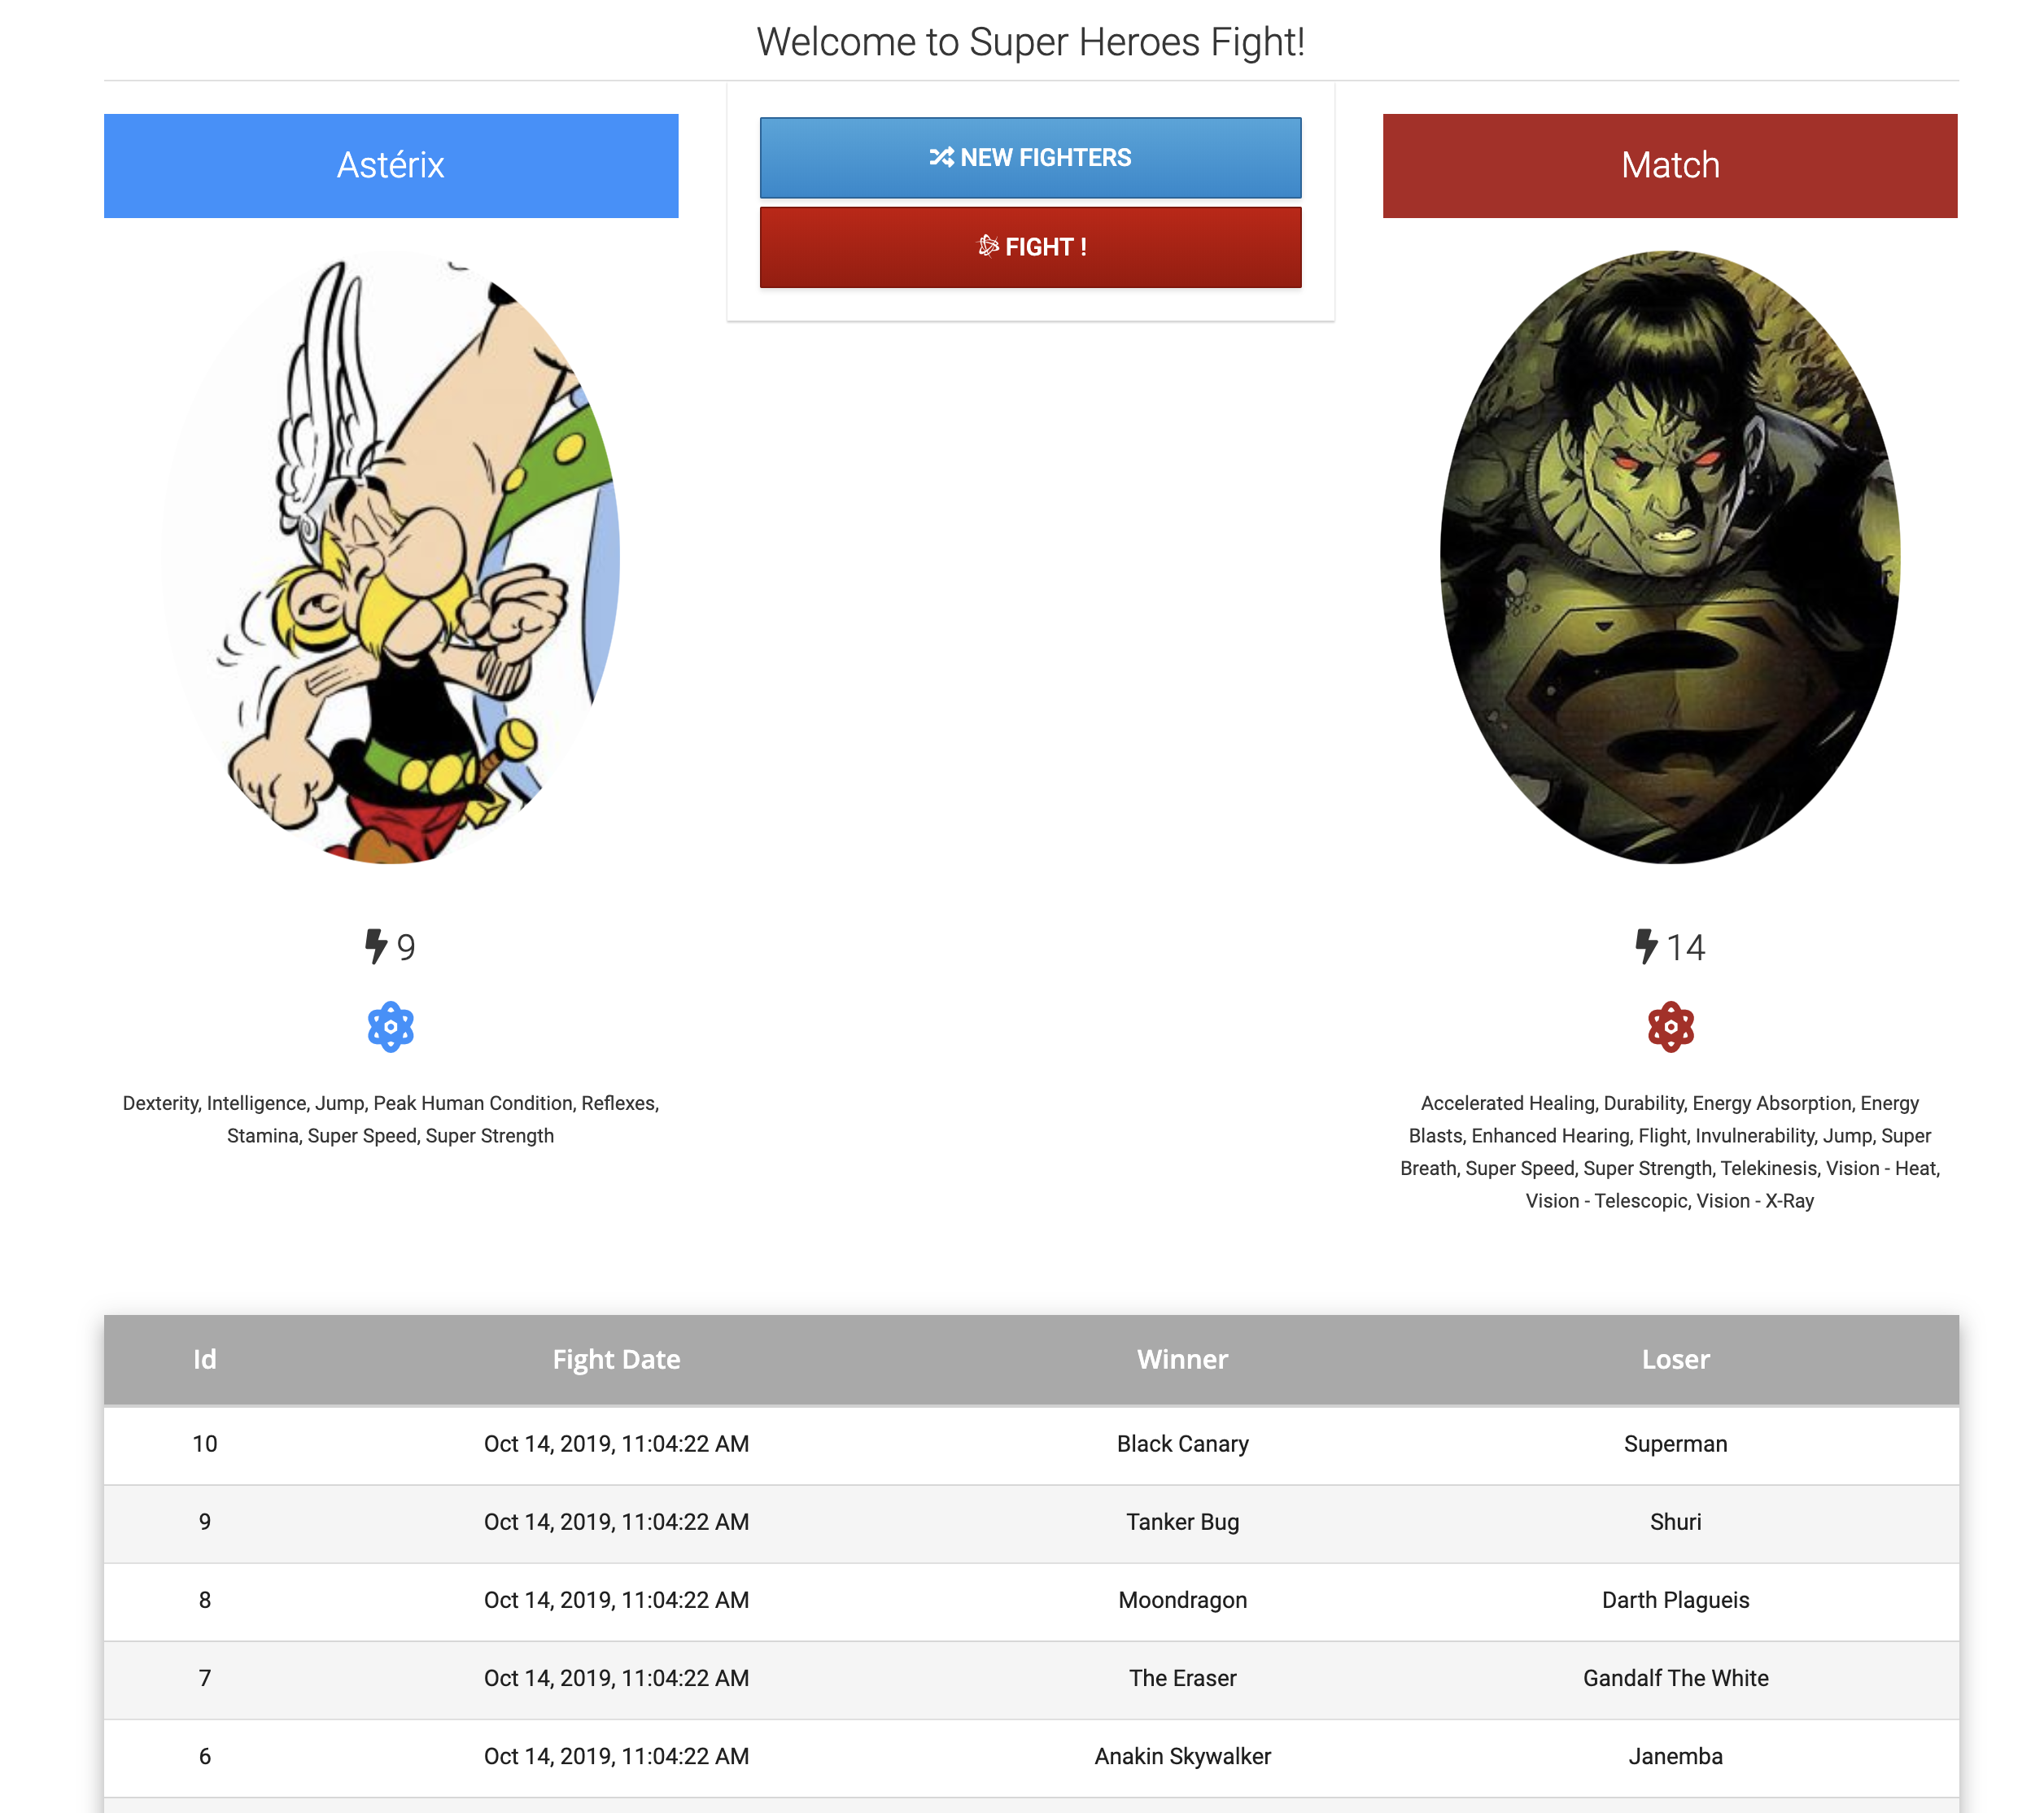
Fallbacks
So now you’ve been playing this great Super Heroes Fight for a few hours… and you kill the Hero REST API. What happens? Well, the Fight REST API cannot invoke the Hero API anymore and breaks with the following exception:
Caused by: io.netty.channel.AbstractChannel$AnnotatedConnectException: Connection refused: localhost/127.0.0.1:8083
Caused by: java.net.ConnectException: Connection refused
        at java.base/sun.nio.ch.SocketChannelImpl.checkConnect(Native Method)
        at java.base/sun.nio.ch.SocketChannelImpl.finishConnect(SocketChannelImpl.java:777)
        at io.netty.channel.socket.nio.NioSocketChannel.doFinishConnect(NioSocketChannel.java:330)
        at io.netty.channel.nio.AbstractNioChannel$AbstractNioUnsafe.finishConnect(AbstractNioChannel.java:334)
        at io.netty.channel.nio.NioEventLoop.processSelectedKey(NioEventLoop.java:707)
        at io.netty.channel.nio.NioEventLoop.processSelectedKeysOptimized(NioEventLoop.java:655)
        at io.netty.channel.nio.NioEventLoop.processSelectedKeys(NioEventLoop.java:581)
        at io.netty.channel.nio.NioEventLoop.run(NioEventLoop.java:493)
        at io.netty.util.concurrent.SingleThreadEventExecutor$4.run(SingleThreadEventExecutor.java:986)
        at io.netty.util.internal.ThreadExecutorMap$2.run(ThreadExecutorMap.java:74)
        at io.netty.util.concurrent.FastThreadLocalRunnable.run(FastThreadLocalRunnable.java:30)
        at java.base/java.lang.Thread.run(Thread.java:829)
One of the challenges brought by the distributed nature of microservices is that communication with external systems is inherently unreliable. This increases demand on resiliency of applications. To simplify making more resilient applications, Quarkus contains an implementation of the MicroProfile Fault Tolerance specification.[20]
Installing the Fault Tolerance Dependency
To install the MicroProfile Fault Tolerance dependency, just run the following command in the Fight microservice:
./mvnw quarkus:add-extension -Dextensions="smallrye-fault-tolerance"This will add the following dependency in the pom.xml file:
<dependency>
  <groupId>io.quarkus</groupId>
  <artifactId>quarkus-smallrye-fault-tolerance</artifactId>
</dependency>
Adding Fallbacks
Let’s make our find random fighters feature better by providing a fallback way of getting a dummy hero or villain in case of failure.
For that, add two fallback methods to the FightService and a @Fallback annotation to both findRandomHero and findRandomVillain methods as follows:
@Fallback(fallbackMethod = "fallbackRandomHero")
Hero findRandomHero() {
    return heroProxy.findRandomHero();
}

@Fallback(fallbackMethod = "fallbackRandomVillain")
Villain findRandomVillain() {
    return villainProxy.findRandomVillain();
}

public Hero fallbackRandomHero() {
    logger.warn("Falling back on Hero");
    Hero hero = new Hero();
    hero.name = "Fallback hero";
    hero.picture = "https://dummyimage.com/240x320/1e8fff/ffffff&text=Fallback+Hero";
    hero.powers = "Fallback hero powers";
    hero.level = 1;
    return hero;
}

public Villain fallbackRandomVillain() {
    logger.warn("Falling back on Villain");
    Villain villain = new Villain();
    villain.name = "Fallback villain";
    villain.picture = "https://dummyimage.com/240x320/b22222/ffffff&text=Fallback+Villain";
    villain.powers = "Fallback villain powers";
    villain.level = 42;
    return villain;
}|
Also add the |
Running the Application
Now we are ready to run our application and test the fallbacks.
For that, kill the Hero (and/or the Villain API) and start playing again. You should see the following:
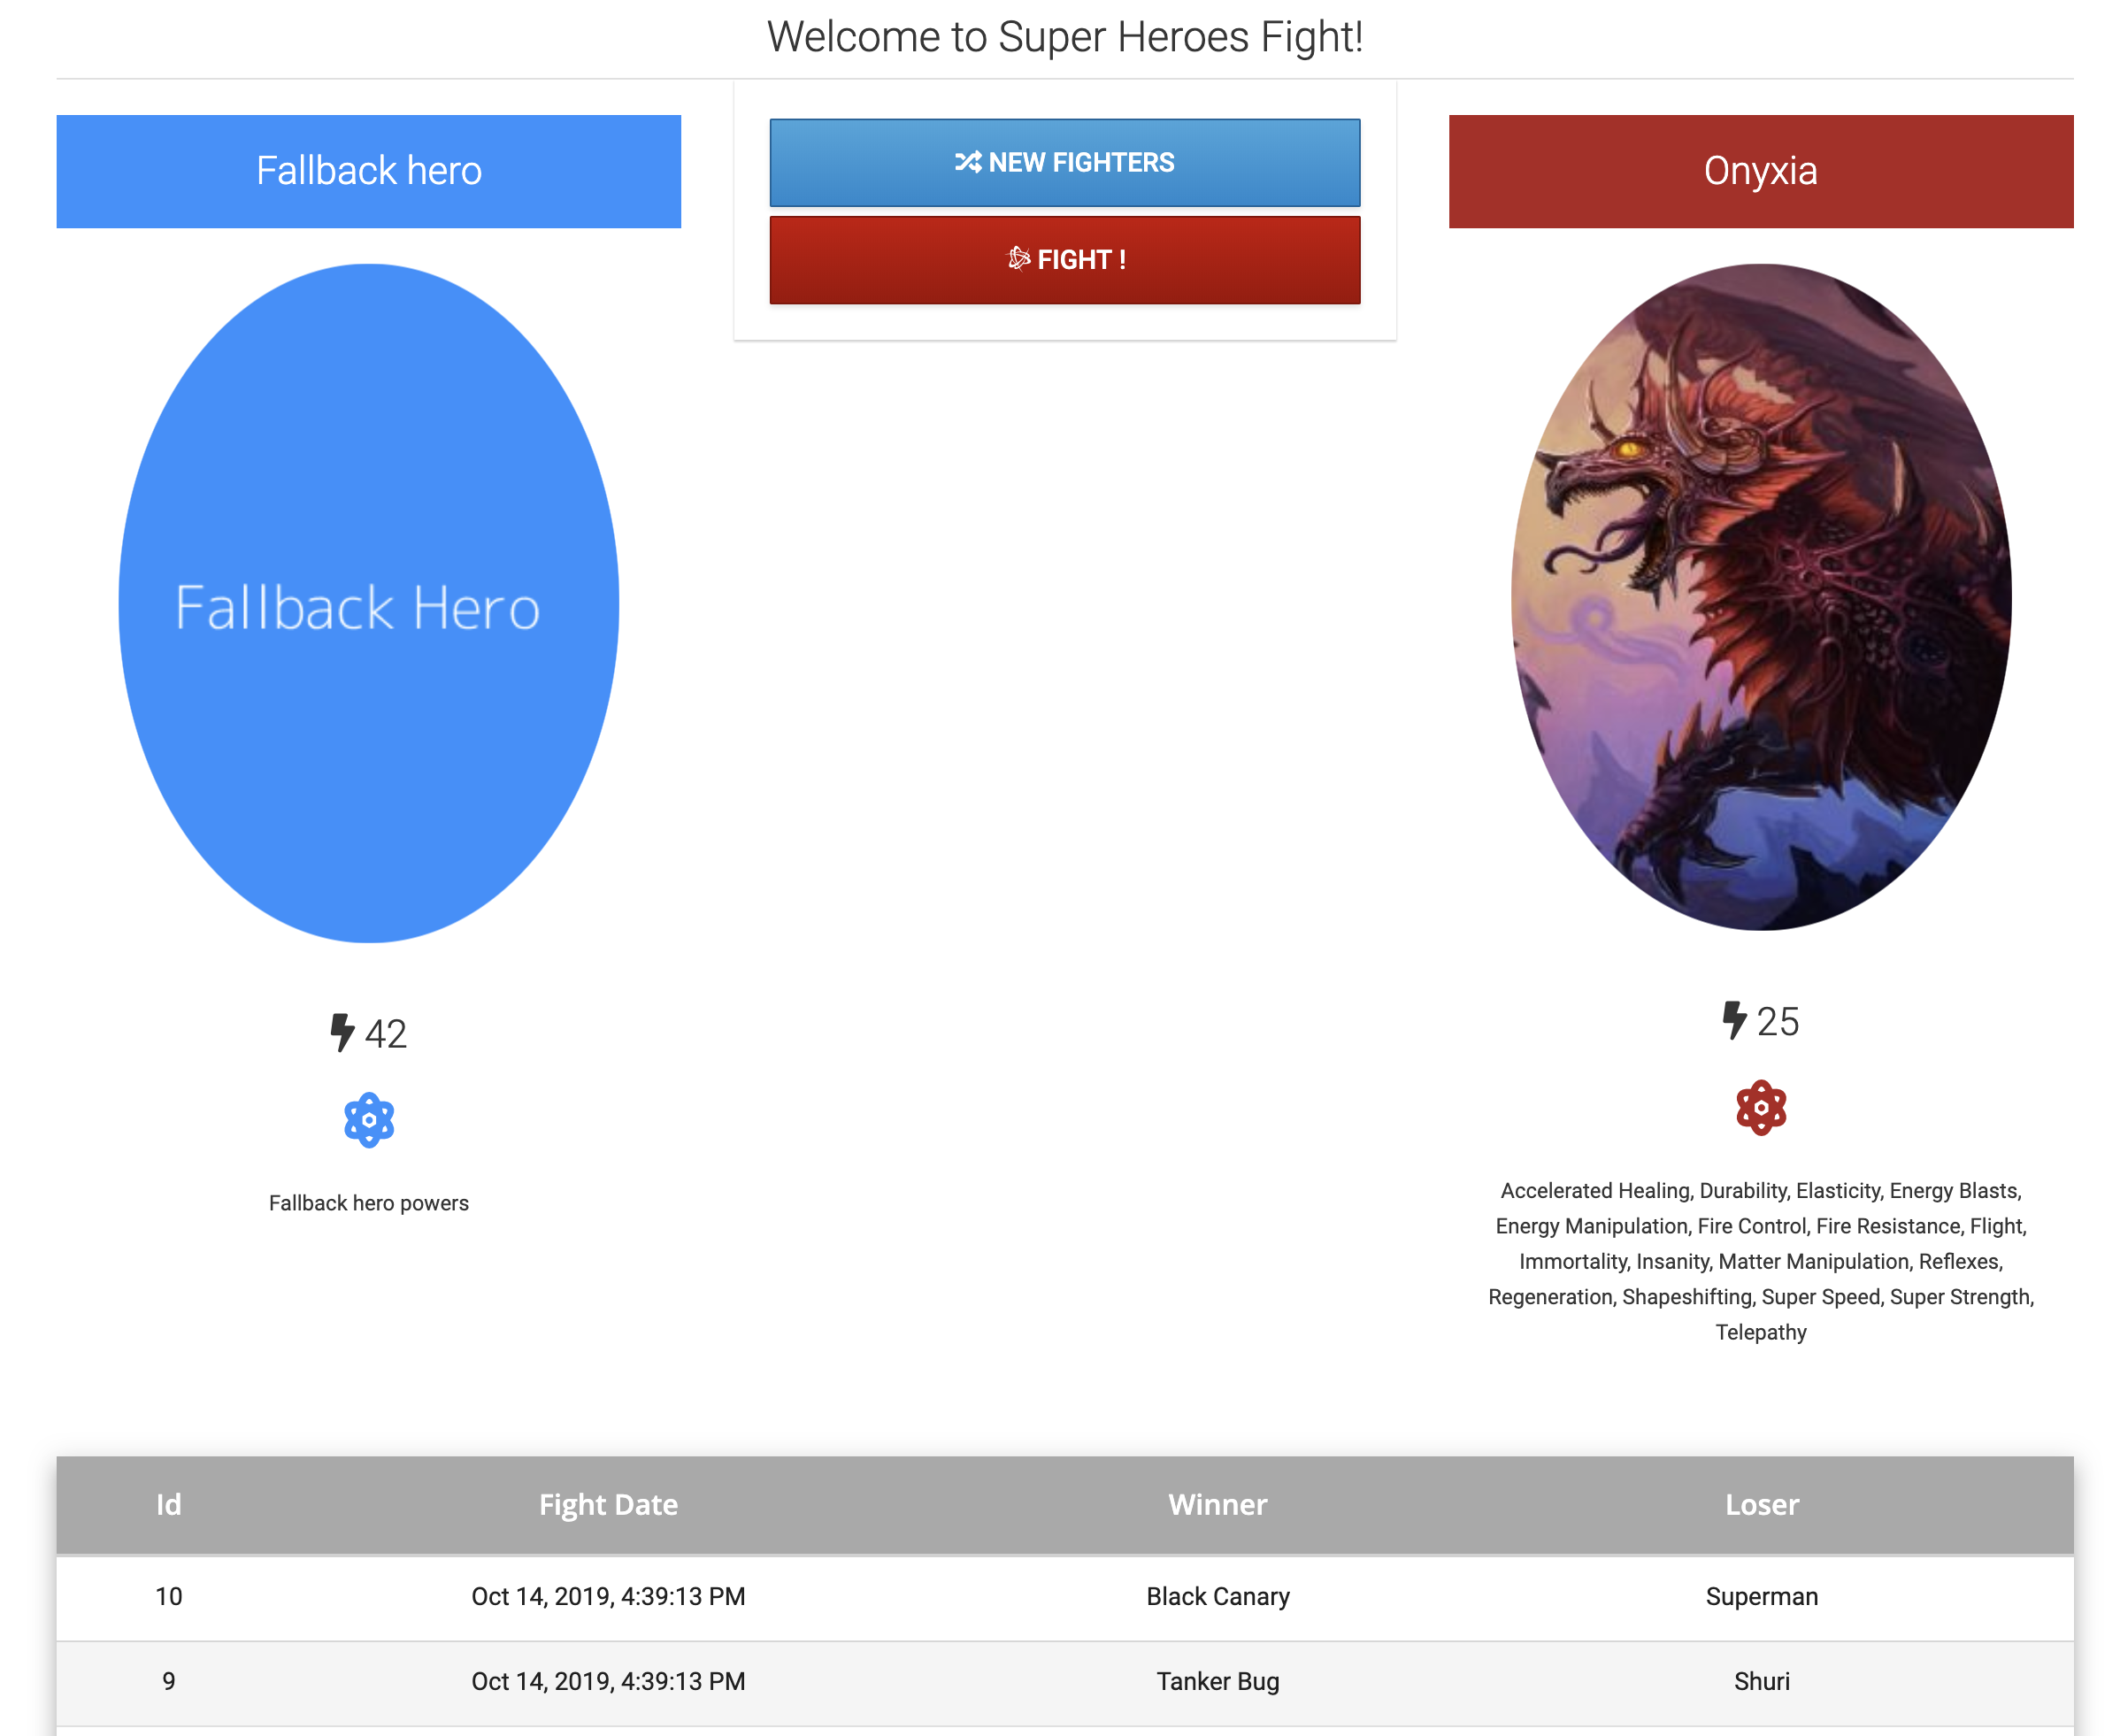
Restart the Hero REST API… and keep on playing. Super-heroes are back to the fight!
Timeout
Sometimes invoking a REST API can take a long time. In fact, the more microservices invoke other microservices, the more network latency you can have. And what happens when a HTTP request takes long? Well, it hangs. On your browser you can see the request pending if you turn on the dev tools and look at what’s the network is doing.
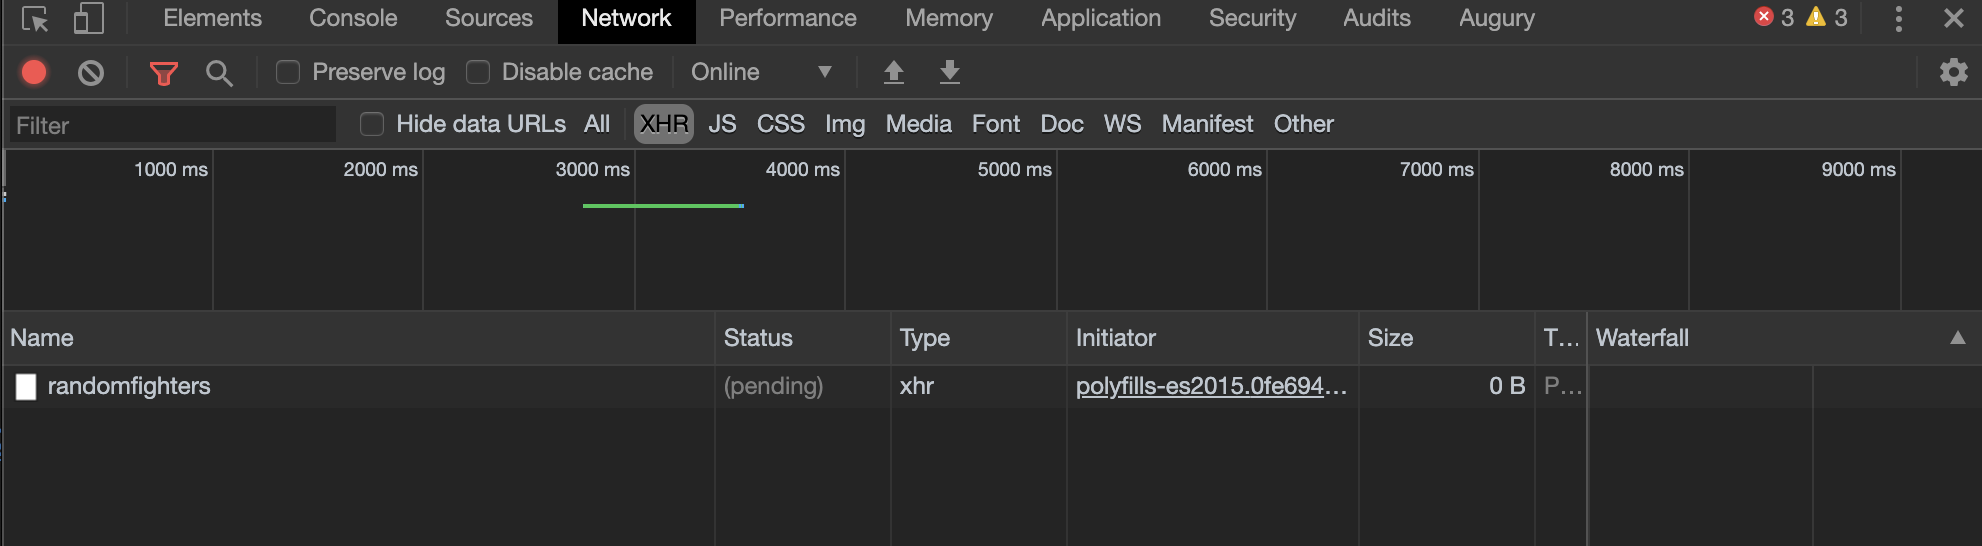
Adding Timeouts
Getting random fighters can take longer than expected.
To simulate a long-running process, add the following code to the FightResource:
@ConfigProperty(name = "process.milliseconds", defaultValue = "0")
long tooManyMilliseconds;

private void veryLongProcess() {
    try {
        Thread.sleep(tooManyMilliseconds);
    } catch (InterruptedException e) {
        Thread.currentThread().interrupt();
    }
}

@GET
@Path("/randomfighters")
@Timeout(500) // <-- Added
public Response getRandomFighters() {
    veryLongProcess(); // <-- Added
    Fighters fighters = service.findRandomFighters();
    logger.debug("Get random fighters " + fighters);
    return Response.ok(fighters).build();
}|
Don’t forget to add the following import: |
Let’s say we’ve added some new functionality in the veryLongProcess method.
When the process is really too long and the system is overloaded, we would rather time out.
Note that the timeout was configured to 500 ms, and a Thread.sleep was introduced and can be configured in the application.properties.
If we set the property to a higher value than the timeout, let’s say 10.000, then the request should be interrupted.
process.milliseconds=10000Running the Application
Now that you have set the number of waiting milliseconds to 10.000, run the application and start fighting again. You should see the following:
18:40:48 ERROR [or.jb.re.re.co.co.AbstractResteasyReactiveContext] (executor-thread-0) Request failed: org.eclipse.microprofile.faulttolerance.exceptions.TimeoutException: Timeout[io.quarkus.workshop.superheroes.fight.FightResource#getRandomFighters] timed out
        at io.smallrye.faulttolerance.core.timeout.Timeout.timeoutException(Timeout.java:91)
        at io.smallrye.faulttolerance.core.timeout.Timeout.doApply(Timeout.java:78)
        at io.smallrye.faulttolerance.core.timeout.Timeout.apply(Timeout.java:30)
...
Before going further, set the process.milliseconds to 0.
|
If you have any problem with the code, don’t understand or feel you are running, remember to ask for some help. Also, you can get the code of this entire workshop from http://github.com/quarkusio/quarkus-workshops/tree/refs/heads/main/quarkus-workshop-super-heroes. You can also download the completed code from https://raw.githubusercontent.com/quarkusio/quarkus-workshops/main/quarkus-workshop-super-heroes/dist/quarkus-super-heroes-workshop-complete.zip. |
Artificial Intelligence
On one side we have superheroes, and on the other side we have super villains. What happens when they fight? Let’s ask an AI to narrate the fight!
In this section we will introduce a new microservice that will use AI to narrate the fight between a superhero and a super villain. It will use Quarkus LangChain4j to invoke an OpenAI model.
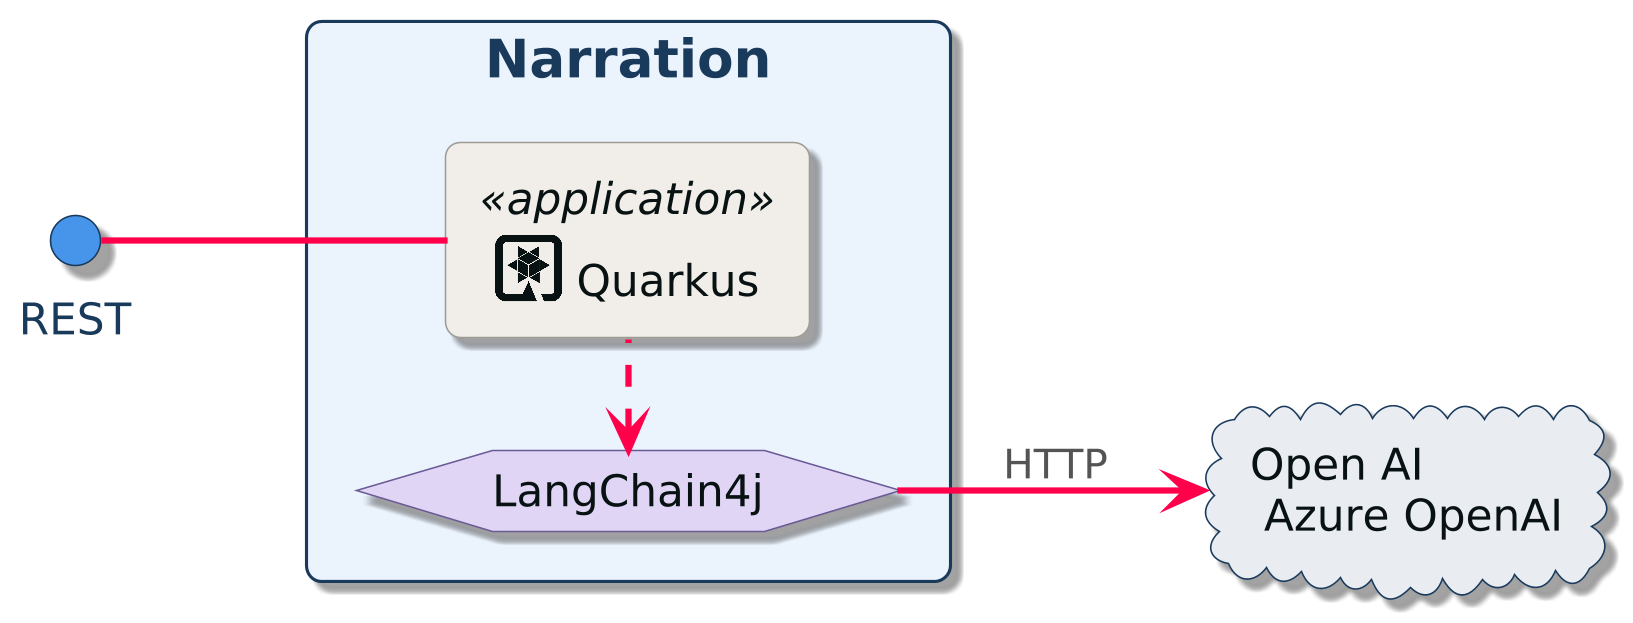
In the following sections, you will learn:
-
What is Quarkus LangChain4j?
-
How to create a declarative AI Service to invoke OpenAI
-
How to configure the OpenAI connection
| This service is exposed on the port 8086. |
What’s Quarkus LangChain4j?
Quarkus LangChain4j is a Quarkus extension that seamlessly integrates Large Language Models (LLMs) into Quarkus applications.
It lets you define AI-powered services declaratively — using annotations like @RegisterAiService, @SystemMessage, and @UserMessage — so that interacting with an LLM is as simple as calling a Java method.
Under the hood, it leverages LangChain4j, a Java framework for building LLM-powered applications, while adding Quarkus-specific features such as CDI integration, configuration via application.properties, and native compilation support.
Narration Microservice
Let’s create a new microservice that will use Quarkus LangChain4j to narrate the fight between a superhero and a super villain. New microservice, new project!
As before, the easiest way to create this new Quarkus project is to use the Quarkus Maven plugin (you can also go to https://code.quarkus.io if you prefer).
Open a terminal and run the following command under the quarkus-workshop-super-heroes/super-heroes directory:
This microservice needs less dependencies than the previous ones:
-
rest-jacksonprovides Quarkus REST and the ability to map JSON objects, -
quarkus-smallrye-openapiprovides the OpenAPI descriptor support and the Swagger UI in the dev console, -
quarkus-smallrye-fault-toleranceprovides the MicroProfile Fault Tolerance dependency so we can fallback in case OpenAI does not respond.
If you want your IDE to manage this new Maven project, you can declare it in the parent POM by adding this new module in the <modules> section:
<module>super-heroes/rest-narration</module>Directory Structure
At the end of this chapter, you will end up with the following directory structure:
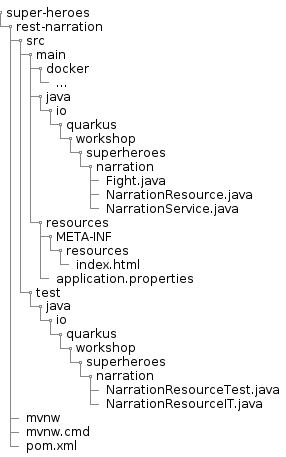
Add the Quarkus LangChain4j dependency
Once the project is created, you need to add the Quarkus LangChain4j OpenAI dependency.
Add the following XML in the rest-narration/pom.xml file:
  <properties>
    <!-- ... -->
    <quarkus-langchain4j.version>1.9.2</quarkus-langchain4j.version>
  </properties>
  <dependencyManagement>
    <dependencies>
      <!-- ... -->
      <dependency>
        <groupId>io.quarkiverse.langchain4j</groupId>
        <artifactId>quarkus-langchain4j-bom</artifactId>
        <version>${quarkus-langchain4j.version}</version>
        <type>pom</type>
        <scope>import</scope>
      </dependency>
    </dependencies>
  </dependencyManagement>
  <dependencies>
    <!-- ... -->
    <dependency>
      <groupId>io.quarkiverse.langchain4j</groupId>
      <artifactId>quarkus-langchain4j-openai</artifactId>
    </dependency>
  </dependencies>
The Fight bean
Let’s start with the Fight class.
The fight is what is going to be narrated by the microservice and ultimately sent by the Fight microservice.
Create the io.quarkus.workshop.superheroes.narration.Fight class in the created project with the following content:
package io.quarkus.workshop.superheroes.narration;

import org.eclipse.microprofile.openapi.annotations.media.Schema;

@Schema(description = "The fight that is narrated")
public class Fight {

    public String winnerName;
    public int winnerLevel;
    public String winnerPowers;
    public String loserName;
    public int loserLevel;
    public String loserPowers;
    public String winnerTeam;
    public String loserTeam;
}
The Narration REST Resource
The NarrationResource has one HTTP POST method to create a new narration.
Given a fight, it will invoke the NarrationService to return a fight narration.
The method is annotated with @Timeout and @Fallback so that if the OpenAI service is slow or unavailable, a fallback narration is returned instead of an error.
Open the generated io.quarkus.workshop.superheroes.narration.NarrationResource and update the content to be:
package io.quarkus.workshop.superheroes.narration;

import jakarta.inject.Inject;
import jakarta.ws.rs.*;
import jakarta.ws.rs.core.MediaType;
import jakarta.ws.rs.core.Response;
import org.eclipse.microprofile.faulttolerance.Fallback;
import org.eclipse.microprofile.faulttolerance.Timeout;
import org.eclipse.microprofile.openapi.annotations.tags.Tag;
import org.jboss.logging.Logger;

@Path("/api/narration")
@Produces(MediaType.TEXT_PLAIN)
@Consumes(MediaType.APPLICATION_JSON)
@Tag(name = "narration")
public class NarrationResource {

    @Inject
    Logger logger;

    @Inject
    NarrationService service;

    @POST
    @Timeout(30_000)
    @Fallback(fallbackMethod = "fallbackNarrate")
    public Response narrate(Fight fight) {
        String narration = service.narrate(fight);
        return Response.status(Response.Status.CREATED).entity(narration).build();
    }

    public Response fallbackNarrate(Fight fight) {
        logger.warn("Falling back on Narration");
        String fallback = """
            High above a bustling city, a symbol of hope and justice soared through the sky, \
            while chaos reigned below, with malevolent laughter echoing through the streets.
            With unwavering determination, the figure swiftly descended, effortlessly evading \
            explosive attacks, closing the gap, and delivering a decisive blow that silenced \
            the wicked laughter.

            In the end, the battle concluded with a clear victory for the forces of good, \
            as their commitment to peace triumphed over the chaos and villainy that had \
            threatened the city.
            The people knew that their protector had once again ensured their safety.
            """;
        return Response.status(Response.Status.CREATED).entity(fallback).build();
    }

    @GET
    @Path("/hello")
    public String hello() {
        return "Hello Narration Resource";
    }
}
The AI Narration Service
Now it’s time to implement the NarrationService.
With Quarkus LangChain4j, instead of writing imperative code to call an LLM, you declare an AI Service interface.
The extension takes care of generating the implementation, sending the right prompt to the LLM, and returning the result.
The key annotations are:
-
@RegisterAiService— marks this interface as an AI service; Quarkus generates the implementation automatically. -
@SystemMessage— provides the system prompt that sets the persona and rules for the LLM. -
@UserMessage— provides the user prompt template. Template variables like{fight.winnerName}are resolved from the method parameters.
Create the io.quarkus.workshop.superheroes.narration.NarrationService interface in the created project with the following content:
package io.quarkus.workshop.superheroes.narration;

import dev.langchain4j.service.SystemMessage;
import dev.langchain4j.service.UserMessage;
import io.quarkiverse.langchain4j.RegisterAiService;
import jakarta.enterprise.context.ApplicationScoped;

@RegisterAiService
@ApplicationScoped
@SystemMessage("""
    You are a Marvel Comics writer, expert in all sorts of super heroes and super villains.
    You narrate fights between a super hero and a super villain.
    During the narration, don't repeat "super hero" or "super villain".
    Write 4 paragraphs maximum.
    The narration must be:
    - G Rated
    - Workplace/family safe
    - No sexism, racism or other bias/bigotry
    Be creative.
    """)
public interface NarrationService {

    @UserMessage("""
        Narrate the fight between a winner and a loser.

        Winner team: {fight.winnerTeam}
        Winner name: {fight.winnerName}
        Winner powers: {fight.winnerPowers}
        Winner level: {fight.winnerLevel}

        Loser team: {fight.loserTeam}
        Loser name: {fight.loserName}
        Loser powers: {fight.loserPowers}
        Loser level: {fight.loserLevel}

        {fight.winnerName} who is a {fight.winnerTeam} has won the fight against {fight.loserName} who is a {fight.loserTeam}.
        """)
    String narrate(Fight fight);
}
That’s it!
No boilerplate, no manual HTTP calls, no JSON parsing.
Quarkus LangChain4j handles all of that.
The @SystemMessage tells the LLM to behave like a Marvel Comics writer, and the @UserMessage passes the fight data as a structured prompt.
Configuring OpenAI access
The OpenAI connection is configured entirely through application.properties — no separate configuration files needed.
|
Make sure that you have previously created an OpenAI subscription and obtained an API key. If not, go back to OpenAI. |
Add the following configuration to the rest-narration/src/main/resources/application.properties file:
## HTTP configuration
quarkus.http.port=8086

## Custom banner file path
quarkus.banner.path=banner.txt

## CORS
quarkus.http.cors.enabled=true
quarkus.http.cors.origins=*

## OpenAI configuration
quarkus.langchain4j.openai.api-key=${OPENAI_API_KEY:demo}
quarkus.langchain4j.openai.chat-model.model-name=gpt-4o-mini
quarkus.langchain4j.openai.chat-model.temperature=0.9
quarkus.langchain4j.openai.timeout=30s
Before running the application, set the OPENAI_API_KEY environment variable with your OpenAI API key:
export OPENAI_API_KEY=<your-openai-api-key>Testing the Narration Microservice
Time for some tests!
Since we don’t want to call the real OpenAI API during tests, we will mock the NarrationService AI service using Quarkus' @InjectMock.
First, make sure you have the Mockito dependency in the project:
<dependency>
    <groupId>io.quarkus</groupId>
    <artifactId>quarkus-junit-mockito</artifactId>
    <scope>test</scope>
</dependency>
Open the io.quarkus.workshop.superheroes.narration.NarrationResourceTest class and copy the following content:
package io.quarkus.workshop.superheroes.narration;

import io.quarkus.test.InjectMock;
import io.quarkus.test.junit.QuarkusTest;
import org.junit.jupiter.api.BeforeEach;
import org.junit.jupiter.api.Test;
import org.mockito.Mockito;

import static io.restassured.RestAssured.given;
import static jakarta.ws.rs.core.HttpHeaders.ACCEPT;
import static jakarta.ws.rs.core.HttpHeaders.CONTENT_TYPE;
import static jakarta.ws.rs.core.MediaType.APPLICATION_JSON;
import static jakarta.ws.rs.core.MediaType.TEXT_PLAIN;
import static jakarta.ws.rs.core.Response.Status.CREATED;
import static jakarta.ws.rs.core.Response.Status.OK;
import static org.hamcrest.CoreMatchers.is;

@QuarkusTest
public class NarrationResourceTest {

    private static final String HERO_NAME = "Super Baguette";
    private static final int HERO_LEVEL = 42;
    private static final String HERO_POWERS = "Eats baguette in less than a second";
    private static final String VILLAIN_NAME = "Super Chocolatine";
    private static final int VILLAIN_LEVEL = 43;
    private static final String VILLAIN_POWERS = "Transforms chocolatine into pain au chocolat";

    @InjectMock
    NarrationService narrationService;

    private static Fight getFight() {
        Fight fight = new Fight();
        fight.winnerName = VILLAIN_NAME;
        fight.winnerLevel = VILLAIN_LEVEL;
        fight.winnerPowers = VILLAIN_POWERS;
        fight.loserName = HERO_NAME;
        fight.loserLevel = HERO_LEVEL;
        fight.loserPowers = HERO_POWERS;
        fight.winnerTeam = "villains";
        fight.loserTeam = "heroes";
        return fight;
    }

    @BeforeEach
    public void setup() {
        Mockito.when(narrationService.narrate(Mockito.any(Fight.class))).thenReturn("Lorem ipsum dolor sit amet");
    }

    @Test
    void shouldPingOpenAPI() {
        given()
            .header(ACCEPT, APPLICATION_JSON)
            .when().get("/q/openapi")
            .then()
            .statusCode(OK.getStatusCode());
    }

    @Test
    public void testHelloEndpoint() {
        given()
            .when().get("/api/narration/hello")
            .then()
            .statusCode(200)
            .body(is("Hello Narration Resource"));
    }

    @Test
    void shouldNarrateAFight() {
        given().log().all()
            .body(getFight())
            .header(CONTENT_TYPE, APPLICATION_JSON)
            .header(ACCEPT, TEXT_PLAIN)
            .when()
            .post("/api/narration")
            .then()
            .statusCode(CREATED.getStatusCode());
    }
}
Make sure the tests pass by executing the command ./mvnw test (or from your IDE).
Running the Narration Microservice
Now that the tests are green, we are ready to run our Narration microservice.
Make sure you have set the OPENAI_API_KEY environment variable, then use ./mvnw quarkus:dev to start it.
Once the Narration microservice is started, create a new narration with the following cUrl command:
curl -X POST -d '{"winnerName":"Super winner", "winnerLevel":42, "winnerPowers":"jumping", "loserName":"Super loser", "loserLevel":2, "loserPowers":"leaping", "winnerTeam":"heroes", "loserTeam":"villains" }' -H "Content-Type: application/json" http://localhost:8086/api/narration -vYou should get something similar to the following response:
< HTTP/1.1 201 Created
< Content-Type: text/plain;charset=UTF-8

The battle between the towering Chewbacca and the dark and menacing Darth Vader was one for the ages. Chewbacca's incredible strength and agility were no match for Vader's mastery of the Force and his arsenal of weapons. The two clashed in a flurry of blows and energy blasts, each trying to gain the upper hand.

Despite Chewbacca's valiant efforts, it was clear that Vader was the superior fighter. His precognition and danger sense allowed him to anticipate every move Chewbacca made, and his energy blasts and electrokinesis were devastating. In the end, Vader emerged victorious, leaving Chewbacca battered and defeated.
The cUrl command returns the narration of the fight as text/plain.
Remember that you can also check Swagger UI by going to the dev console: http://localhost:8086/q/dev.
Invoking the Narration Microservice from the Fight Microservice
Now that we have a narration microservice up and running, we can invoke it from the fight microservice.
Adding narration to the Fight Microservice
We now need to add a new endpoint to the Fight microservice to invoke the Narration microservice.
Because it uses a remote call, we need to use the @RegisterRestClient annotation to register the NarrationProxy as a REST client.
Go back to the io.quarkus.workshop.superheroes.fight.FightResource class and add the new narrateFight method:
@POST
@Path("/narrate")
@Consumes(APPLICATION_JSON)
@Produces(TEXT_PLAIN)
public Response narrateFight(@Valid Fight fight) {
    logger.debug("Narrate the fight " + fight);
    String narration = service.narrateFight(fight);
    return Response.status(Response.Status.CREATED).entity(narration).build();

}
The FightResource invokes a new method of the FightService.
Add the following method to the io.quarkus.workshop.superheroes.fight.FightService class and make sure to inject the NarrationProxy:
@RestClient
NarrationProxy narrationProxy;

public String narrateFight(Fight fight) {
    return narrationProxy.narrate(fight);
}
Under the client package, where all the other proxies are already located, create a new NarrationProxy class:
package io.quarkus.workshop.superheroes.fight.client;

import io.quarkus.workshop.superheroes.fight.Fight;
import jakarta.ws.rs.Consumes;
import jakarta.ws.rs.POST;
import jakarta.ws.rs.Path;
import jakarta.ws.rs.Produces;
import jakarta.ws.rs.core.MediaType;
import org.eclipse.microprofile.rest.client.inject.RegisterRestClient;

@Path("/api/narration")
@Produces(MediaType.TEXT_PLAIN)
@Consumes(MediaType.APPLICATION_JSON)
@RegisterRestClient(configKey = "narration")
public interface NarrationProxy {

    @POST
    String narrate(Fight fight);
}
To link both microservices, we need to add the following configuration to the rest-fights/src/main/resources/application.properties file of the fight microservice:
quarkus.rest-client.narration.url=http://localhost:8086Test and mock the Narration microservice invocation
Like the other dependencies, the Narration microservice needs to be mocked so we can test the Fight microservice in isolation.
Add the following shouldNarrate test to the io.quarkus.workshop.superheroes.fight.FightResourceTest class.
And make sure you use the right imports:
import java.time.Instant;
import static jakarta.ws.rs.core.MediaType.TEXT_PLAIN;
@Test
void shouldNarrate() {
Fight fight = new Fight();
fight.fightDate = Instant.now();
fight.winnerName = DEFAULT_WINNER_NAME;
fight.winnerLevel = DEFAULT_WINNER_LEVEL;
fight.winnerPowers = DEFAULT_WINNER_POWERS;
fight.winnerPicture = DEFAULT_WINNER_PICTURE;
fight.loserName = DEFAULT_LOSER_NAME;
fight.loserLevel = DEFAULT_LOSER_LEVEL;
fight.loserPowers = DEFAULT_LOSER_POWERS;
fight.loserPicture = DEFAULT_LOSER_PICTURE;
fight.winnerTeam = "villains";
fight.loserTeam = "heroes";
given().body(fight)
.header(CONTENT_TYPE, APPLICATION_JSON)
.header(ACCEPT, TEXT_PLAIN)
.when()
.post("/api/fights/narrate")
.then()
.statusCode(CREATED.getStatusCode())
.body(startsWith("Lorem ipsum dolor sit amet"));
}Create the io.quarkus.workshop.superheroes.fight.client.MockNarrationProxy class and add the new narrateFight method:
package io.quarkus.workshop.superheroes.fight.client;

import io.quarkus.test.Mock;
import io.quarkus.workshop.superheroes.fight.Fight;
import jakarta.enterprise.context.ApplicationScoped;
import org.eclipse.microprofile.rest.client.inject.RestClient;

@Mock
@ApplicationScoped
@RestClient
public class MockNarrationProxy implements NarrationProxy {

    @Override
    public String narrate(Fight fight) {
        return """
            Lorem ipsum dolor sit amet, consectetur adipiscing elit, sed do eiusmod tempor incididunt ut labore et dolore magna aliqua.
            Ut enim ad minim veniam, quis nostrud exercitation ullamco laboris nisi ut aliquip ex ea commodo consequat.
            Duis aute irure dolor in reprehenderit in voluptate velit esse cillum dolore eu fugiat nulla pariatur.
            Excepteur sint occaecat cupidatat non proident, sunt in culpa qui officia deserunt mollit anim id est laborum.
            """;
    }
}
Now execute ./mvnw test and make sure that all the tests pass.
Running, Testing and Packaging the Application
Time to run the entire application!
For that, start all the microservices (Heroes, Villains, Fight and Narration) as well as the frontend.
When all the microservices are started, access the frontend at http://localhost:8080 and click on the Fight button.
The result of the fight is displayed, and below, you have a "Narrate the Fight" button.
Click on it, wait a few seconds (remember that the Narration microservice access a remote AI service that takes time) and the narration of the fight is displayed.
Being Generative AI, you can click several times on the button and you will get different narrations.
Event-driven and Reactive microservices
So far, we have build microservices that all use HTTP to interact. However, HTTP has significant flaws, such as temporal coupling between the different microservices. If the service is not there or is slow, the caller is directly impacted. Also, it’s hard to guess the capacity of the service you call; maybe you should not call it right now because this service is under heavy load.
Fortunately, event-driven microservices are rising and avoid most of these issues. By using events (wrapped in messages), the different microservices enforce a looser coupling. Depending on the messaging protocol you use, it may handle durability (avoiding the temporal coupling) and back-pressure (avoiding the overload).
In this section, we are going to see how Quarkus let you build event-driven microservices. More specially, you are going to see how to:
-
Send messages and process them
-
Connect a Quarkus application to Apache Kafka
-
Write Kafka records and read them
-
Use reactive programming to compute statistics on the fly
-
Send messages to the browser using web sockets
Quarkus uses MicroProfile Reactive Messaging to interact with Apache Kafka, and other messaging middleware (such as AMQP).[21]
In this chapter, we are going to use events as a way for microservices to interact.
You are going to extend the current system with the stats group depicted on the next figure:
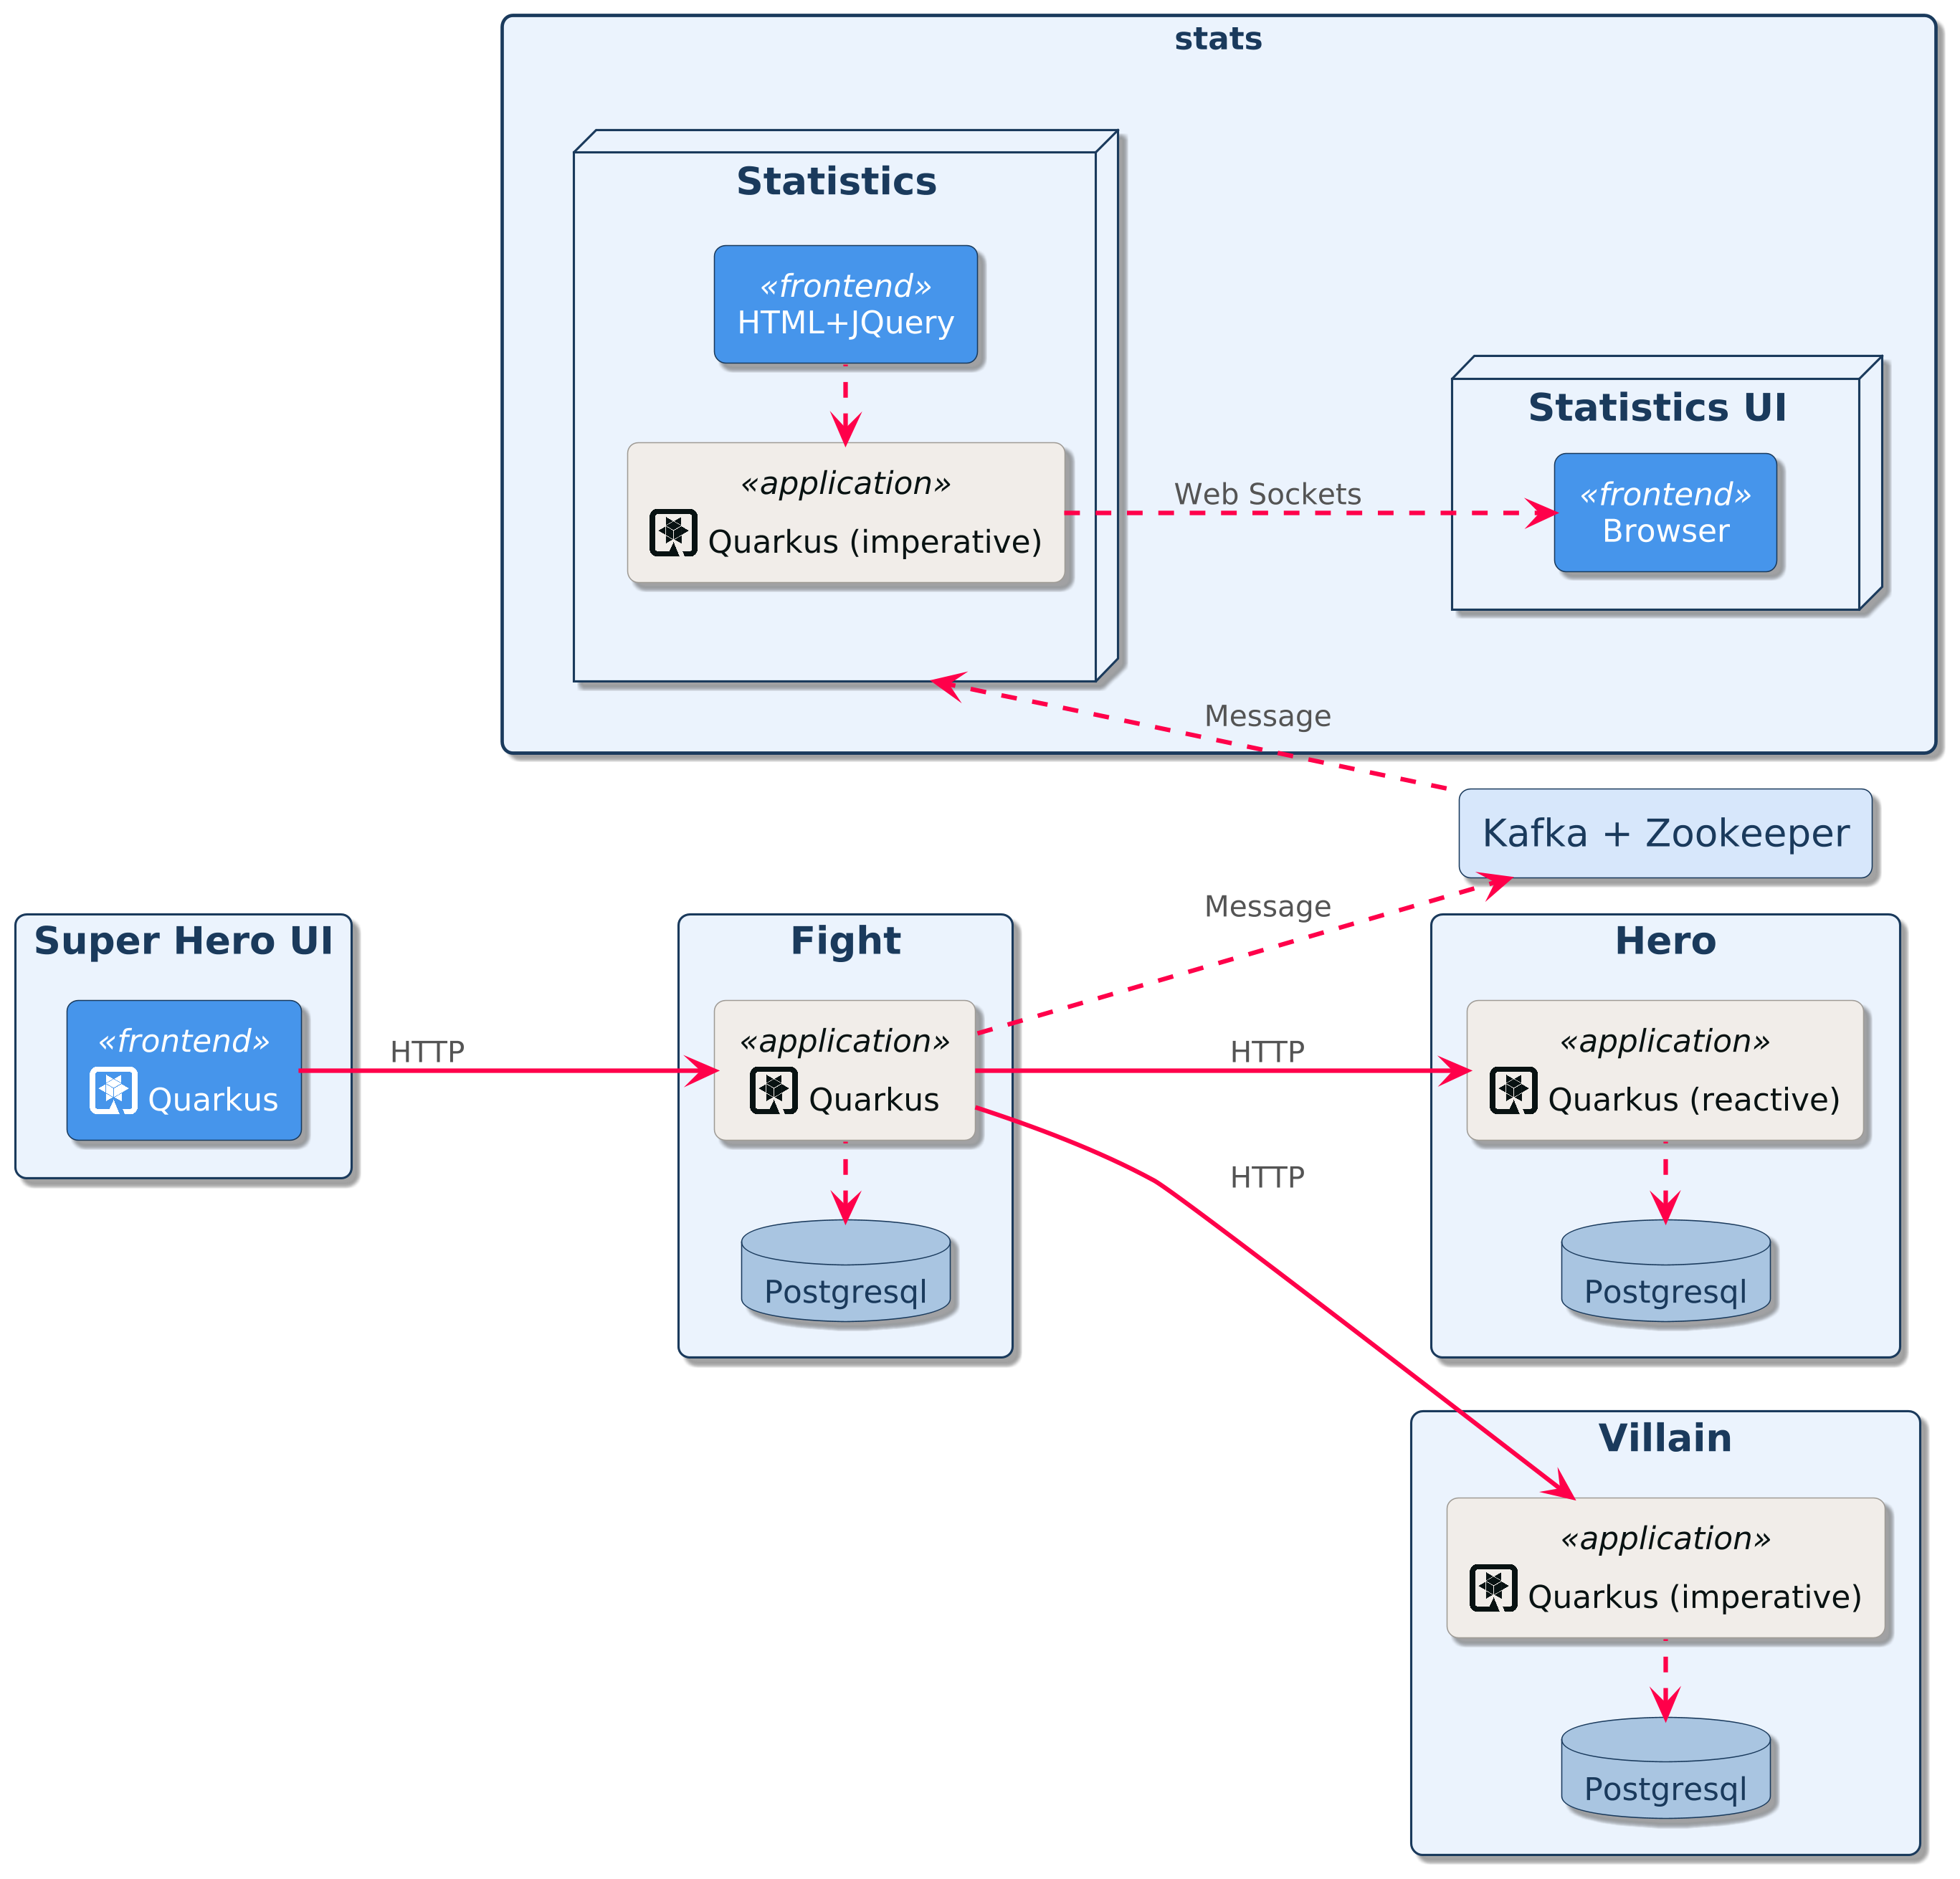
When the application persists a new fight, in the fight microservice, you are going to send it to a Kafka topic. These messages are read in the statistics microservice, processed, and the result is sent to a UI using web sockets.
| This service is exposed on the port 8085. |
Sending Messages to Kafka
In this section, you are going to see how you can send messages to a Kafka topic.[22]
Directory Structure
In this section we are going to extend the Fight microservice. In the following tree, we are going to edit the marked classes
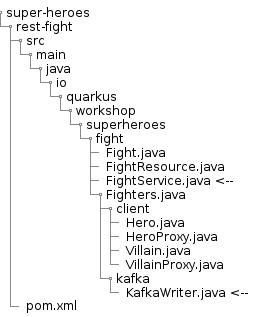
Adding the Reactive Messaging Dependency
The Kafka extension was already imported during the project creation. In doubt, you can run in the Fight microservice:
./mvnw quarkus:add-extension -Dextensions=" io.quarkus:quarkus-smallrye-reactive-messaging-kafka"The previous command adds the following dependency:
<dependency>
  <groupId>io.quarkus</groupId>
  <artifactId>quarkus-messaging-kafka</artifactId>
</dependency>
If not yet started, start the microservice using ./mvnw quarkus:dev.
|
Quarkus starts a Kafka broker automatically.
You can check that by executing the |
Connecting Imperative and Reactive Using an Emitter
Now edit the FightService class.
First, add the following field:
@Channel("fights") Emitter<Fight> emitter;|
You will also need to add the following imports: |
This field is an emitter, and lets you send events or messages (here, we are sending fights) to the channel specified with the @Channel annotation.
A channel is a virtual destination.
In the persistFight method, add the following line just before the return statement:
emitter.send(fight).toCompletableFuture().join();With this in place, every time the application persists a fight, it also sends the fight to the fights channel.
You may wonder why we need .toCompletableFuture().join().
Sending a message to Kafka is an asynchronous operation, and we need to be sure that the fight is not accessed outside the transaction.
Thus, we wait until Kafka confirms the reception before returning.
Connecting to Kafka
At this point, the serialized fights are sent to the fights channel.
You need to connect this channel to a Kafka topic.
For this, edit the application.properties file and add the following properties:
mp.messaging.outgoing.fights.connector=smallrye-kafka
mp.messaging.outgoing.fights.value.serializer=io.quarkus.kafka.client.serialization.ObjectMapperSerializer
These properties are structured as follows:
mp.messaging.[incoming|outgoing].channel.attribute=valueFor example, mp.messaging.outgoing.fights.connector configures the connector used for the outgoing channel fights.
The mp.messaging.outgoing.fights.value.serializer configures the serializer used to write the message in Kafka.
When omitted, the Kafka topic reuses the channel name (fights).
Now, you have connected the fight microservice to Kafka, and you are sending new fights to the Kafka topic.
Let’s see how you can read these messages in the stats microservice.
Receiving Messages from Kafka
In this section, you are going to see how you can receive messages from a Kafka topic.
For this, you are going to create a new microservice, named stats.
This microservice computes statistics based on the results of the fights.
For example, it determines if villains win more battle than heroes, and who is the superhero or super-villain having won the most fights.
Directory Structure
In this section, we are going to develop the following structure:

Bootstrapping the Statistics REST Endpoint
Like for the other microservice, the easiest way to create this new Quarkus project is to use a command.
Under the quarkus-workshop-super-heroes/super-heroes root directory where you have all your code.
Open a terminal and run the following command:
If you want your IDE to manage this new Maven project, you can declare it in the parent POM by adding this new module in the <modules> section:
<module>super-heroes/event-statistics</module>Delete all the classes under the io.quarkus.workshop.superheroes.statistics package as well as the associated test classes.
There are just examples.
Consuming Fight
This service receives the Fight from the fight microservice.
So, naturally, we need a fight class.
Create the io.quarkus.workshop.superheroes.statistics.Fight class with the following content:
package io.quarkus.workshop.superheroes.statistics;

import java.time.Instant;

import io.quarkus.runtime.annotations.RegisterForReflection;

@RegisterForReflection
public class Fight {

    public Instant fightDate;
    public String winnerName;
    public int winnerLevel;
    public String winnerPicture;
    public String loserName;
    public int loserLevel;
    public String loserPicture;
    public String winnerTeam;
    public String loserTeam;
}
We also need to create a deserializer that will receive the Kafka record and create the Fight instances.
Create the io.quarkus.workshop.superheroes.statistics.FightDeserializer class with the following content:
package io.quarkus.workshop.superheroes.statistics;

import io.quarkus.kafka.client.serialization.ObjectMapperDeserializer;

public class FightDeserializer extends ObjectMapperDeserializer<Fight> {

    public FightDeserializer() {
        super(Fight.class);
    }
}
Computing Statistics
Now, create the io.quarkus.workshop.superheroes.statistics.SuperStats class with the following content.
This class contains two methods annotated with @Incoming and @Outgoing, both consuming the Fight coming from Kafka.
The computeTeamStats method transforms the fight stream into a stream of ratio indicating the amount of victories for heroes and villains.
It calls onItem().transform method for each received fight.
It sends the computed ratios on the channel team-stats.
The computeTopWinners method uses more advanced reactive programming constructs such as group and scan:
package io.quarkus.workshop.superheroes.statistics;

import io.smallrye.mutiny.Multi;
import org.eclipse.microprofile.reactive.messaging.Incoming;
import org.eclipse.microprofile.reactive.messaging.Outgoing;
import org.jboss.logging.Logger;

import jakarta.enterprise.context.ApplicationScoped;
import jakarta.inject.Inject;

@ApplicationScoped
public class SuperStats {

    @Inject
    Logger logger;

    private final Ranking topWinners = new Ranking(10);
    private final TeamStats stats = new TeamStats();

    @Incoming("fights")
    @Outgoing("team-stats")
    public Multi<Double> computeTeamStats(Multi<Fight> results) {
        return results
            .onItem().transform(stats::add)
            .invoke(() -> logger.info("Fight received. Computed the team statistics"));
    }

    @Incoming("fights")
    @Outgoing("winner-stats")
    public Multi<Iterable<Score>> computeTopWinners(Multi<Fight> results) {
        return results
            .group().by(fight -> fight.winnerName)
            .onItem().transformToMultiAndMerge(group ->
                group
                    .onItem().scan(Score::new, this::incrementScore))
            .onItem().transform(topWinners::onNewScore)
            .invoke(() -> logger.info("Fight received. Computed the top winners"));
    }

    private Score incrementScore(Score score, Fight fight) {
        score.name = fight.winnerName;
        score.score = score.score + 1;
        return score;
    }
}
In addition, create the io.quarkus.workshop.superheroes.statistics.Ranking, io.quarkus.workshop.superheroes.statistics.Score and io.quarkus.workshop.superheroes.statistics.TeamStats classes with the following contents:
Then, create the Ranking class, used to compute a floating top 10, with the following content:
package io.quarkus.workshop.superheroes.statistics;

import java.util.Collections;
import java.util.Comparator;
import java.util.LinkedList;

public class Ranking {

    private final int max;

    private final Comparator<Score> comparator = Comparator.comparingInt(s -> -1 * s.score);

    private final LinkedList<Score> top = new LinkedList<>();

    public Ranking(int size) {
        max = size;
    }

    public Iterable<Score> onNewScore(Score score) {
        // Remove score if already present,
        top.removeIf(s -> s.name.equalsIgnoreCase(score.name));
        // Add the score
        top.add(score);
        // Sort
        top.sort(comparator);

        // Drop on overflow
        if (top.size() > max) {
            top.remove(top.getLast());
        }

        return Collections.unmodifiableList(top);
    }
}
The Score class is a simple structure storing the name of a hero or villain and its actual score, i.e. the number of won battles.
package io.quarkus.workshop.superheroes.statistics;

import io.quarkus.runtime.annotations.RegisterForReflection;

@RegisterForReflection
public class Score {
    public String name;
    public int score;

    public Score() {
        this.score = 0;
    }
}
The TeamStats class is an object keeping track of the number of battles won by heroes and villains.
package io.quarkus.workshop.superheroes.statistics;

class TeamStats {

    private int villains = 0;
    private int heroes = 0;

    double add(Fight result) {
        if (result.winnerTeam.equalsIgnoreCase("heroes")) {
            heroes = heroes + 1;
        } else {
            villains = villains + 1;
        }
        return ((double) heroes / (heroes + villains));
    }
}|
The |
Reading Messages from Kafka
It’s now time to connect the fights channel with the Kafka topic.
Edit the application.properties file and add the following content:
quarkus.http.port=8085

## Custom banner file path
quarkus.banner.path=banner.txt

## Kafka configuration
mp.messaging.incoming.fights.connector=smallrye-kafka
mp.messaging.incoming.fights.auto.offset.reset=earliest
mp.messaging.incoming.fights.broadcast=true
As for the writing side, it configures the Kafka connector.
The mp.messaging.incoming.fights.auto.offset.reset=earliest property indicates that the topic is read from the earliest available record.
Check the Kafka configuration to see all the available settings.
Sending Events on WebSockets
At this point, you read the fights from Kafka and computes statistics. Actually, even if you start the application, nothing will happen as nobody consumes these statistics.
In this section, we are going to consume these statistics and send them to two WebSockets. For this, we are going to add two classes and a simple presentation page:
-
TeamStatsWebSocket -
TopWinnerWebSocket -
index.html
Quarkus uses the JSR 356 providing an annotation-driven approach to implement WebSockets.
The TeamStats WebSocket
Create the io.quarkus.workshop.superheroes.statistics.TeamStatsWebSocket class with the following content:
package io.quarkus.workshop.superheroes.statistics;

import io.smallrye.mutiny.Multi;
import io.smallrye.mutiny.subscription.Cancellable;
import jakarta.annotation.PostConstruct;
import jakarta.annotation.PreDestroy;
import org.eclipse.microprofile.reactive.messaging.Channel;
import org.jboss.logging.Logger;

import jakarta.enterprise.context.ApplicationScoped;
import jakarta.inject.Inject;
import jakarta.websocket.OnClose;
import jakarta.websocket.OnOpen;
import jakarta.websocket.Session;
import jakarta.websocket.server.ServerEndpoint;
import java.util.List;
import java.util.concurrent.CopyOnWriteArrayList;

@ServerEndpoint("/stats/team")
@ApplicationScoped
public class TeamStatsWebSocket {

    @Channel("team-stats")
    Multi<Double> stream;

    @Inject Logger logger;

    private final List<Session> sessions = new CopyOnWriteArrayList<>();
    private Cancellable cancellable;

    @OnOpen
    public void onOpen(Session session) {
        sessions.add(session);
    }

    @OnClose
    public void onClose(Session session) {
        sessions.remove(session);
    }

    @PostConstruct
    public void subscribe() {
        cancellable = stream.subscribe()
            .with(ratio -> sessions.forEach(session -> write(session, ratio)));
    }

    @PreDestroy
    public void cleanup() {
        cancellable.cancel();
    }

    private void write(Session session, double ratio) {
        session.getAsyncRemote().sendText(Double.toString(ratio), result -> {
            if (result.getException() != null) {
                logger.error("Unable to write message to web socket", result.getException());
            }
        });
    }
}
This component is a WebSocket as specified by the @ServerEndpoint("/stats/team") annotation.
It handles the /stats/team WebSocket.
When a client (like a browser) connects to the WebSocket, it keeps track of the session. This session is released when the client disconnects.
The TeamStatsWebSocket also injects a Multi attached to the team-stats channel.
After creation, the component subscribes to this stream and broadcasts the fights to the different clients connected to the web socket.
The subscription is an essential part of the stream lifecycle. It indicates that someone is interested in the items transiting on the stream, and it triggers the emission. In this case, it triggers the connection to Kafka and starts receiving the messages from Kafka. Without it, items would not be emitted.
The TopWinner WebSocket
The io.quarkus.workshop.superheroes.statistics.TopWinnerWebSocket follows the same pattern but subscribes to the winner-stats channel.
Create the io.quarkus.workshop.superheroes.statistics.TopWinnerWebSocket with the following content:
package io.quarkus.workshop.superheroes.statistics;

import com.fasterxml.jackson.databind.ObjectMapper;
import io.smallrye.mutiny.Multi;
import io.smallrye.mutiny.subscription.Cancellable;
import io.smallrye.mutiny.unchecked.Unchecked;
import jakarta.annotation.PostConstruct;
import jakarta.annotation.PreDestroy;
import org.eclipse.microprofile.reactive.messaging.Channel;
import org.jboss.logging.Logger;

import jakarta.enterprise.context.ApplicationScoped;
import jakarta.inject.Inject;
import jakarta.websocket.OnClose;
import jakarta.websocket.OnOpen;
import jakarta.websocket.Session;
import jakarta.websocket.server.ServerEndpoint;
import java.util.List;
import java.util.concurrent.CopyOnWriteArrayList;

@ServerEndpoint("/stats/winners")
@ApplicationScoped
public class TopWinnerWebSocket {

    @Inject ObjectMapper mapper;

    @Inject Logger logger;

    @Channel("winner-stats")
    Multi<Iterable<Score>> winners;

    private final List<Session> sessions = new CopyOnWriteArrayList<>();
    private Cancellable cancellable;

    @OnOpen
    public void onOpen(Session session) {
        sessions.add(session);
    }

    @OnClose
    public void onClose(Session session) {
        sessions.remove(session);
    }

    @PostConstruct
    public void subscribe() {
        cancellable = winners
            .map(Unchecked.function(scores -> mapper.writeValueAsString(scores)))
            .subscribe().with(serialized -> sessions.forEach(session -> write(session, serialized)));
    }

    @PreDestroy
    public void cleanup() {
        cancellable.cancel();
    }

    private void write(Session session, String serialized) {
        session.getAsyncRemote().sendText(serialized, result -> {
            if (result.getException() != null) {
                logger.error("Unable to write message to web socket", result.getException());
            }
        });
    }
}
Because the items (top 10) need to be serialized, the TopWinnerWebSocket also use Jackson to transform the object into a serialized form.
The UI
Finally, you need a UI to watch these live statistics.
Create the src/main/resources/META-INF/resources/index.html file with the following content:
<!DOCTYPE html>
<html lang="en">
<head>
    <meta charset="UTF-8">
    <title>Super Battle Stats</title>

    <link rel="stylesheet" type="text/css" href="https://cdnjs.cloudflare.com/ajax/libs/patternfly/3.24.0/css/patternfly.min.css">
    <link rel="stylesheet" type="text/css" href="https://cdnjs.cloudflare.com/ajax/libs/patternfly/3.24.0/css/patternfly-additions.min.css">

    <style>
        .page-title {
            font-size: xx-large;
        }

        .progress {
            background-color: firebrick;
        }

        .progress-bar {
            background: dodgerblue;
        }

    </style>
</head>
<body>
<div class="container">
    <div class="row">
        <div class="col"><h1 class="page-title">Super Stats</h1></div>
    </div>
</div>
<div class="container container-cards-pf">
    <div class="row row-cards-pf">
        <div class="col-xs-12 col-sm-6 col-md-4 col-lg-3">
            <!-- Top winners -->
            <div class="card-pf card-pf-view card-pf-view-select">
                <h2 class="card-pf-title">
                    <i class="fa fa-trophy"></i> Top Winner
                </h2>
                <div class="card-pf-body">
                    <div id="top-winner">

                    </div>
                </div>
            </div>
        </div>

        <div class="col-xs-12 col-sm-8 col-md-6 col-lg-6">
            <!-- Top losers -->
            <div class="card-pf card-pf-view card-pf-view-select">
                <h2 class="card-pf-title">
                    <i class="fa pficon-rebalance"></i> Heroes vs. Villains
                </h2>
                <div class="card-pf-body">
                    <div class="progress-container progress-description-left progress-label-right">
                        <div class="progress-description">
                            Heroes
                        </div>
                        <div class="progress">
                            <div id="balance" class="progress-bar" role="progressbar" aria-valuenow="50" aria-valuemin="0" aria-valuemax="100" style="width: 50%;">
                                <span>Villains</span>
                            </div>
                        </div>
                    </div>
                </div>
            </div>
        </div>
    </div>
</div>

<script src="https://cdnjs.cloudflare.com/ajax/libs/jquery/3.2.1/jquery.min.js"></script>
<script src="https://cdnjs.cloudflare.com/ajax/libs/twitter-bootstrap/3.3.7/js/bootstrap.min.js"></script>
<script src="https://cdnjs.cloudflare.com/ajax/libs/patternfly/3.24.0/js/patternfly.min.js"></script>
<script src="https://cdnjs.cloudflare.com/ajax/libs/c3/0.7.11/c3.js"></script>
<script src="https://cdnjs.cloudflare.com/ajax/libs/d3/5.12.0/d3.min.js"></script>

<script>
    $(document).ready(function() {
        var host = window.location.host;
        var protocol = (window.location.protocol == "https:") ? "wss" : "ws";

        var top = new WebSocket(protocol + "://" + host + "/stats/winners");
        top.onmessage = function (event) {
            updateTop(event.data);
        };
        var team = new WebSocket(protocol + "://" + host + "/stats/team");
        team.onmessage = function(event) {
            console.log(event.data);
            updateRatio(event.data);
        };
    });


    function updateTop(scores) {
        $("#top-winner").children("p").remove();
        JSON.parse(scores).forEach(function(score) {
            $("#top-winner").append($("<p>" + score.name + " [" + score.score + "]</p>"))
        });
    }

    function updateRatio(ratio) {
        var percent = ratio * 100;
        $("#balance").attr("aria-valuenow", ratio * 100).attr("style", "width: " + percent + "%;");
    }
</script>
</body>
</html>
Running the Application
You are all set!
Time to start the application using:
./mvnw quarkus:devThen, open http://localhost:8085 in a new browser window.
Trigger some fights, and you should see the live statistics moving.
Quarkus automatically reuse the Kafka broker from the fight service. So, make sure the fight service is started.
|
If you have any problem with the code, don’t understand or feel you are running, remember to ask for some help. Also, you can get the code of this entire workshop from http://github.com/quarkusio/quarkus-workshops/tree/refs/heads/main/quarkus-workshop-super-heroes. You can also download the completed code from https://raw.githubusercontent.com/quarkusio/quarkus-workshops/main/quarkus-workshop-super-heroes/dist/quarkus-super-heroes-workshop-complete.zip. |
Unifying Imperative and Reactive Programming
So, as seen in this chapter, Quarkus is not limited to HTTP microservices, but fits perfectly in an event-driven architecture. The secret behind this is to use a single reactive engine for both imperative and reactive code:

This unique architecture allows mixing imperative and reactive, but also use the right model for the job. To go further on this, we recommend:
-
https://quarkus.io/guides/reactive-routes-guide to use reactive routes
-
https://quarkus.io/guides/reactive-sql-clients to access SQL database in a non-blocking fashion
-
https://quarkus.io/guides/kafka-guide to integrate with Kafka
-
https://quarkus.io/guides/amqp-guide to integrate with AMQP 1.0
-
https://quarkus.io/guides/using-vertx to understand how you can use Vert.x directly
Loading the Microservices
Now that we have the three main microservices exposing health checks and metrics, time to have a decent user interface to monitor how the system behaves. The purpose of this workshop is to add some load to our application. You will download the load application, install it and run it.
Give me some load!
In the super-heroes/load-super-heroes directory, there is a command line Quarkus application .
This application simulates users interacting with the system so it generates some load.
Looking at Some Code
The CLIMain class is just a Picocli extension command line application that executes the FightScenario, HeroScenario and VillainScenario,
on the same thread but randomly executing 3 different random calls to the 3 REST APIs.
For example, if you look at the HeroScenario, you will see that it’s just a suit of HTTP calls on the Hero API:
protected List<Supplier<Response>> callSupplier () {
    Supplier<Response> helloCall = () -> heroProxy.hello();
    Supplier<Response> allCall = () -> heroProxy.all();
    Supplier<Response> randomCall = () -> heroProxy.random();
    Supplier<Response> getCall = () -> heroProxy.get(idParam());
    Supplier<Response> createCall = () -> heroProxy.create(create());
    Supplier<Response> deleteCall = () -> heroProxy.delete(idParam());
    return Stream.of(allCall, helloCall, randomCall, getCall, createCall, deleteCall).collect(Collectors.toList());
}
Running the Load Application
You are all set! Time to compile and start the load application using:
./mvnw package
java -jar ./target/quarkus-app/quarkus-run.jar -s
You will see the following logs. To stop the load, write something and press Enter key.
INFO: GET - http://localhost:8082/api/fights/1 - 200
INFO: DELETE - http://localhost:8084/api/villains/440 - 204
INFO: GET - http://localhost:8083/api/heroes - 200
INFO: GET - http://localhost:8084/api/villains/hello - 200
INFO: GET - http://localhost:8082/api/fights - 200
INFO: GET - http://localhost:8083/api/heroes/581 - 200
INFO: GET - http://localhost:8084/api/villains/126 - 200
INFO: GET - http://localhost:8082/api/fights/hello - 200
INFO: DELETE - http://localhost:8083/api/heroes/491 - 204|
Stop the load application before going further. |
Building Native Executables
Let’s now produce native executables for our application.
Thanks to its GraalVM integration, Quarkus can easily generate native executables.
Just like Go, native executables don’t need a VM to run; they contain the whole application, like an .exe file on Windows.
Building Native Executables with Quarkus
Having native executables for our microservices improves their startup time and produces a minimal disk footprint. This can be a big plus if your microservices run in a serverless environment where scaling from zero is important. The produced binary has everything to run the application, including the needed parts of the "JVM" (shrunk to be just enough to run the application), and the application itself.
|
Choosing JVM execution vs. native executable execution depends on your application needs and environment. There are some trade-offs to consider. |
To be able to build native executables, you need GraalVM to be installed.
And make sure you have the GRAALVM_HOME environment variable defined and pointing to where you installed GraalVM.
Then, if you look at all the pom.xml files, you will find the following profile.
This allows you to build a native executable just by invoking ./mvnw package -Pnative.
<profile>
    <id>native</id>
    <activation>
        <property>
            <name>native</name>
        </property>
    </activation>
    <properties>
        <quarkus.package.jar.enabled>false</quarkus.package.jar.enabled>
        <skipITs>false</skipITs>
        <quarkus.native.enabled>true</quarkus.native.enabled>
    </properties>
</profile>
Building Native Executables for our Microservices
Let’s create native executables for all our microservices. Well, maybe not all of them. Let’s see.
From the root super-heroes directory, run the following commands (to speed up the compilation you can also skip the tests by adding -Dmaven.test.skip=true):
./mvnw --file rest-fights/pom.xml package -Pnative
./mvnw --file rest-heroes/pom.xml package -Pnative
./mvnw --file rest-villains/pom.xml package -Pnative
./mvnw --file ui-super-heroes/pom.xml package -Pnative
./mvnw --file event-statistics/pom.xml package -Pnative|
Creating a native executable requires a lot of memory and CPU. It also takes a few minutes, even for a simple application like the Villain microservice. Most of the time is spent during the dead code elimination, as it traverses the whole (closed) world. |
During the compilation of each microservice, you see a lot of information about the native compilation. Below is a summary of the output for that you will get.
========================================================================================================================
GraalVM Native Image: Generating 'rest-heroes-1.0.0-SNAPSHOT-runner' (executable)...
========================================================================================================================
For detailed information and explanations on the build output, visit:
https://github.com/oracle/graal/blob/master/docs/reference-manual/native-image/BuildOutput.md
------------------------------------------------------------------------------------------------------------------------
[1/8] Initializing...                                                                                    (5.3s @ 0.28GB)
 Java version: 25.0.2+10, vendor version: GraalVM CE 25.0.2+10.1
 Graal compiler: optimization level: 2, target machine: armv8.1-a
 C compiler: cc (apple, arm64, 21.0.0)
 Garbage collector: Serial GC (max heap size: 80% of RAM)
 11 user-specific feature(s):
 - com.oracle.svm.thirdparty.gson.GsonFeature
 - io.quarkus.caffeine.runtime.graal.CacheConstructorsFeature
 - io.quarkus.hibernate.orm.runtime.graal.DisableLoggingFeature: Disables INFO logging during the analysis phase
 - io.quarkus.hibernate.orm.runtime.graal.RegisterServicesForReflectionFeature: Makes methods of reachable Hibernate services accessible through Class#getMethods()
 - io.quarkus.hibernate.validator.runtime.DisableLoggingFeature: Disables INFO logging during the analysis phase for the [org.hibernate.validator.internal.util.Version] categories
 - io.quarkus.runner.Feature: Auto-generated class by Quarkus from the existing extensions
 - io.quarkus.runtime.graal.DisableLoggingFeature: Adapts logging during the analysis phase
 - io.quarkus.runtime.graal.JVMChecksFeature
 - io.quarkus.runtime.graal.SkipConsoleServiceProvidersFeature: Skip unsupported console service providers when quarkus.native.auto-service-loader-registration is false
 - org.eclipse.angus.activation.nativeimage.AngusActivationFeature
 - org.hibernate.graalvm.internal.GraalVMStaticFeature: Hibernate ORM's static reflection registrations for GraalVM
------------------------------------------------------------------------------------------------------------------------
 5 experimental option(s) unlocked:
 - '-H:+AllowFoldMethods' (origin(s): command line)
 - '-H:BuildOutputJSONFile' (origin(s): command line)
 - '-H:-UseServiceLoaderFeature' (origin(s): command line)
 - '-H:+GenerateBuildArtifactsFile' (origin(s): command line)
 - '-H:AddOpens' (alternative API option(s): --add-opens java.base/java.lang=ALL-UNNAMED; origin(s): command line)
------------------------------------------------------------------------------------------------------------------------
Build resources:
 - 25.68GB of memory (37.4% of system memory, using available memory)
 - 16 thread(s) (100.0% of 16 available processor(s), determined at start)
[2/8] Performing analysis...  [******]                                                                   (9.3s @ 2.60GB)
   23,519 types,  30,251 fields, and 105,346 methods found reachable
    7,460 types,     129 fields, and   6,950 methods registered for reflection
       63 types,      68 fields, and      55 methods registered for JNI access
        0 downcalls and 0 upcalls registered for foreign access
        5 native libraries: -framework CoreServices, -framework Foundation, dl, pthread, z
[3/8] Building universe...                                                                               (2.8s @ 2.55GB)
[4/8] Parsing methods...      [*]                                                                        (0.9s @ 2.78GB)
[5/8] Inlining methods...     [***]                                                                      (0.6s @ 2.96GB)
[6/8] Compiling methods...    [***]                                                                      (8.6s @ 2.10GB)
[7/8] Laying out methods...   [***]                                                                      (5.3s @ 2.81GB)
[8/8] Creating image...       [**]                                                                       (4.0s @ 3.17GB)
  39.70MB (46.41%) for code area:    69,386 compilation units
  44.83MB (52.39%) for image heap:  485,408 objects and 78 resources
   1.03MB ( 1.20%) for other data
85.56MB in total image size, 85.56MB in total file size|
Do you remember the |
Running the Application in Native mode
The native compilation takes a while.
In addition to the regular files, the build also produces target/xxx-yyy-1.0.0-SNAPSHOT-runner files.
Notice that there is no .jar file extension.
It’s just a binary file that you can execute directly like any other binary.
Let’s execute the entire application in native mode.
Native mode is using the prod profile, meaning that the infrastructure needs to be up and running (docker compose -f docker-compose.yaml up -d).
Then, from the root super-heroes directory, run the following commands (to speed up the compilation you can also skip the tests by adding -Dmaven.test.skip=true):
./rest-fights/target/rest-fights-1.0.0-SNAPSHOT-runner
./rest-heroes/target/rest-heroes-1.0.0-SNAPSHOT-runner
./rest-villains/target/rest-villains-1.0.0-SNAPSHOT-runner
./ui-super-heroes/target/ui-super-heroes-1.0.0-SNAPSHOT-runner
./event-statistics/target/event-statistics-1.0.0-SNAPSHOT-runner
./rest-narration/target/quarkus-app/quarkus-run.jar
You can then go to http://localhost:8080 and start new fights.
Building Containers
In this chapter we will build containers out of our Quarkus microservices and execute them locally thanks to Docker Compose. Thanks to Quarkus Cloud Native capabilities, we will be able to build and execute containers easily. We will also produce Linux 64 bits native executables and runs them in a container. The native compilation uses the OS and architecture of the host system.
Building Containers with Quarkus
When we bootstrapped our microservices with the Maven Quarkus plugin, a set of Dockerfiles have been generated under src/main/docker:
-
Dockerfile.jvm: Dockerfile is used in order to build a container that runs the Quarkus application in JVM mode. -
Dockerfile.legacy-jar: Deprecated Dockerfile building a container in JVM mode. -
Dockerfile.native: Dockerfile is used in order to build a container that runs the Quarkus application in native (no JVM) mode. -
Dockerfile.native-micro: Same as above but it uses a micro base image, tuned for Quarkus native executables.
Quarkus is able to build a container image automatically.
The quarkus-container-image-docker extension is already included in our projects for this purpose.
It uses Docker and the generated Dockerfiles to build container images.
Building Containers for our Microservices in JVM Mode
The Dockerfile.jvm file is for running the application in JVM mode.
It looks like this:
FROM eclipse-temurin:21-jre

ENV LANGUAGE='en_US:en'


# We make four distinct layers so if there are application changes the library layers can be re-used
COPY --chown=185 target/quarkus-app/lib/ /deployments/lib/
COPY --chown=185 target/quarkus-app/*.jar /deployments/
COPY --chown=185 target/quarkus-app/app/ /deployments/app/
COPY --chown=185 target/quarkus-app/quarkus/ /deployments/quarkus/

EXPOSE 8080
USER 185

ENTRYPOINT ["java", "-Dquarkus.http.host=0.0.0.0", "-Djava.util.logging.manager=org.jboss.logmanager.LogManager", "-jar", "/deployments/quarkus-run.jar"]
From the super-heroes directory, execute the following commands to build the applications and create the container images (add -Dmaven.test.skip=true if you want to skip the tests):
cd rest-fights
./mvnw clean package -Dquarkus.container-image.build=true
cd ..
cd rest-heroes
./mvnw clean package -Dquarkus.container-image.build=true
cd ..
cd rest-villains
./mvnw clean package -Dquarkus.container-image.build=true
cd ..
cd ui-super-heroes
./mvnw clean package -Dquarkus.container-image.build=true
cd ..
cd event-statistics
./mvnw clean package -Dquarkus.container-image.build=true
cd ..
cd rest-narration
./mvnw clean package -Dquarkus.container-image.build=true
cd ..
Check that you have all the Docker images installed locally:
docker image lsThe output should look like this:
REPOSITORY                      TAG                  IMAGE ID       SIZE
<org>/rest-fights             1.0.0-SNAPSHOT       adb8a546a66b   419MB
<org>/rest-heroes             1.0.0-SNAPSHOT       d9e6ae6e3e23   402MB
<org>/rest-villains           1.0.0-SNAPSHOT       60a5c813f59a   402MB
<org>/ui-super-heroes         1.0.0-SNAPSHOT       82fce62c11a5   379MB
<org>/event-statistics        1.0.0-SNAPSHOT       a5472c5bd576   395MB
<org>/rest-narration          1.0.0-SNAPSHOT       fcfe334594f3   390MB
Running JVM Mode Containers Locally
Now that we have all our Docker images created, let’s execute them all to be sure that everything is working.
Under super-heroes/infrastructure you will find the docker-compose-app-local.yaml file.
It declares all the needed infrastructure (databases, Kafka) as well as our microservices.
|
In the |
Execute it with:
docker compose -f docker-compose-app-local.yaml upTo know that all your containers are started, you can use the following command:
docker compose -f docker-compose-app-local.yaml psYou should get something similar to the following list. Make sure all your containers are in running status:
NAME               IMAGE                                         STATUS         PORTS
ui-super-heroes    agoncal<org/ui-super-heroes:1.0.0-SNAPSHOT    Up             0.0.0.0:8080->8080/tcp
rest-fights        agoncal<org/rest-fights:1.0.0-SNAPSHOT        Up             0.0.0.0:8082->8082/tcp
rest-heroes        agoncal<org/rest-heroes:1.0.0-SNAPSHOT        Up             0.0.0.0:8083->8083/tcp
rest-villains      agoncal<org/rest-villains:1.0.0-SNAPSHOT      Up             0.0.0.0:8084->8084/tcp
event-statistics   agoncal<org/event-statistics:1.0.0-SNAPSHOT   Up             0.0.0.0:8085->8085/tcp
rest-narration     agoncal<org/rest-narration:1.0.0-SNAPSHOT     Up             0.0.0.0:8086->8086/tcp
super-database     postgres:14                                   Up (healthy)   0.0.0.0:5432->5432/tcp
super-kafka        quay.io/strimzi/kafka:0.28.0-kafka-3.1.0      Up             0.0.0.0:9092->9092/tcp
Once all the containers are started, you can:
-
Go to http://localhost:8080 to check the main UI
-
Go to http://localhost:8085 to check the statistics UI
-
curl http://localhost:8084/api/villains | jq
-
curl http://localhost:8083/api/heroes | jq
Then, make sure you shut down the entire application with:
docker compose -f docker-compose-app-local.yaml downBuilding Containers for our Microservices in Native Mode
And… Linux Containers are … Linux. So before being able to build a container with our native executable, we need to produce compatible native executables. If you are using a Linux 64 bits machine, you are good to go. If not, Quarkus comes with a trick to produce these executable:
The Dockerfile.native file is for running the application in native mode.
It looks like this:
FROM registry.access.redhat.com/ubi9/ubi-minimal:9.6
WORKDIR /work/
RUN chown 1001 /work \
    && chmod "g+rwX" /work \
    && chown 1001:root /work
COPY --chown=1001:root --chmod=0755 target/*-runner /work/application

EXPOSE 8080
USER 1001

ENTRYPOINT ["./application", "-Dquarkus.http.host=0.0.0.0"]
./mvnw clean package -Pnative -Dquarkus.native.container-build=true -DskipTestsThe -Dquarkus.native.container-build=true allows running the native compilation inside a container (provided by Quarkus).
The result is a macOS 64-bit executable. The result is a Linux 64-bit executable. The result is a Windows 64-bit executable.
|
Building a native executable takes time, CPU, and memory. It’s even more accurate in the container. So, first, be sure that your container system has enough memory to build the executable. It requires at least 6Gb of memory, 8Gb is recommended. |
Execute the above command for all our microservices. We also copy the UI into the fight service, to simplify the process:
cd rest-heroes
./mvnw clean package -Pnative -Dquarkus.native.container-build=true -DskipTests
cd ..
cd rest-villains
./mvnw clean package -Pnative -Dquarkus.native.container-build=true -DskipTests
cd ..
cd rest-fights
cp -R ../ui-super-heroes/dist/* src/main/resources/META-INF/resources
./mvnw clean package -Pnative -Dquarkus.native.container-build=true -DskipTests
cd ..
cd event-statistics
./mvnw clean package -Pnative -Dquarkus.native.container-build=true -DskipTests
cd ..
Building native containers
Now that we have the native executables, we can build containers.
When you create projects, Quarkus generates two Dockerfiles:
-
Dockerfile.jvm- ADockerfilefor running the application in JVM mode -
Dockerfile.native- ADockerfilefor running the application in native mode
We are interested in this second file.
Open one of these Dockerfile.native files:
FROM registry.access.redhat.com/ubi9/ubi-minimal:9.6
WORKDIR /work/
RUN chown 1001 /work \
    && chmod "g+rwX" /work \
    && chown 1001:root /work
COPY --chown=1001:root --chmod=0755 target/*-runner /work/application

EXPOSE 8080
USER 1001

ENTRYPOINT ["./application", "-Dquarkus.http.host=0.0.0.0"]
It’s a pretty straightforward Dockerfile taking a minimal base image and copying the generated native executable.
It also exposes the port 8080.
Wait, our microservices are not configured to run on the port 8080.
We need to override this property as well as a few other such as the HTTP client endpoints, and database locations.
To build the containers, use the following scripts:
export ORG=xxxx
cd rest-heroes
docker build -f src/main/docker/Dockerfile.native -t $ORG/quarkus-workshop-hero .
cd ..
cd rest-villains
docker build -f src/main/docker/Dockerfile.native -t $ORG/quarkus-workshop-villain .
cd ..
cd rest-fights
docker build -f src/main/docker/Dockerfile.native -t $ORG/quarkus-workshop-fight .
cd ..
cd event-statistics
docker build -f src/main/docker/Dockerfile.native -t $ORG/quarkus-workshop-stats .
cd ..|
Replace |
Running Native Mode Containers Locally
Building a container running a native executable
We’ve just created a container that embeds the Java application and a JVM. But you can also build and use the native executable. To do this, runs the following command:
./mvnw clean package -Dquarkus.container-image.build=true -Pnative -Dquarkus.native.container-build=true-Dquarkus.native.container-build=true is indicating that we need a Linux 64bits executable.
This option is not required if you use Linux.
Deploying with Kubernetes
This chapter explores how you can deploy containerized Quarkus applications in Cloud platforms using Kubernetes. There are many different approaches to achieve these deployments. In this chapter, we are focusing on deploying our containers in Kubernetes.
Deploying on Kubernetes
This section is going to deploy our microservices on Kubernetes. It is required to have access to a Kubernetes or OpenShift cluster.
|
To deploy your microservices, push the built container images to an image registry accessible by your cluster, such as Quay.io or DockerHub. |
We recommend using a specific namespace to deploy your system.
In the following sections, we use the quarkus-workshop namespace.
Deploying the infrastructure
The first thing to deploy is the required infrastructure:
-
3 PostgreSQL instances
-
Kafka brokers (3 brokers with 3 Zookeeper to follow the recommended approach)
There are many ways to deploy this infrastructure. Here, we are going to use two operators:
-
PostgreSQL Operator by Dev4Ddevs.com
-
Strimzi Apache Kafka Operator by Red Hat
With these operators installed, you can create the required infrastructure with the following custom resource definition (CRD):
apiVersion: postgresql.dev4devs.com/v1alpha1
kind: Database
metadata:
    name: heroes-database
    namespace: quarkus-workshop
spec:
    databaseCpu: 30m
    databaseCpuLimit: 60m
    databaseMemoryLimit: 512Mi
    databaseMemoryRequest: 128Mi
    databaseName: heroes-database
    databaseNameKeyEnvVar: POSTGRESQL_DATABASE
    databasePassword: superman
    databasePasswordKeyEnvVar: POSTGRESQL_PASSWORD
    databaseStorageRequest: 1Gi
    databaseUser: superman
    databaseUserKeyEnvVar: POSTGRESQL_USER
    image: centos/postgresql-96-centos7
    size: 1
This CRD creates the database for the Hero microservice. Duplicate this CRD for the fight and villain databases.
For the Kafka broker, create the following CRD:
apiVersion: kafka.strimzi.io/v1beta1
kind: Kafka
metadata:
  name: my-kafka
  namespace: quarkus-workshop
spec:
  kafka:
    version: 2.3.0
    replicas: 3
    listeners:
      plain: {}
      tls: {}
    config:
      offsets.topic.replication.factor: 3
      transaction.state.log.replication.factor: 3
      transaction.state.log.min.isr: 2
      log.message.format.version: '2.3'
    storage:
      type: ephemeral
  zookeeper:
    replicas: 3
    storage:
      type: ephemeral
  entityOperator:
    topicOperator: {}
    userOperator: {}
This CRD creates the brokers and the Zookeeper instances.
It’s also recommended to create the topic.
For this, create the following CRD:
apiVersion: kafka.strimzi.io/v1beta1
kind: KafkaTopic
metadata:
  name: fights
  labels:
    strimzi.io/cluster: my-kafka
  namespace: quarkus-workshop
spec:
  partitions: 1
  replicas: 3
  config:
    retention.ms: 604800000
    segment.bytes: 1073741824
Once everything is created, you should have the following resources:
$ kubectl get database
NAME                AGE
fights-database     16h
heroes-database     16h
villains-database   16h

$ kubectl get kafka
NAME       DESIRED KAFKA REPLICAS   DESIRED ZK REPLICAS
my-kafka   3
Deploying the Hero & Villain microservices
Now that the infrastructure is in place, we can deploy our microservices. Let’s start with the hero and villain microservices.
For each, we need to override the port and data source URL.
Create a config map with the following content:
apiVersion: v1
data:
    port: "8080"
    database: "jdbc:postgresql://heroes-database:5432/heroes-database"
kind: ConfigMap
metadata:
    name: hero-config
Do the same for the villain microservice. Then, apply these resources:
$ kubectl apply -f config-hero.yaml
$ kubectl apply -f config-villain.yaml
Once the config maps are created, we can deploy the microservices.
Create a deployment-hero.yaml file with the following content:
apiVersion: "v1"
kind: "List"
items:
    - apiVersion: "v1"
      kind: "Service"
      metadata:
          labels:
              app: "quarkus-workshop-hero"
              version: "01"
              group: "$ORG"
          name: "quarkus-workshop-hero"
      spec:
          ports:
              - name: "http"
                port: 8080
                targetPort: 8080
          selector:
              app: "quarkus-workshop-hero"
              version: "01"
              group: "$ORG"
          type: "ClusterIP"
    - apiVersion: "apps/v1"
      kind: "Deployment"
      metadata:
          labels:
              app: "quarkus-workshop-hero"
              version: "01"
              group: "$ORG"
          name: "quarkus-workshop-hero"
      spec:
          replicas: 1
          selector:
              matchLabels:
                  app: "quarkus-workshop-hero"
                  version: "01"
                  group: "$ORG"
          template:
              metadata:
                  labels:
                      app: "quarkus-workshop-hero"
                      version: "01"
                      group: "$ORG"
              spec:
                  containers:
                      - image: "$ORG/quarkus-workshop-hero:latest"
                        imagePullPolicy: "IfNotPresent"
                        name: "quarkus-workshop-hero"
                        ports:
                            - containerPort: 8080
                              name: "http"
                              protocol: "TCP"
                        env:
                            - name: "KUBERNETES_NAMESPACE"
                              valueFrom:
                                  fieldRef:
                                      fieldPath: "metadata.namespace"

                            - name: QUARKUS_DATASOURCE_URL
                              valueFrom:
                                  configMapKeyRef:
                                      name: hero-config
                                      key: database

                            - name: QUARKUS_HTTP_PORT
                              valueFrom:
                                  configMapKeyRef:
                                      name: hero-config
                                      key: port
This descriptor declares:
-
A service to expose the HTTP endpoint
-
A deployment that instantiates the application
The deployment declares one container using the container image we built earlier. It also overrides the configuration for the HTTP port and database URL.
Don’t forget to create the equivalent files for the villain microservice.
Then, deploy the microservice with:
$ kubectl apply -f deployment-hero.yaml
$ kubectl apply -f deployment-villain.yaml
Deploying the Fight microservice
Follow the same approach for the fight microservice. Note that there are more properties to configure from the config map:
-
The location of the hero and villain microservice
-
The location of the Kafka broker
Once everything is configured and deployed, your system is now running on Kubernetes.
From Container to Kubernetes
|
This section is optional and demonstrates how to ask Quarkus to create a container and deploy it to Kubernetes.
You will need |
Prerequisites
-
Make sure that Docker Desktop (if installed) is turned off
-
Make sure Rancher Desktop is started. The container runtime must be dockerd (Preferences → Container Runtime → dockerd (moby)).
Deploying to Kubernetes
Quarkus can also run our application in Kubernetes and compute the Kubernetes descriptor. In addition to allow customizing any part of the descriptor, it is possible to configure config maps, secrets…
|
As mentioned above, we will use Rancher Desktop. Adapt the instructions for your Kubernetes:
|
Edit the src/main/resources/application.properties to add the following lines:
quarkus.kubernetes.namespace=default # Added
quarkus.kubernetes.image-pull-policy=IfNotPresent # Added

%prod.quarkus.http.port=8080 # Added
%prod.quarkus.datasource.username=superbad
%prod.quarkus.datasource.password=superbad
%prod.quarkus.datasource.jdbc.url=jdbc:postgresql://my-villains-db-postgresql:5432/villains_database # Updated
%prod.quarkus.hibernate-orm.sql-load-script=import.sql
Add the quarkus-kubernetes extension using the following command:
./mvnw quarkus:add-extension -Dextensions="kubernetes"| If you are behind a proxy, check the Quarkus Registry proxy documentation. |
Alternatively, you can add the following dependency to the pom.xml file directly:
<dependency>
  <groupId>io.quarkus</groupId>
  <artifactId>quarkus-kubernetes</artifactId>
</dependency>
Rancher Desktop authentication use elliptic algorithms not supported by default in Java. So, we also need to add the following dependency to the project:
<dependency>
  <groupId>org.bouncycastle</groupId>
  <artifactId>bcpkix-jdk18on</artifactId>
  <version>1.71</version>
</dependency>
Before deploying our application, we need to deploy the database. To achieve this, we are going to use helm (installed alongside Rancher Desktop) and the following postgresql package.
Run the following commands:
helm repo add bitnami https://charts.bitnami.com/bitnami
helm install my-villains-db \
    --set auth.postgresPassword=superbad \
    --set auth.username=superbad \
    --set auth.password=superbad \
    --set auth.database=villains_database bitnami/postgresql
Finally, deploy the application using:
./mvnw clean package -Dquarkus.kubernetes.deploy=true -DskipTestsCheck the pods with the following command:
kubectl get podsYou should see something like:
NAME                             READY   STATUS    RESTARTS   AGE
my-villains-db-postgresql-0      1/1     Running   0          28m
rest-villains-7c7479b959-7fn64   1/1     Running   0          12m
Make sure you wait for the rest-villains pod to be ready (1/1).
Enable port-forwarding to port 8080 either from the rancher desktop UI (Preferences → Port Forwarding → default / rest-villains / http), or using the following command line:
kubectl port-forward pods/rest-villains-7c7479b959-7fn64 8080:8080Now, you can access the application from your browser using: http://localhost:8080/api/villains
Conclusion
This is the end of the Super Hero workshop. We hope you liked it, learnt a few things, and more importantly, will be able to take this knowledge back to your projects.
This workshop started making sure your development environment was ready to develop the entire application. Then, there was some brief terminology to help you in understanding some concepts around Quarkus. If you find it was too short and need more details on Quarkus, Microservices, MicroProfile, Cloud Native, or GraalVM, check the Quarkus website for more references.[23]
Then, we focused on developing several isolated microservices. Some written in pure JAX-RS (such as the Villain) others with Reactive JAX-RS and Reactive Hibernate (such as the Hero). These microservices return data in JSON, validate data thanks to Bean Validation, store and retrieve data from a relational database with the help of JPA, Panache and JTA.
You then installed an already coded React application on another instance of Quarkus. At this stage, the React application couldn’t access the microservices because of CORS issues that we quickly fixed.
Then, we made the microservices communicate with each other in HTTP thanks to REST Client. But HTTP-related technologies usually use synchronous communication and therefore need to deal with invocation failure. With Fault Tolerance, it was just a matter of using a few annotations and we can get some fallback when the communication fails.
That’s also why we introduced Reactive Messaging with Kafka: so we don’t have a temporal coupling between the microservices.
We’ve also added some Artificial Intelligence. Thanks to Quarkus LangChain4j, with a few lines of code, we allowed our Narration microservice to narrate the fight between a Super Hero and a Super Villain.
Then, came production time. With Quarkus it’s very easy to build executable JARs. With a JVM installed you can execute these JARs which are optimal for production. And if you need to turn your microservice into an executable binary (thanks to GraalVM), that’s easy too. Quarkus supports GraalVM since the beginning and makes its integration smooth. Same if you want to package microservices into Docker containers. Quarkus supports Jib. So with a simple build command you can turn your microservice into a container.
Remember that you can find all the code for this fascicle at http://github.com/quarkusio/quarkus-workshops/tree/refs/heads/main/quarkus-workshop-super-heroes. If some parts were not clear enough, or if you found something missing, a bug, or you just want to leave a note or suggestion, please use the GitHub issue tracker at http://quarkus.io/.
References
Appendix: Installing extra software
Apache Maven 3.9.x
All the examples of this workshop are built and tested using Maven.[24] Maven offers a building solution, shared libraries, and a plugin platform for your projects, allowing you to do quality control, documentation, teamwork, and so forth. Based on the "convention over configuration" principle, Maven brings a standard project description and a number of conventions such as a standard directory structure. With an extensible architecture based on plugins, Maven can offer many different services.
Installing Maven
The examples of this workshop have been developed with Apache Maven 3.9.x.
For this workshop, it is not necessary to install Maven.
You can just use the Maven wrapper in your working directory, ./mvnw.
The wrapper is always at a suitable Maven version.
However, if you’d prefer to have a global installation of Maven (mvn), here’s how.
Once you have installed JDK 17, make sure the JAVA_HOME environment variable is set.
Then, download Maven from http://maven.apache.org/, unzip the file on your hard drive and add the apache-maven/bin directory to your PATH variable.
More details about the installation process are available on https://maven.apache.org/install.html.
If you are on Mac OS X and use Homebrew, install Maven with the following command:
brew install mavenChecking for Maven Installation
Once you’ve got Maven installed, open a command line and enter mvn -version to validate your installation.
Maven should print its version and the JDK version it uses (which is handy as you might have different JDK versions installed on the same machine).
$ mvn -version
Apache Maven 3.8.4 (ea98e05a04480131370aa0c110b8c54cf726c06f)
Maven home: /usr/local/Cellar/maven/3.8.4/libexec
Java version: 11.0.15, vendor: AdoptOpenJDK, runtime: /Users/clement/.sdkman/candidates/java/11.0.15.hs-adpt
Default locale: en_FR, platform encoding: UTF-8
OS name: "mac os x", version: "11.5", arch: "x86_64", family: "mac"
Be aware that Maven needs Internet access to download plugins and project dependencies from the Maven Central and other remote repositories.[25]
Some Maven Commands
Maven is a command-line utility where you can use several parameters and options to build, test, or package your code. To get some help on the commands, you can type, use the following command:
$ mvn --help

usage: mvn [options] [<goal(s)>] [<phase(s)>]
Here are some commands that you will be using to run the examples in the workshop.
Each invokes a different phase of the project life cycle (clean, compile, install, etc.) and use the pom.xml to download libraries, customize the compilation, or extend some behaviors with plugins:
-
mvn clean: Deletes all generated files (compiled classes, generated code, artifacts etc.). -
mvn compile: Compiles the main Java classes. -
mvn test-compile: Compiles the test classes. -
mvn test: Compiles the main Java classes as well as the test classes and executes the tests. -
mvn package: Compiles, executes the tests, and packages the code into an archive. -
mvn install: Builds and installs the artifacts in your local repository. -
mvn clean install: Cleans and installs (note that you can add several commands separated by a space, likemvn clean compile test).
cURL
To invoke the REST Web Services described in this workshop, we often use cURL.[26] cURL is a command-line tool and library to do reliable data transfers with various protocols, including HTTP. It is free, open-source (available under the MIT Licence), and has been ported to several operating systems. If your operating system does not already include cURL (most do), here is how to install it.
Installing cURL
If you are on Mac OS X and have installed Homebrew, then installing cURL is just a matter of a single command.[27] Open your terminal and install cURL with the following command:
brew install curlFor Windows, download and install curl from https://curl.se/download.html.
Checking for cURL Installation
Once installed, check for cURL by running curl --version in the terminal.
It should display cURL version:
$ curl --version
curl 7.64.1 (x86_64-apple-darwin20.0) libcurl/7.64.1 (SecureTransport) LibreSSL/2.8.3 zlib/1.2.11 nghttp2/1.41.0
Release-Date: 2019-03-27
Protocols: dict file ftp ftps gopher http https imap imaps ldap ldaps pop3 pop3s rtsp smb smbs smtp smtps telnet tftp
Features: AsynchDNS GSS-API HTTP2 HTTPS-proxy IPv6 Kerberos Largefile libz MultiSSL NTLM NTLM_WB SPNEGO SSL UnixSockets
Some cURL Commands
cURL is a command-line utility where you can use several parameters and options to invoke URLs.
You invoke curl with zero, one, or several command-line options to accompany the URL (or set of URLs) you want the transfer to be about.
cURL supports over two hundred different options, and I would recommend reading the documentation for more help.[28]
To get some help on the commands and options, you can type, use the following command:
$ curl --help

Usage: curl [options...] <url>
You can also opt to use curl --manual, which will output the entire man page for cURL plus an appended tutorial for the most common use cases.
Here are some commands you will use to invoke the RESTful web service examples in this workshop.
-
curl http://localhost:8083/api/heroes/hello: HTTP GET on a given URL. -
curl -X GET http://localhost:8083/api/heroes/hello: Same effect as the previous command, an HTTP GET on a given URL. -
curl -v http://localhost:8083/api/heroes/hello: HTTP GET on a given URL with verbose mode on. -
curl -H 'Content-Type: application/json' http://localhost:8083/api/heroes/hello: HTTP GET on a given URL passing the JSON Content Type in the HTTP Header. -
curl -X DELETE http://localhost:8083/api/heroes/1: HTTP DELETE on a given URL.
Warming the caches
This workshop needs internet access to download all sorts of Maven artifacts, Docker images, and even pictures. Some of these artifacts are large, and because we have to share internet connexions at the workshop, it is better to download them before the workshop.
If you’re getting ready for a workshop, you might find it helpful to pre-download some Docker images. This can save strain on shared bandwidth. If, however, you’re already attending a workshop, don’t worry about warming anything up.
Warming up Maven
Download the workshop scaffolding
First, download the zip file https://raw.githubusercontent.com/quarkusio/quarkus-workshops/main/quarkus-workshop-super-heroes/dist/quarkus-super-heroes-workshop.zip, and unzip it wherever you want. This zip file contains some of the code of the workshop, and you will need to complete it.
Download the Maven dependencies
Now that you have the initial structure in place, navigate to the root directory and run:
./mvnw clean installBy running this command, it downloads all the required dependencies.
Warming up Docker images
To warm up your Docker image repository, navigate to the quarkus-workshop-super-heroes/super-heroes/infrastructure directory.
Here, you will find a docker-compose.yaml file which defines all the needed Docker images.
Here, you will find a docker-compose-linux.yaml file which defines all the needed Docker images.
Notice that there is a db-init directory with an initialize-databases.sql script which sets up our databases, and a monitoring directory (all that will be explained later).
Then execute the following command which will download all the Docker images and start the containers:
docker compose -f docker-compose.yaml up -dIf you are doing the optional messaging section, also start the Kafka infrastructure:
docker compose -f docker-compose-kafka.yaml up -d|
Linux Users beware
If you are on Linux, use |
|
If you have an issue creating the roles for the database with the |
After this, verify the containers are running using the following command:
docker compose -f docker-compose.yaml psThe output should resemble something like this:
     Name                   Command               State           Ports
--------------------------------------------------------------------------------
super-database   docker-entrypoint.sh postgres    Up      0.0.0.0:5432->5432/tcp
super-visor      /bin/prometheus --config.f ...   Up      0.0.0.0:9090->9090/tcp
Once all the containers are up and running, you can shut them down and remove their volumes with the commands:
docker compose -f docker-compose.yaml down
docker compose -f docker-compose.yaml rm
If you started the Kafka infrastructure, also shut it down:
docker compose -f docker-compose-kafka.yaml down
docker compose -f docker-compose-kafka.yaml rm|
What’s this infra?
Any microservice system is going to rely on a set of technical services. In our context, we are going to use PostgreSQL as the database, Prometheus as the monitoring tool, and Kafka as the event/message bus. This infrastructure starts all these services, so you don’t have to worry about them. This infra will only be used when we run our services in prod mode. In dev mode, Quarkus will start everything for us. |